I love Ubuntu, especially when I wanted to work with python programming, But I also love windows 10 because of its GUI and the vast variety of software support.
In the last blog, I covered how you can install windows 10 on Centos/Redhat KVM. But in this tutorial I going to cover the Debian derivative Ubuntu.
And the steps mentioned here are exactly the same for the other Debian derivative Linux mint.
Since I get a lot of questions with regards to Ubuntu specifically I decided to write separate blogs for Ubuntu and Redhat, so if you are using Centos/Redhat/Fedora you may click here.
Prerequisite.
Ubuntu machine with good configuration.
Download the Windows ISO image by following the guide here.
Windows virtio drivers iso download latest.
Download Spice guest tools.
Steps to install windows 10 in Ubuntu KVM.
1. How to install KVM on Ubuntu?
The first step is to prepare the environment by installing the KVM utilities on the Ubuntu host.
On my PC I am using Ubuntu version 20.04 so enter the below commands to install KVM on an ubuntu machine. The Same command can be used with as well.
sudo apt update
sudo apt install qemu-kvm bridge-utils virt-manager libosinfo-bin -y
You may now go ahead and reboot the host, if you dont reboot the machine then you will end getting a below error.
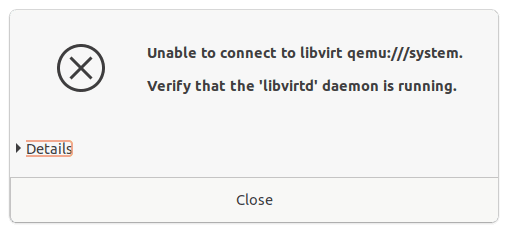
2. Open the virtualization manager and create the VM.
Open terminal and type virt-manager
In the virtual machine manager window click on create a new virtual machine.
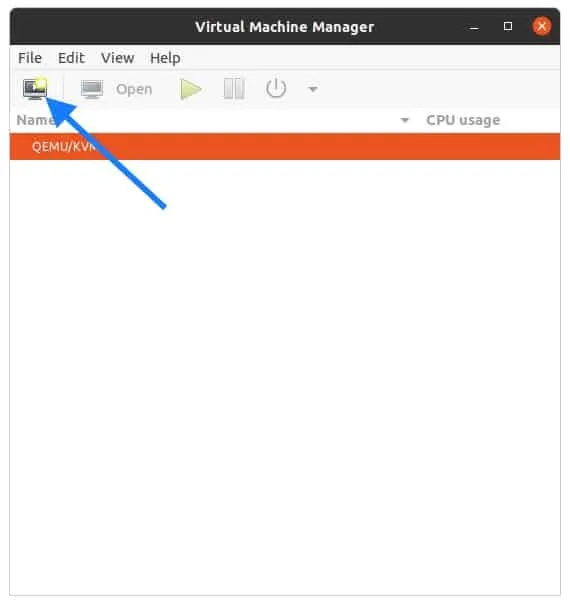
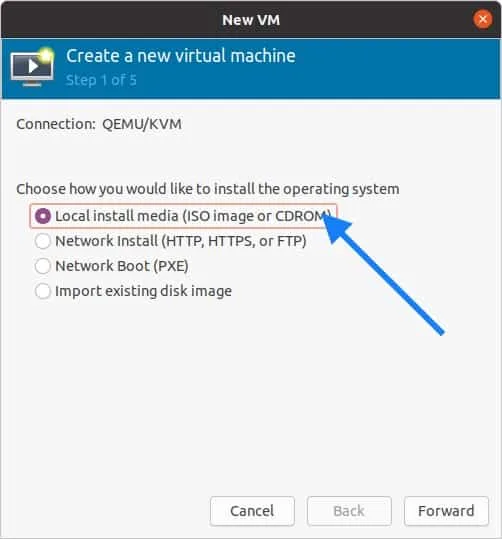
A new window now will pop up. In the New VM wizard select Local install media and click on forward.
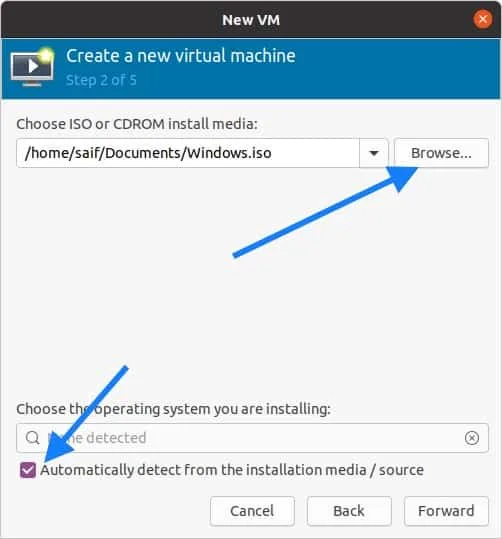
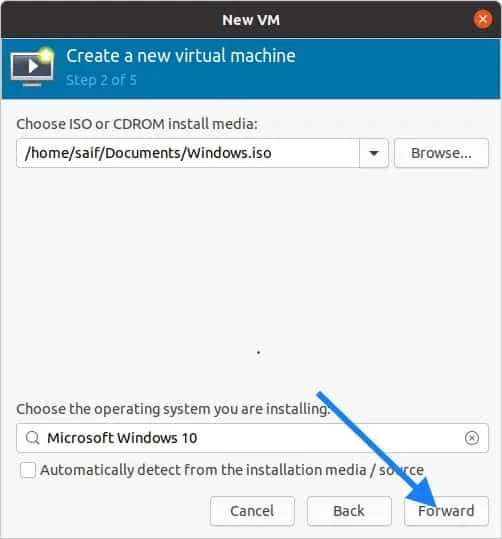
You will now have to browse for the windows 10 iso that you have downloaded and Uncheck the option which says automatically detect from the installation media.
Start searching for the window10 under choose operating system, and check the box which says include end of life operating system. Once you check the box you will be able to see the Microsoft Windows 10 operating system in the list.
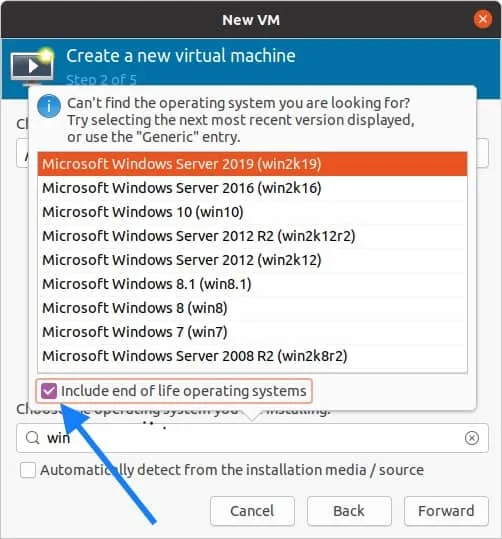
Once you select the Microsoft Windows 10 click on forward.
3. Configure the virtual machine resources.
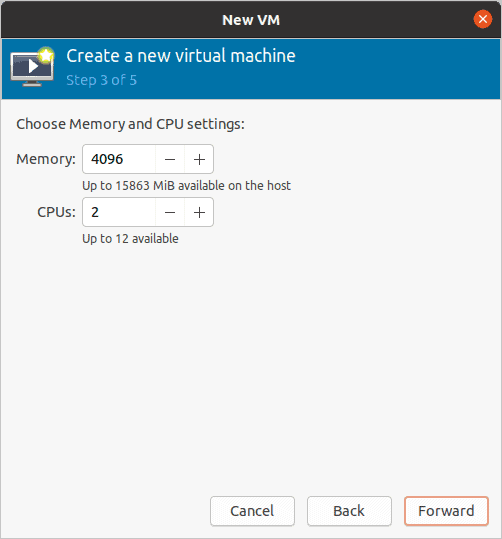
Next, you will be asked to define the memory and the CPU, I am giving 4GB of memory and 2 CPU’s and click on forward.
Depends on your configuration you may choose yours.
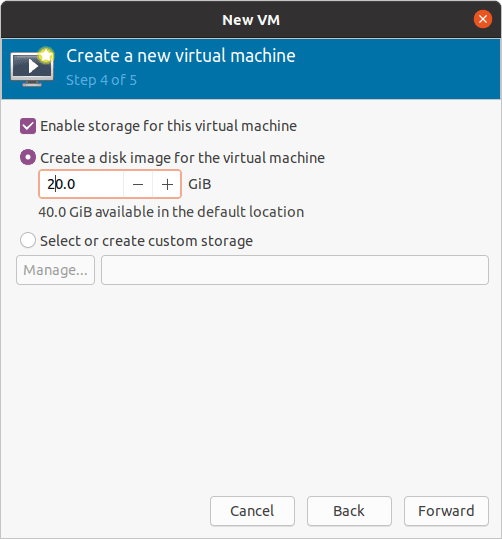
When you configure the virtual hard disk, by default Ubuntu KVM would pick up 40GB, since I don’t require that much space I just added only 20GB and clicked forward.
You may choose 40GB or more.
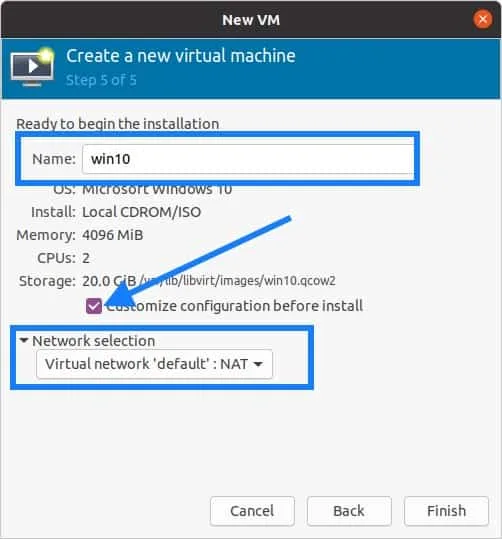
Finally, you will have to Name the windows KVM VM and check the option Customize configuration before install.
I also selected the network as Virtual network ‘default’ NAT. By selecting this network you guest VM will start using the Ubuntu host internet connection.
Click on Finish at this moment now.
4. Configure the virtual Hardware’s.
Since you selected customize option you will now be presented with the KVM customization screen.
Do not click on Begin installation yet, before that we have to modify some hardware changes.
Click on the SATA Disk1 , and on the right side expand the advanced options and click on the Disk bus drop-down list.
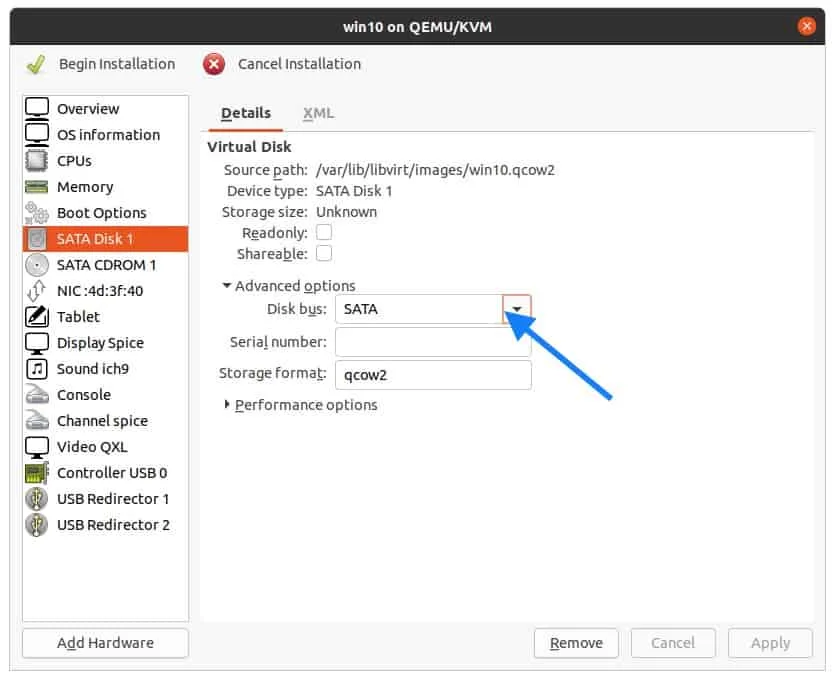
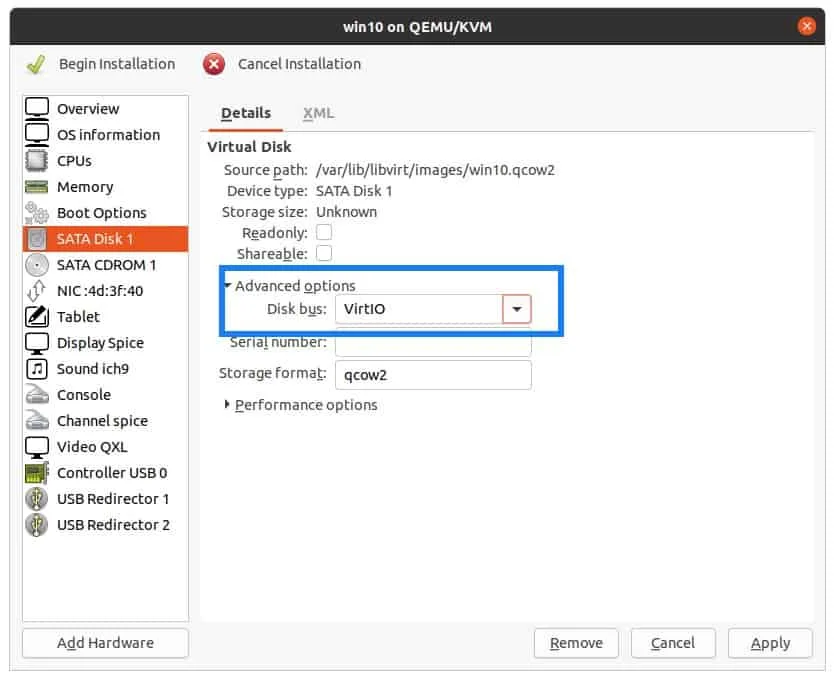
Select VirtIO as the disk bus, and then click on Apply.
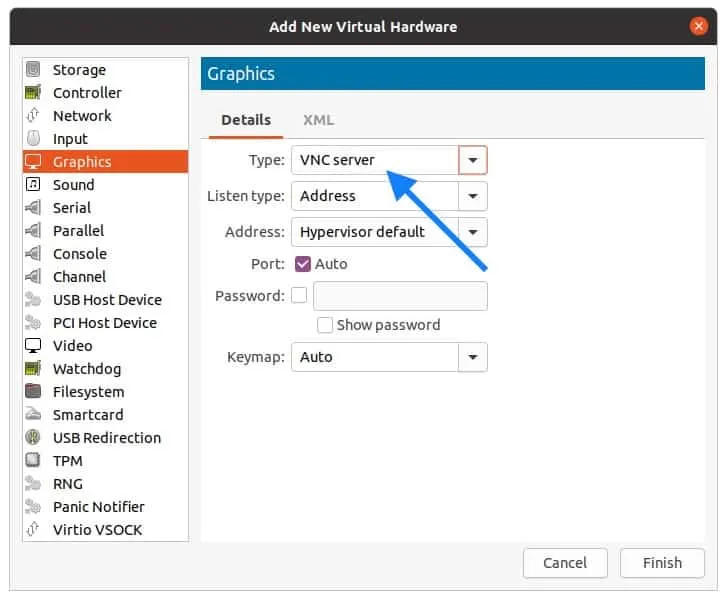
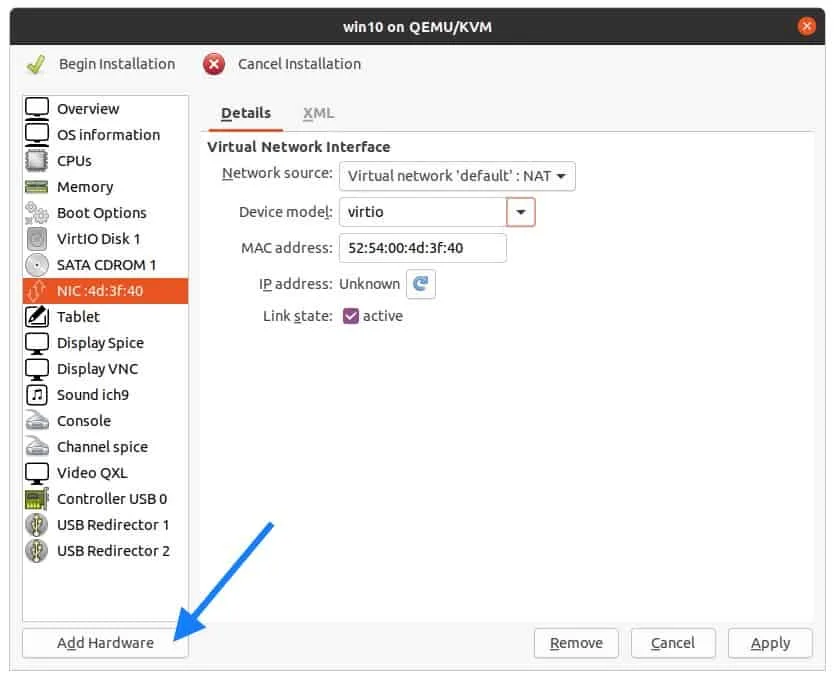
You now have to add VNC Viewer as the graphics, so click on Add hardware from the bottom left.
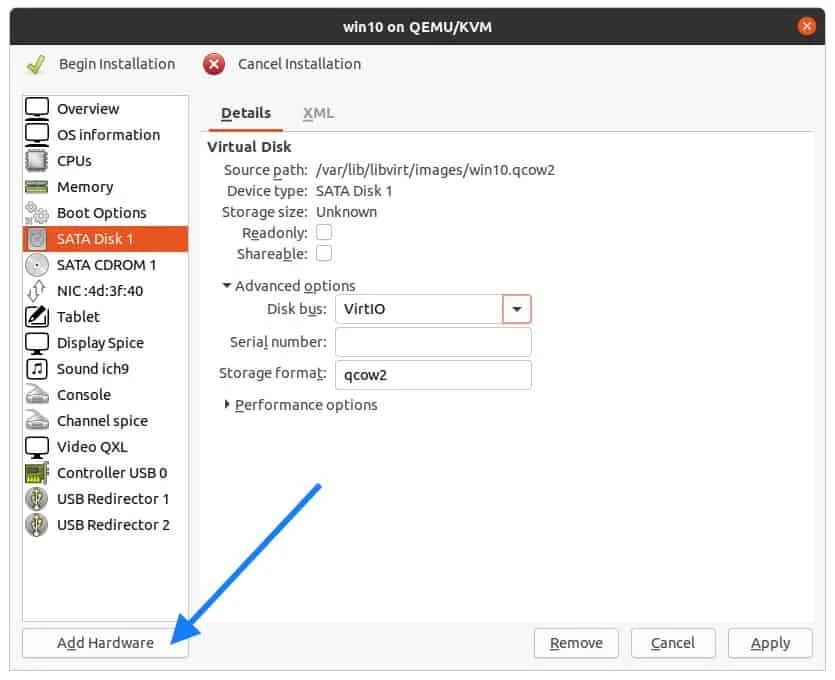
In the add New virtual hardware windows, select Graphics and in the Type select VNC Server and click on Finish.
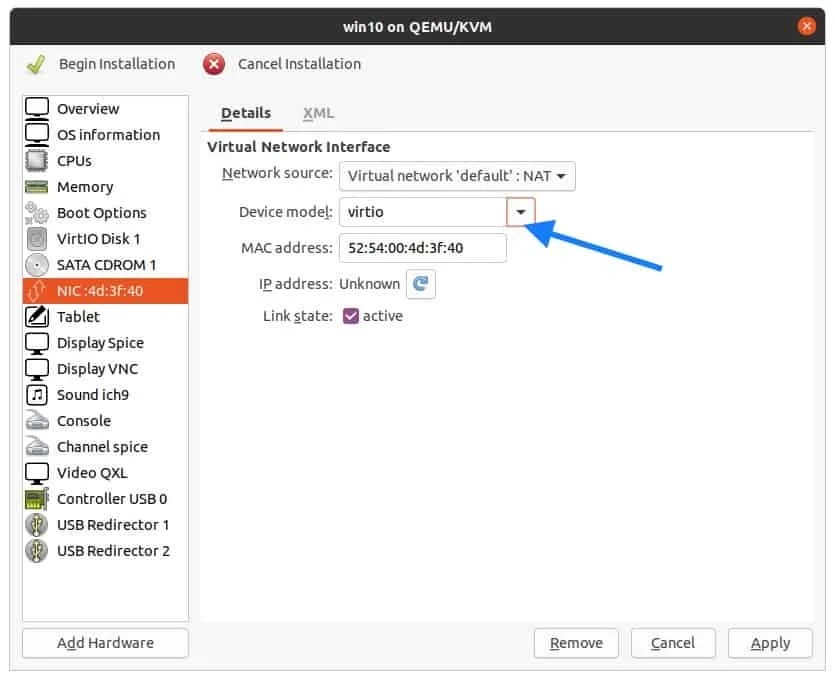
Click on Network interface card (NIC), change the device model to VirtIO, and click on Apply.
5. Add the Windows 10 virt drivers and configure the boot loader.
Remember that we have downloaded VirtIO Windows drivers for Ubuntu KVM, let’s attach that now. So click on Add hardware.
Select the storage and click on manage and attach the VirtIO iso file that we have downloaded, and also change the Disk type to CDROM device and click on Finish.
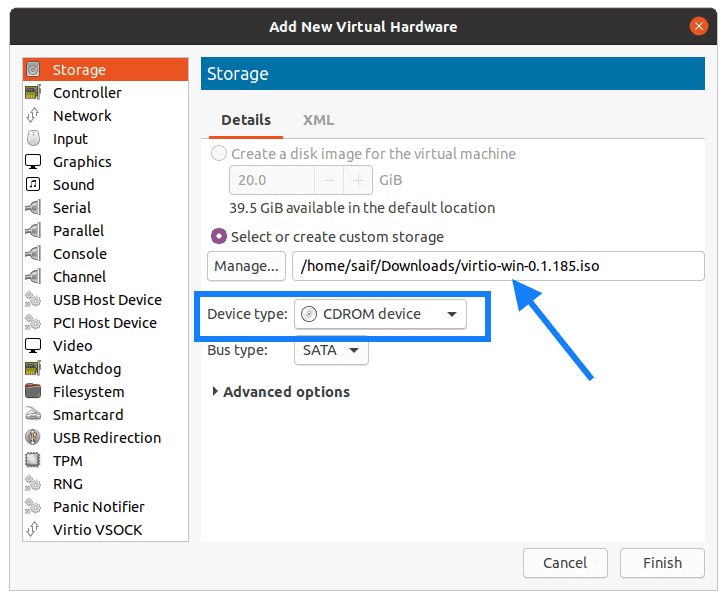
The second CDROM now has VirtIO drivers and the first one has the windows 10 ISO image.
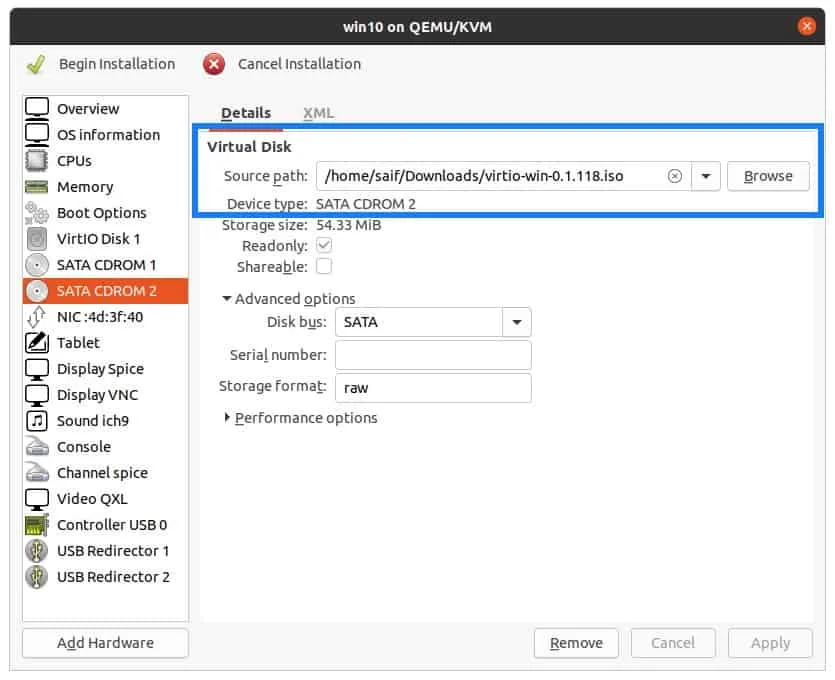
Change the boot order for windows
Let’s go ahead and change the Boot order of the device, first being the CDROM1 and the VirtIO disk and the CDROM2.
Note : The important part is for the KVM to load the windows 10 image from the list.
Check the option Enable boot menu.
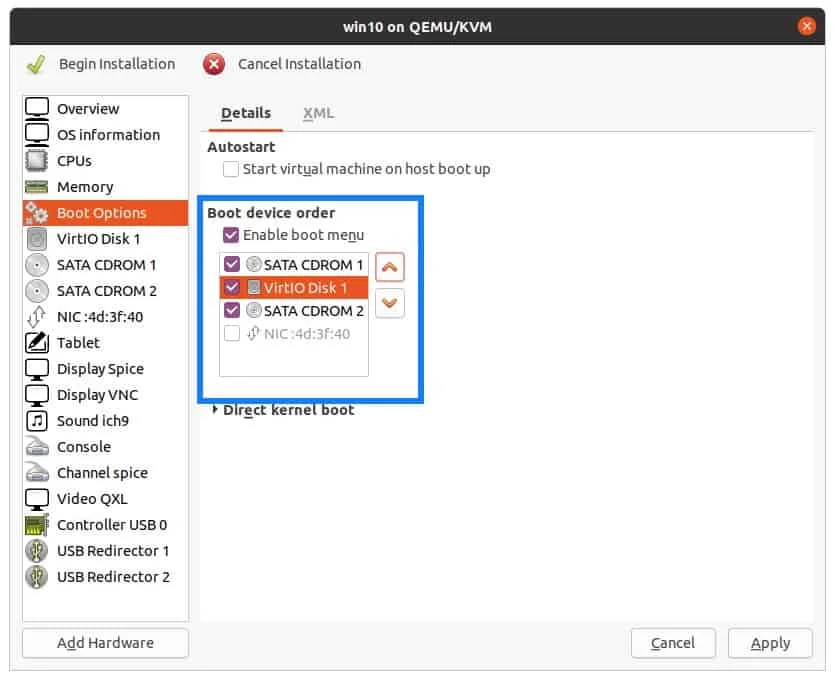
Once you rearranged the boot loader click on Apply.
6. Configure the qemu CPU the right way.
Click on CPU and change the current allocations to 4
Check the options which say manually set CPU topology.
In the topology assign 1 socket, 2cores and 2threads.
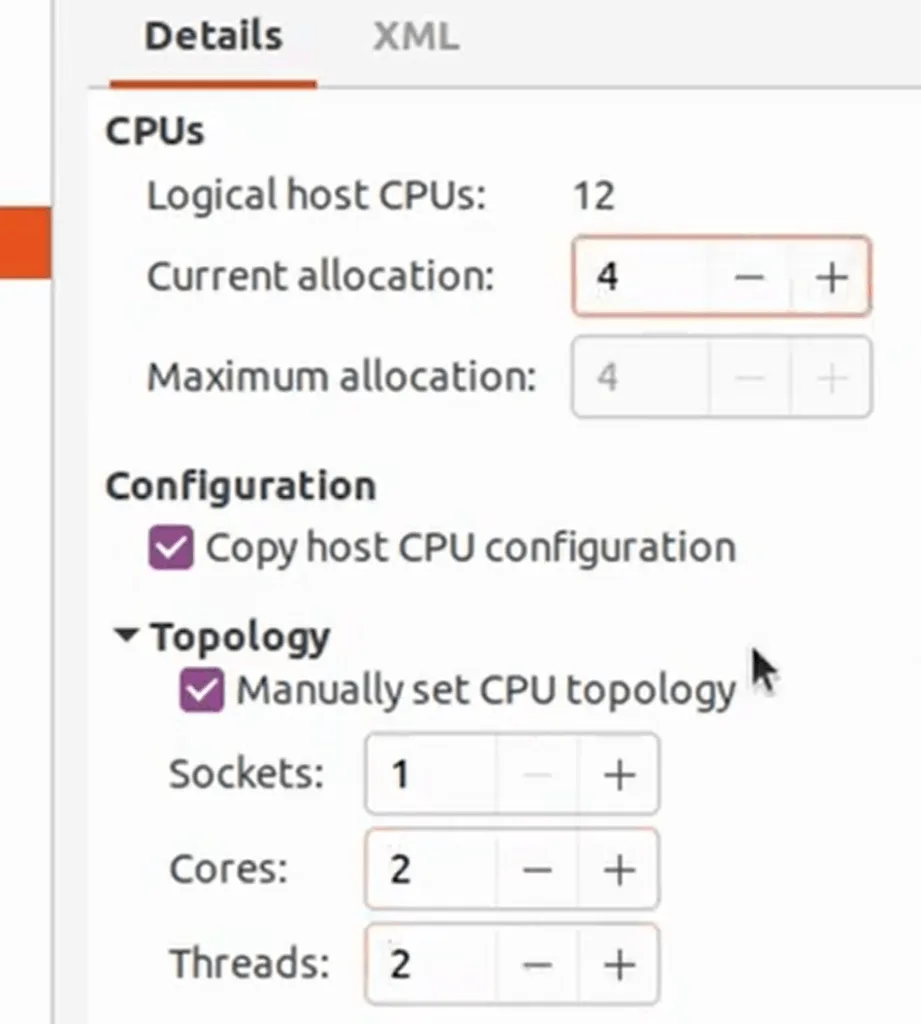
7. Begin the windows 10 VM installation.
We just finished adding the required virtual hardware, you may now click on Begin installation.
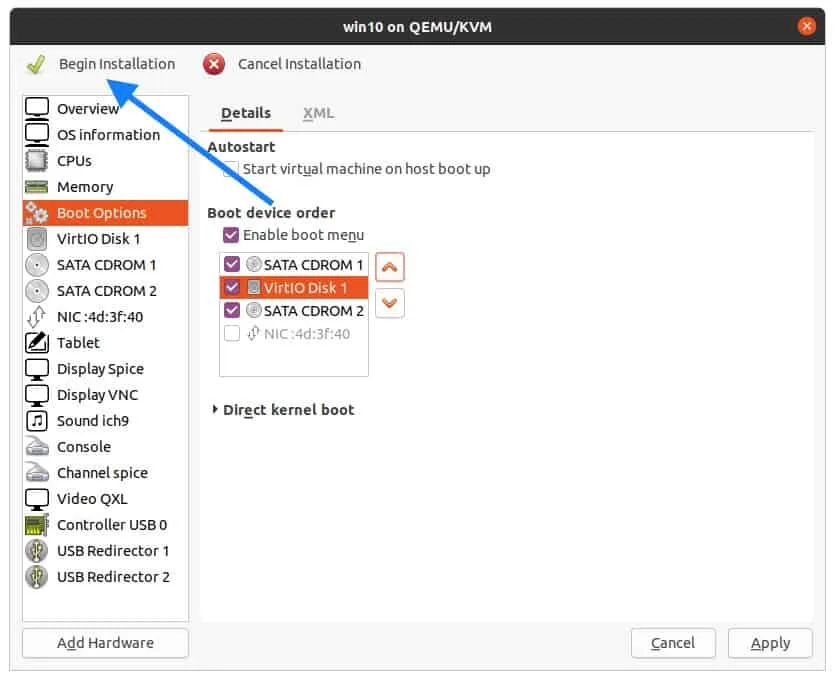
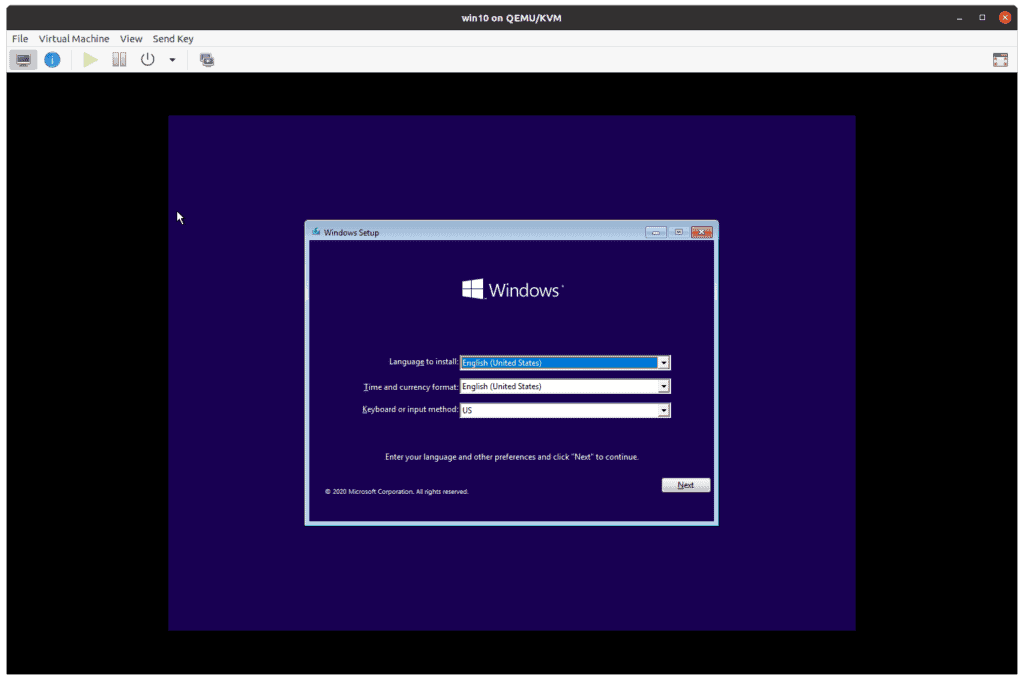
If everything went well, you should be able to see the windows logo, and after few seconds Windows prompt where you have to choose the language and the time and date and the keyboard click on Next.
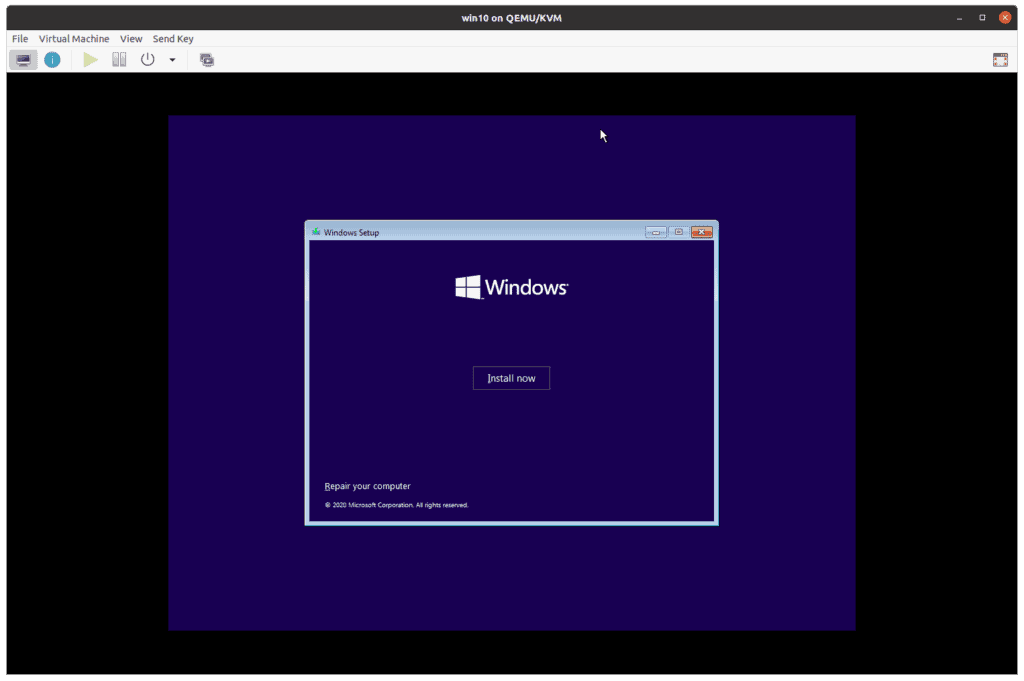
You will have to click on install now on the next prompt.
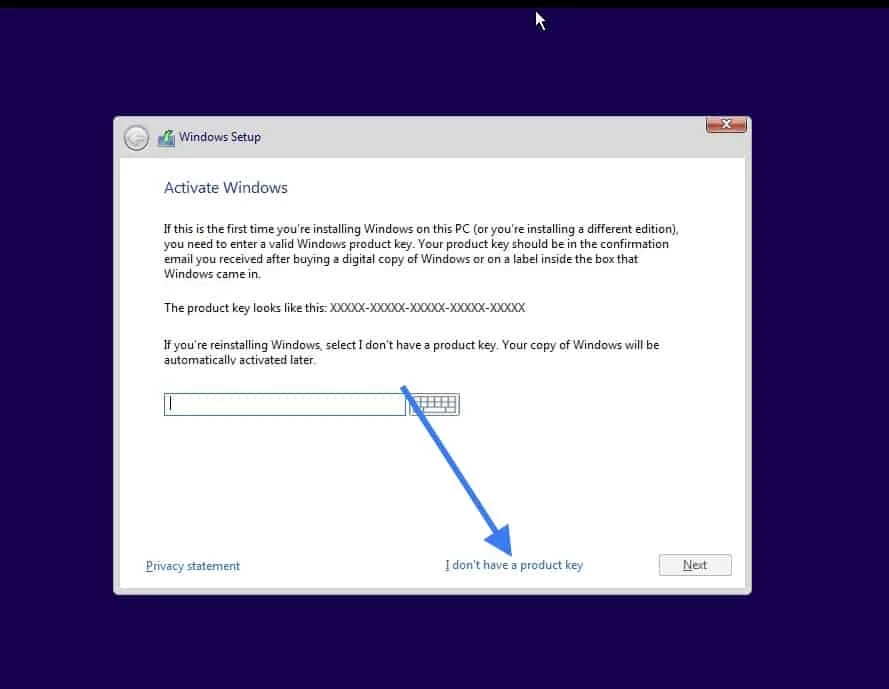
If you have the product license key, you may enter it now. Else click on I don’t have a product key, I choose the same as I didn’t have the product key during the installation.
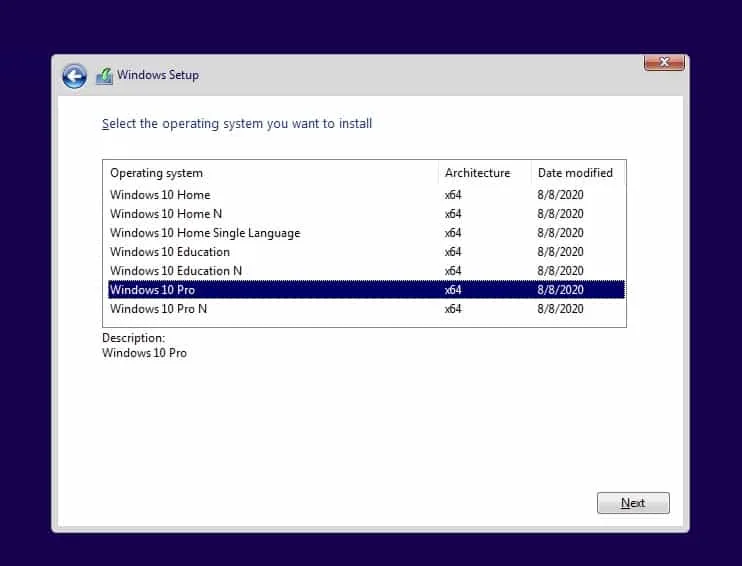
Select the version that you would like to install, I am choosing the version Windows 10 Pro.
Accept the license agreement and click on Next.
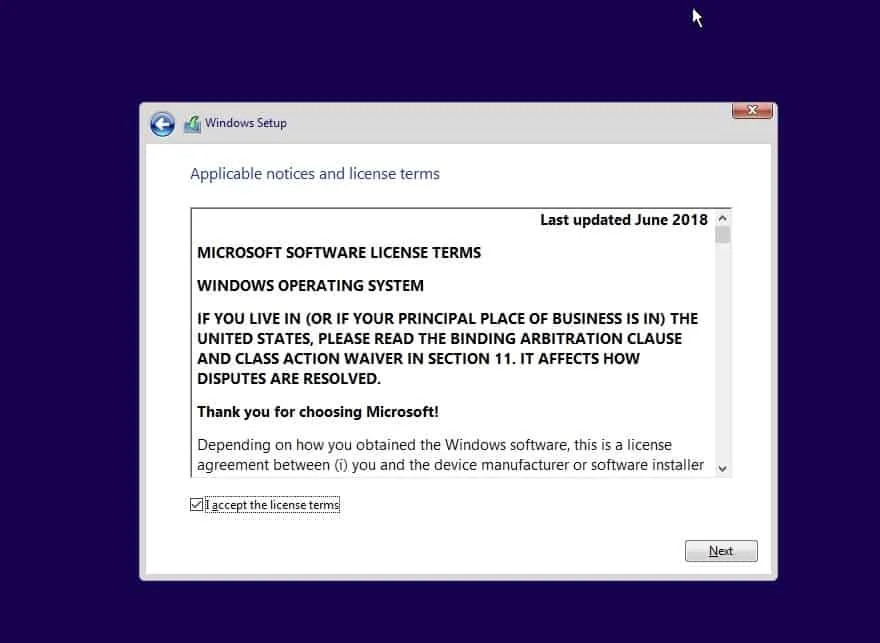
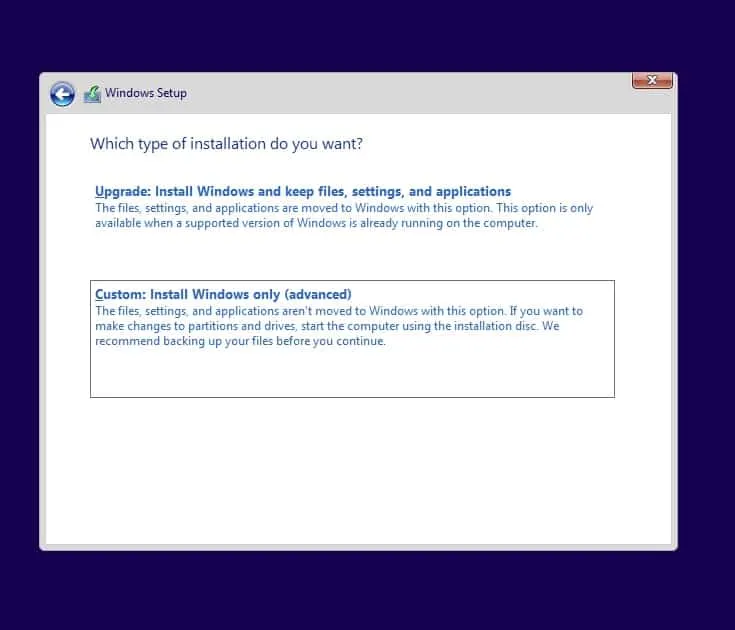
You now have two options to install the windows, Either upgrade or Custom, Choose custom here.
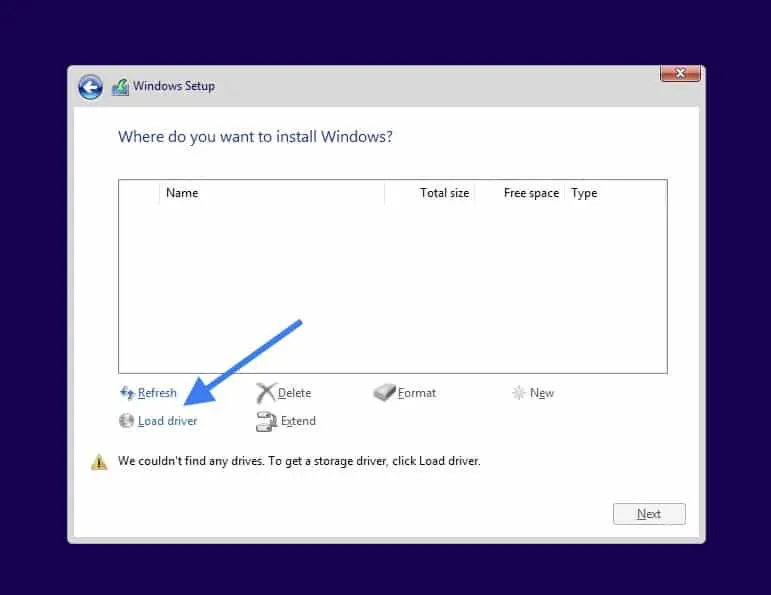
8. Install the Redhat SCSI controller driver.
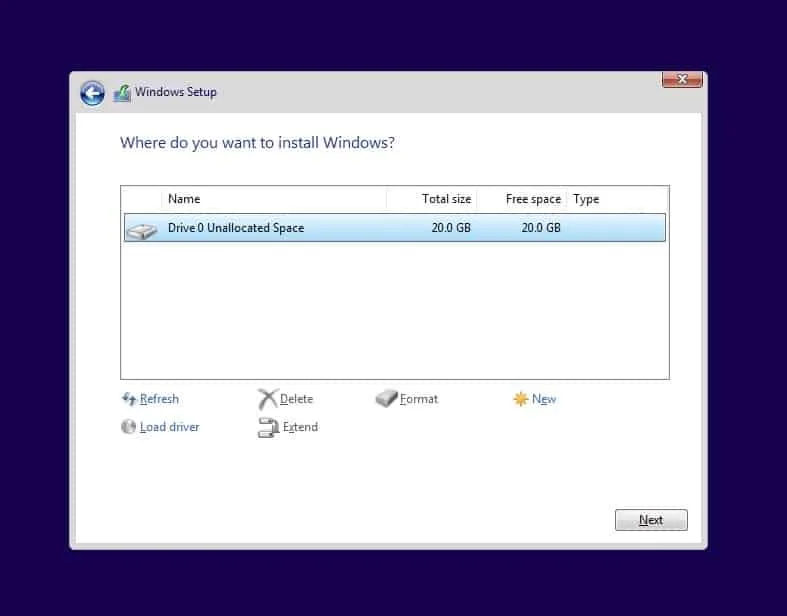
Remember we have added the storage of 20GB in the beginning, but we are not able to see them so click on Load driver here.
You will get a load driver prompt click on OK.
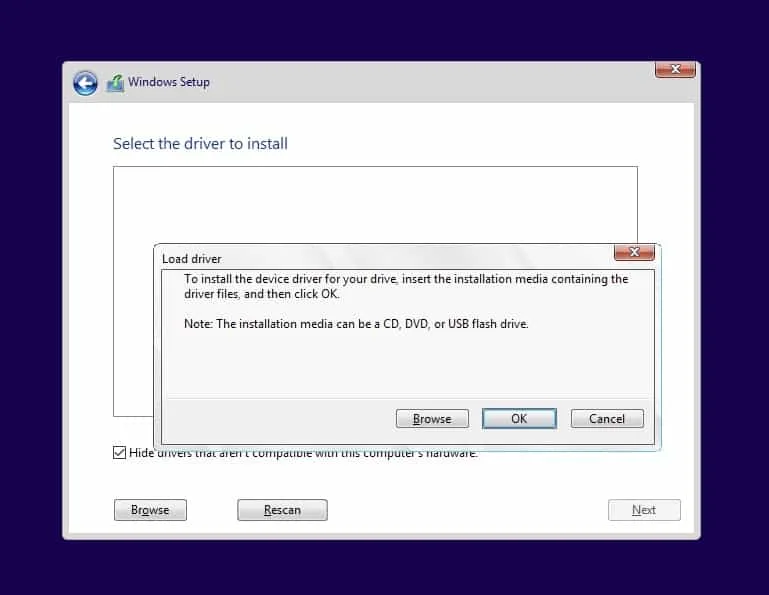
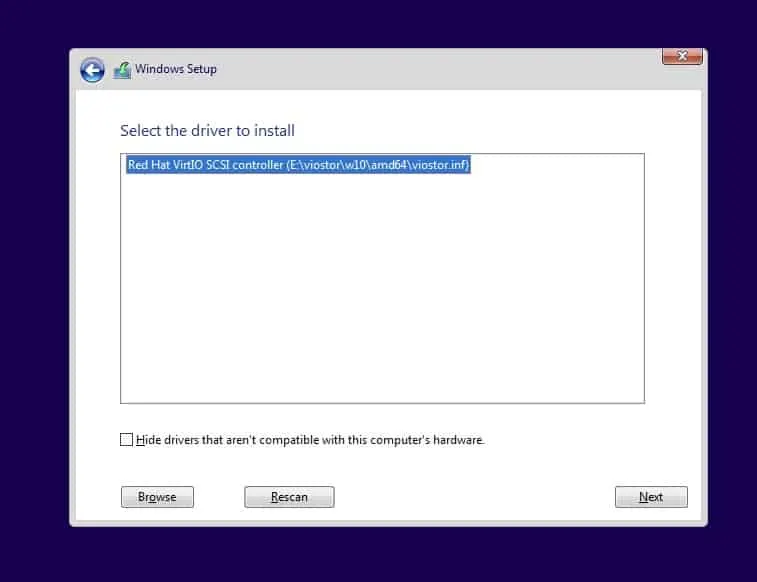
Once you click on OK you will be able to see all the drivers like below.
Select the windows 10 SCSI driver and click on Next.
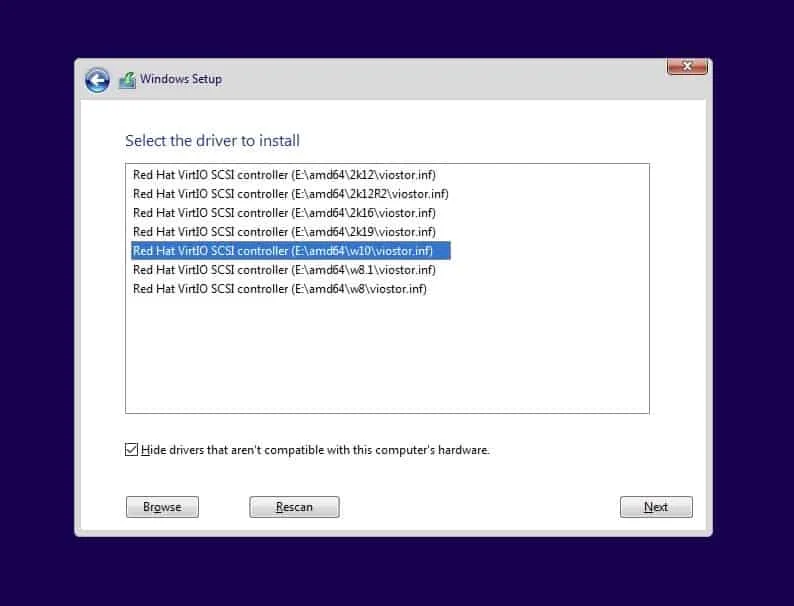
Note: If the driver doesn’t show up then you may follow the below steps.
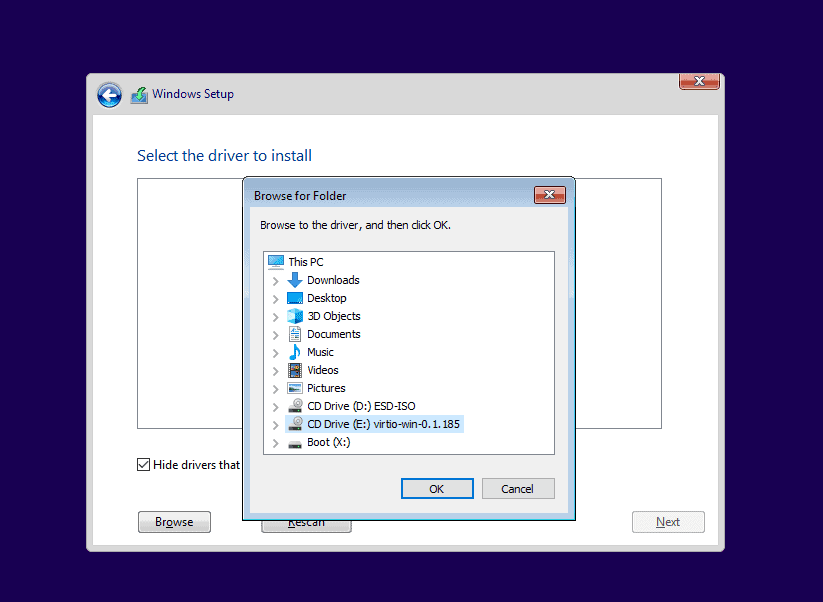
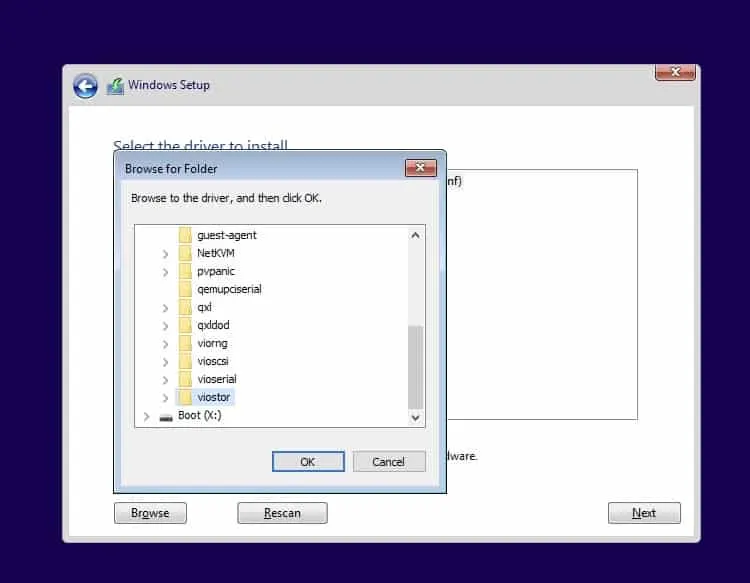
- Click on Browse and expand the VirtIO driver iso file CDROM.
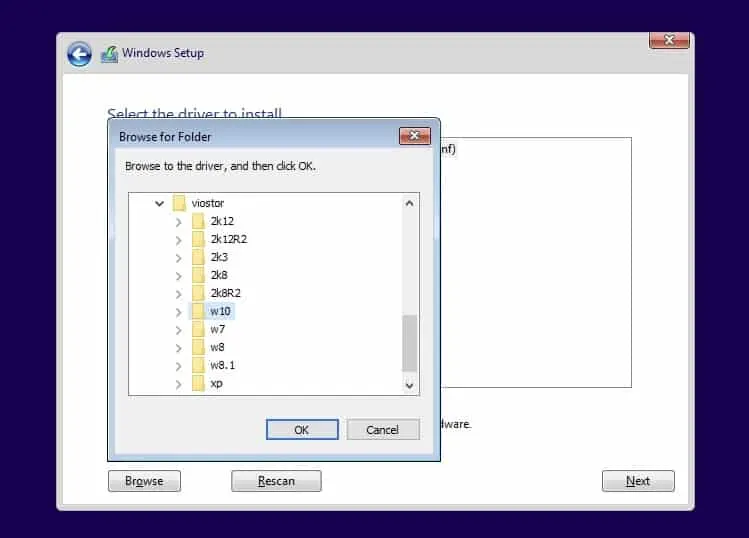
- Go down and expand the folder viostor.
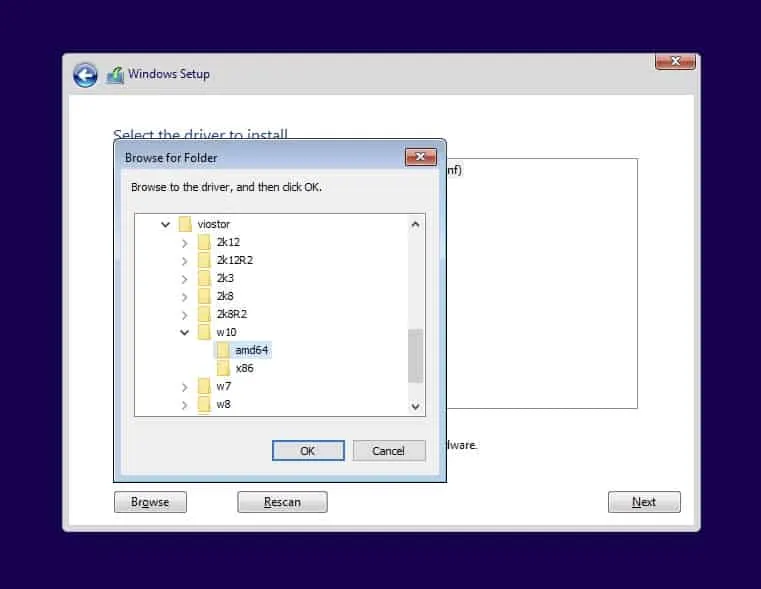
- Expand Win10
- And select amd64 and click on OK.
- You should now be able to see the drive listed now.
After you selected the drive and once you click on Next after a few seconds you should be able to see the virtual hard disk that you have attached earlier, select that and click on Next.
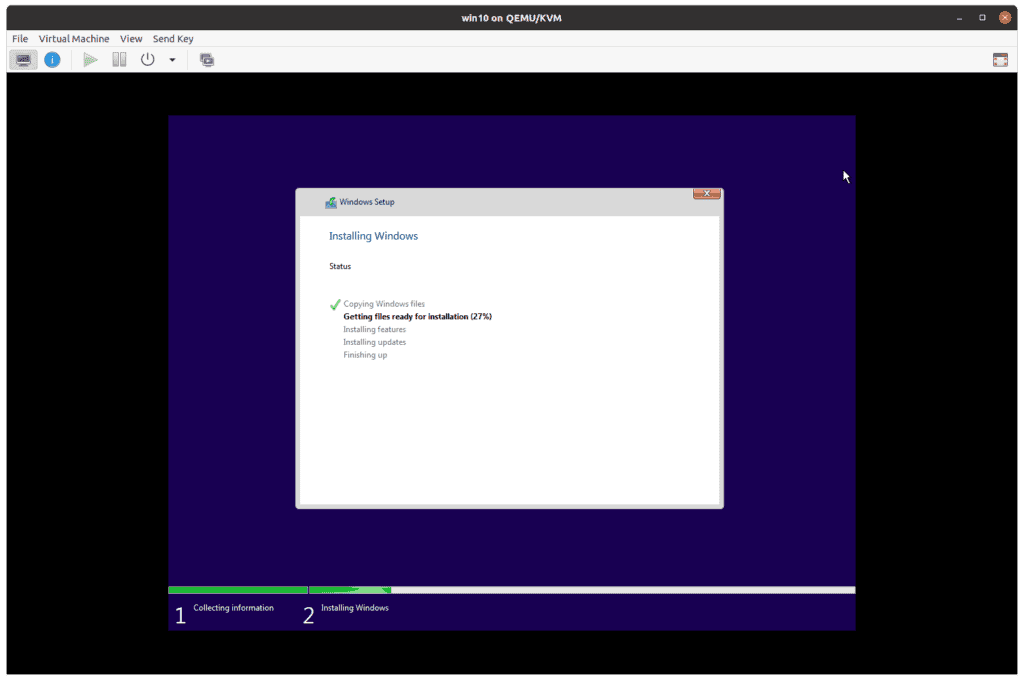
The windows installation now begins and starts to copy the files now.
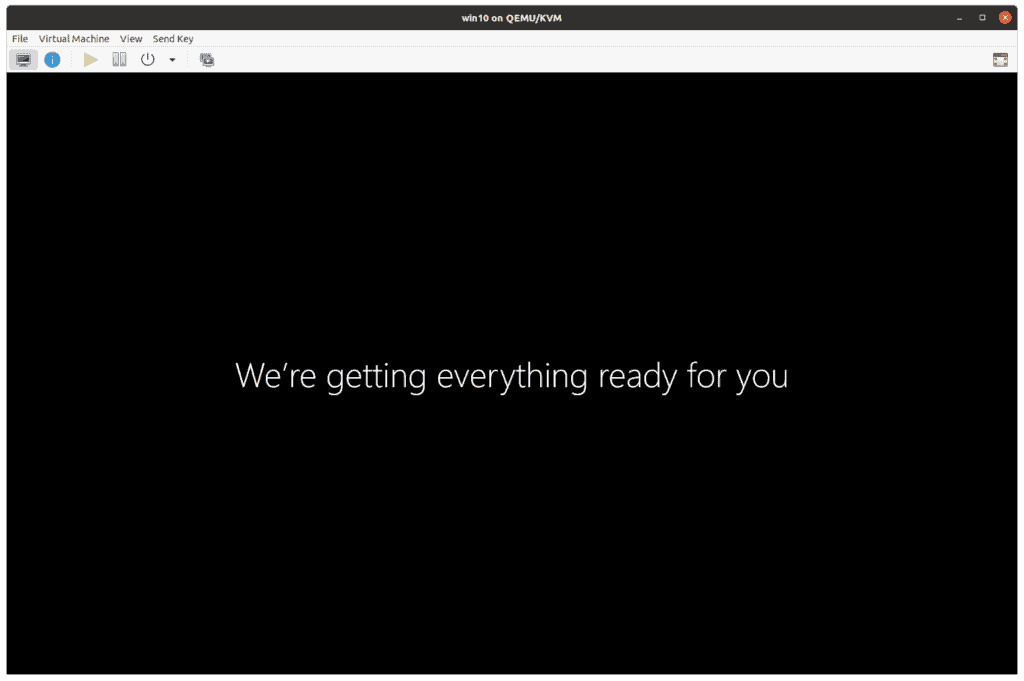
After a couple of restarts, you should get the windows setup screen where you need to have the basic configuration to be done.
During the process, you could either connect the Microsoft account or create a local account.
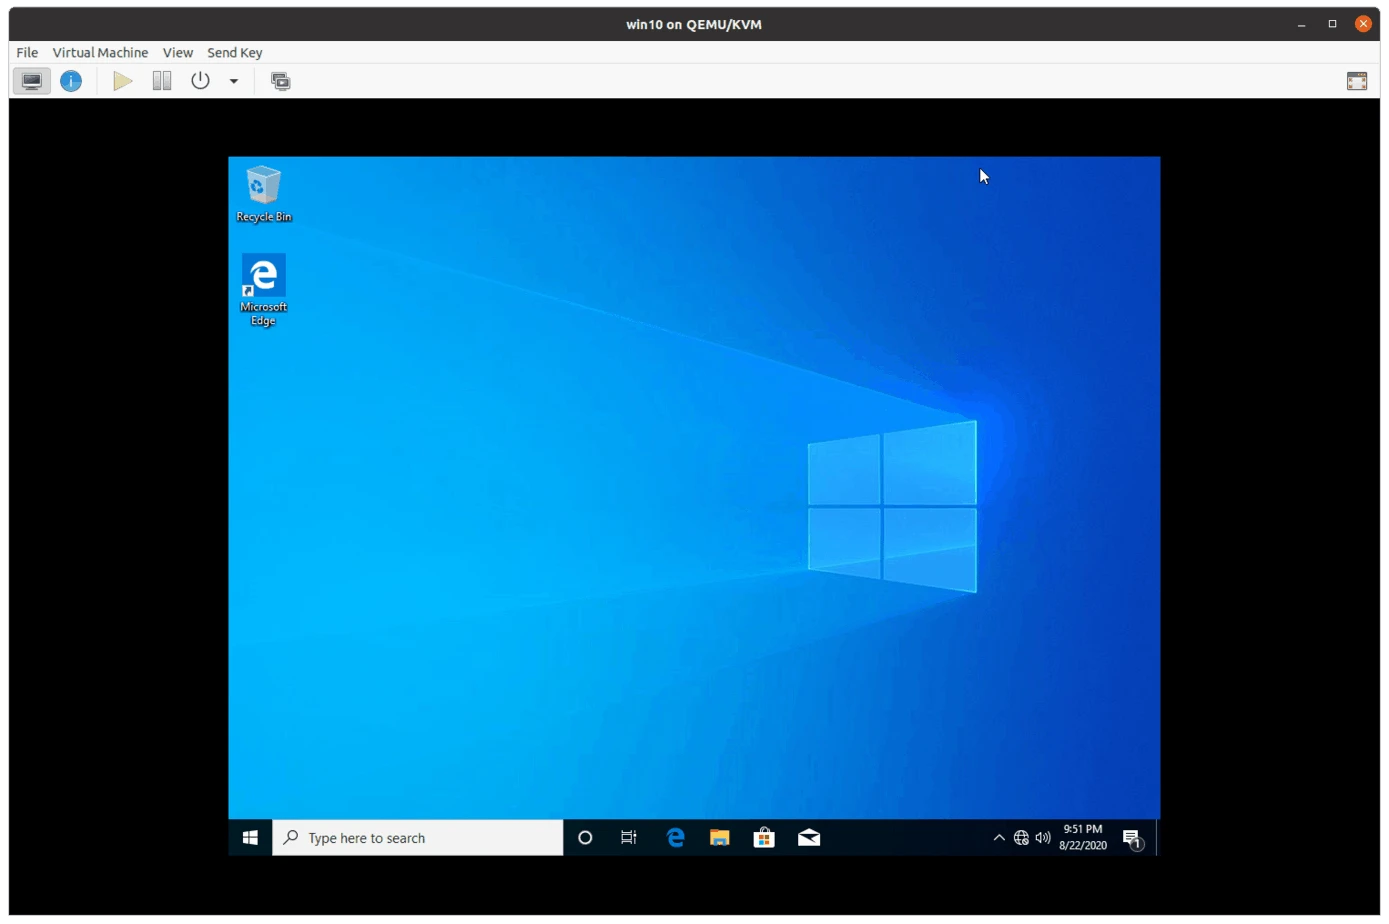
And you should be presented with the windows home screen like below.
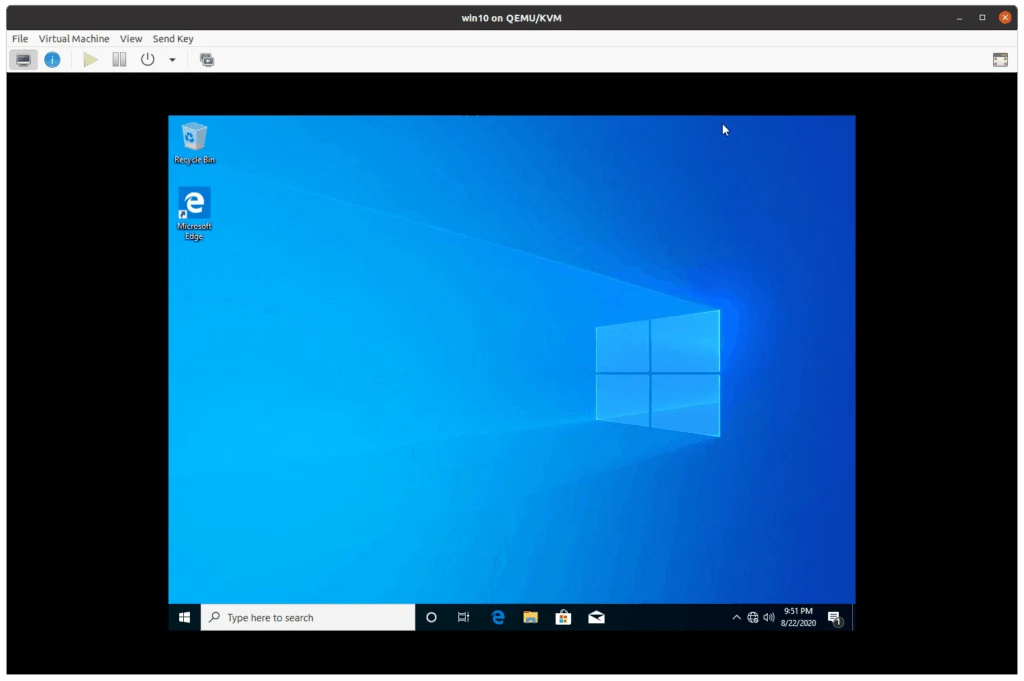
9. How to install virtio drivers windows 10.
After the windows 10 installation is completed, you now have to install the VirtIO drivers to windows 10. Post which the networking, display graphics, copy-paste functionality, and others should work.
Type This PC and right click and click on Manage.
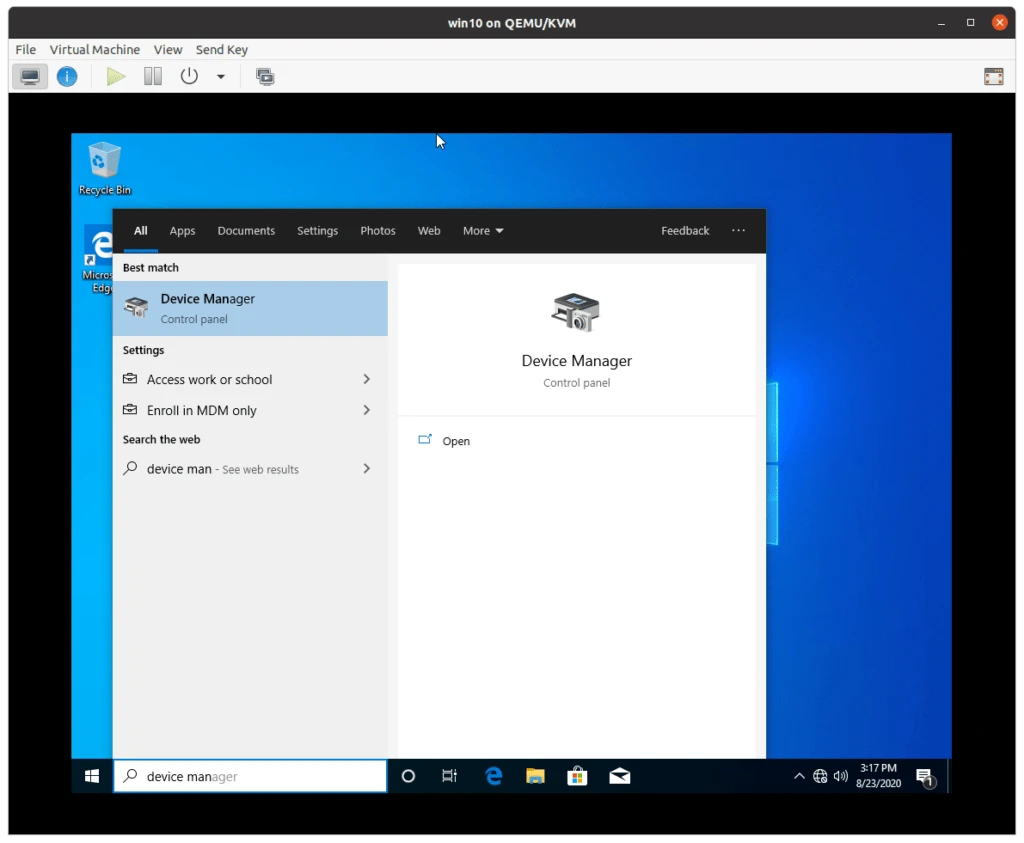
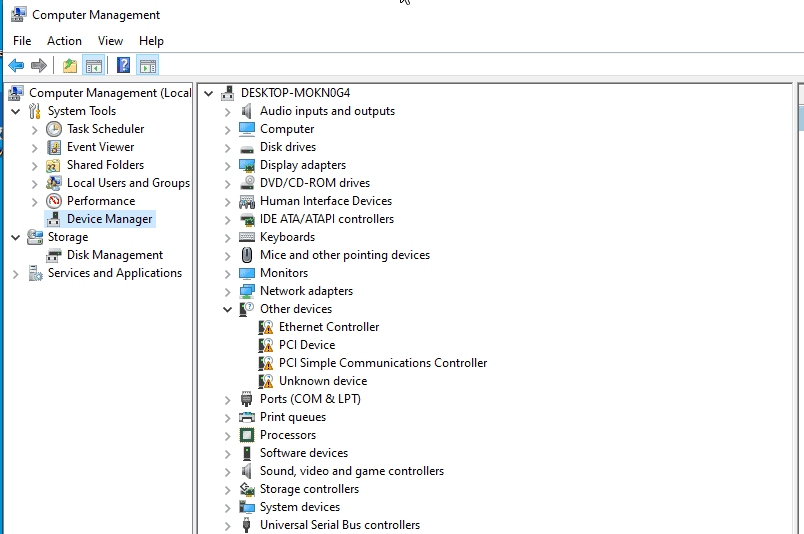
In the device manager, you should be able to see there are some drivers that are not installed under Other devices.
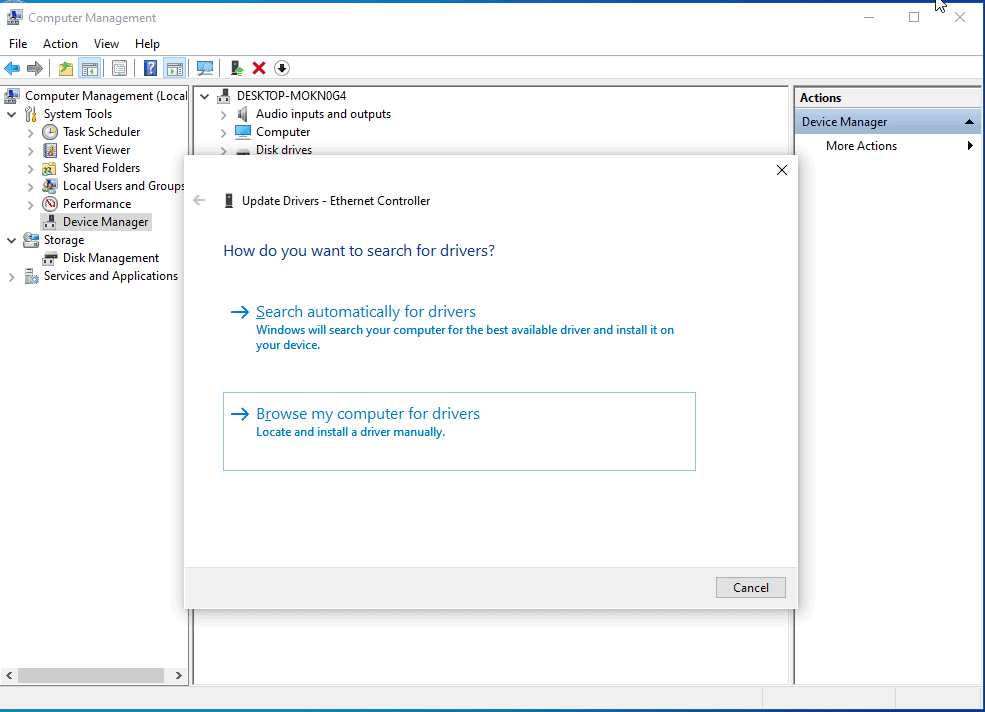
Just right click on each driver and click on update driver. Let’s see how we can do it for the Ethernet controller.
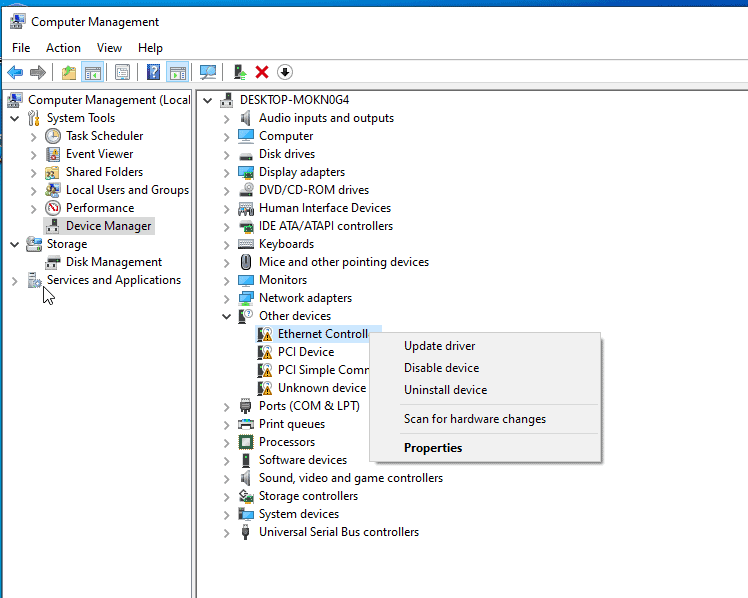
Click on Browse my computer for drivers
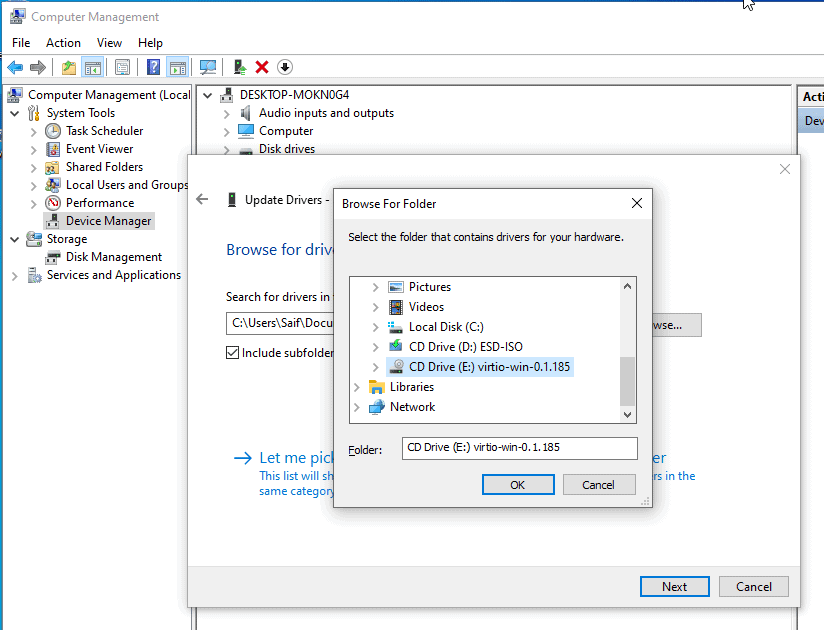
In the browse section select the VirtIO iso CDROM that we have attached.
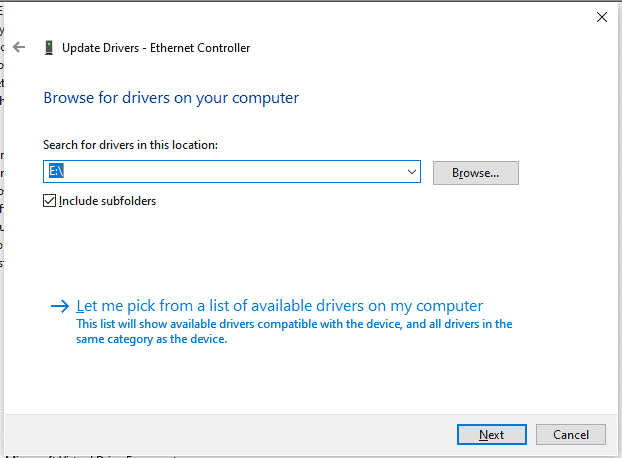
You should be able to see the drive letter as E, check the box which says include subfolders, and click on Next.
You should be able to see the pop up to install the Redhat ehternet Adapter driver to the machine click on Install.
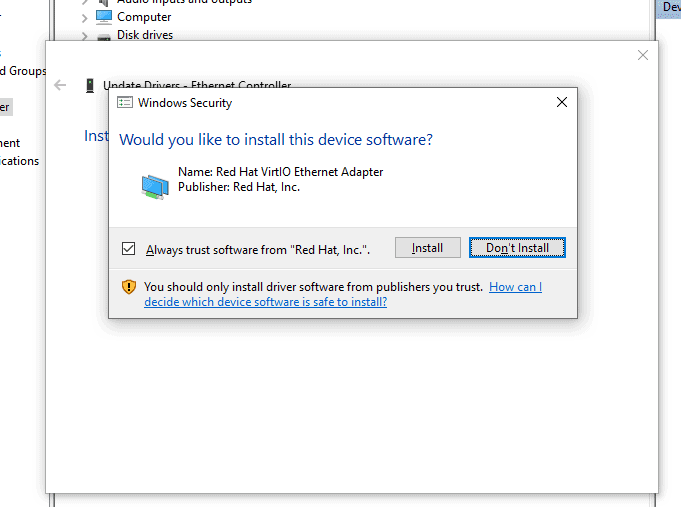
Similarly do it for other dirvers as well.
Note: I couldn’t quite get the ‘Unknown device’ to get it working under other drivers, so it should be fine.
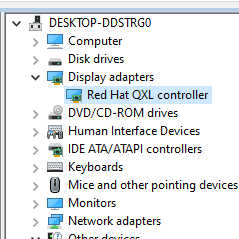
There is one more driver that you need to install, which is Display adapters, By default it has picked up Microsoft Basic Display Adapter.
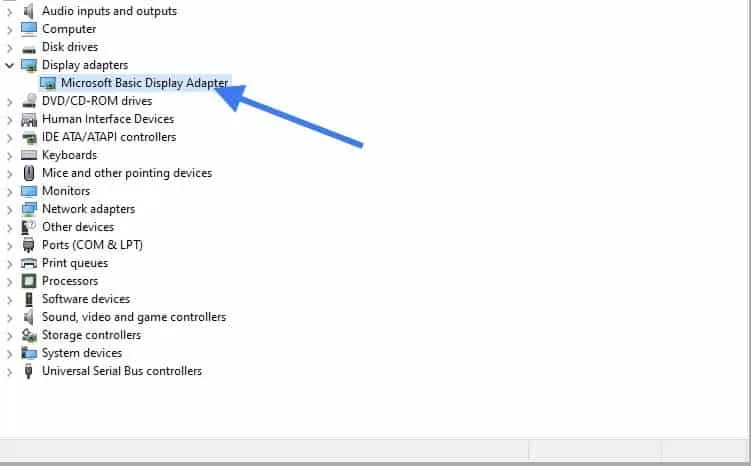
Just like you did the driver update for other devices, do the same thing for the display adapter as well.
10. Install SPICE Guest tools.
There is a SPICE Guest agent that you need to install now. For that you need to transfer the file from Ubuntu host machine to the windows.
Steps to transfer files from Ubuntu host to Windows 10 guest vm.
In windows create folder called Driver.
Now right click and click on properties.
Click on the Sharing tab, and click on Advanced sharing.
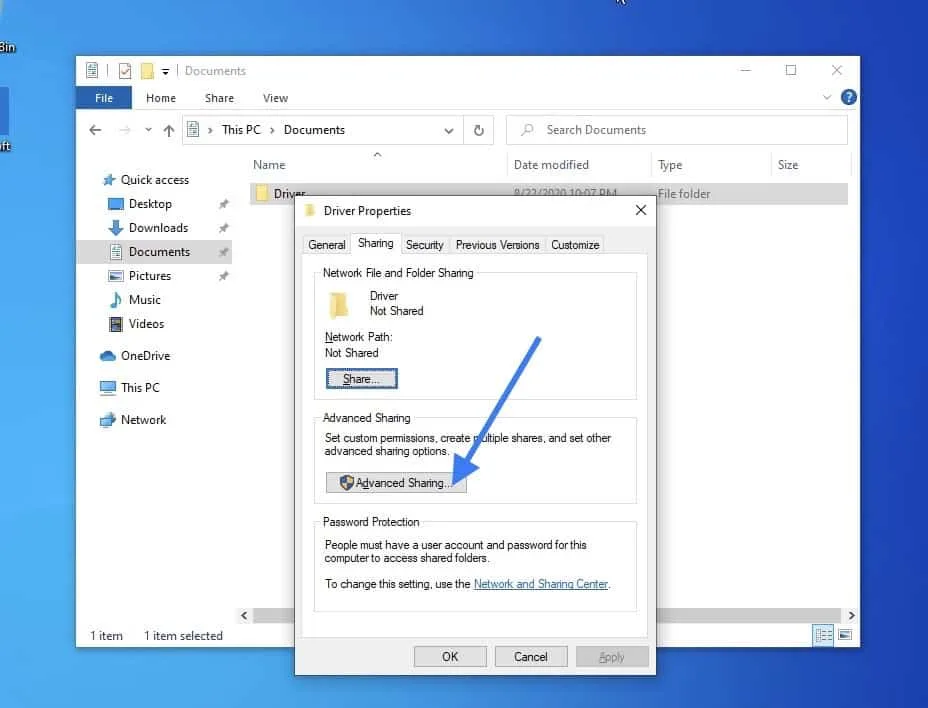
Check the option Share this folder and click on Permissions.
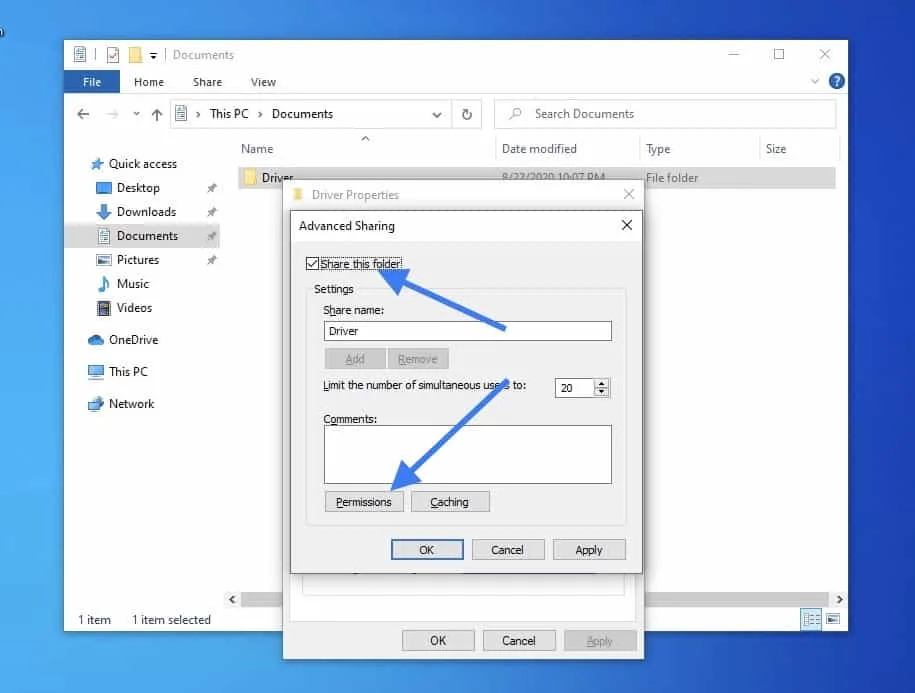
Check all the permissions now, you may cancel this later once you transfer the files.
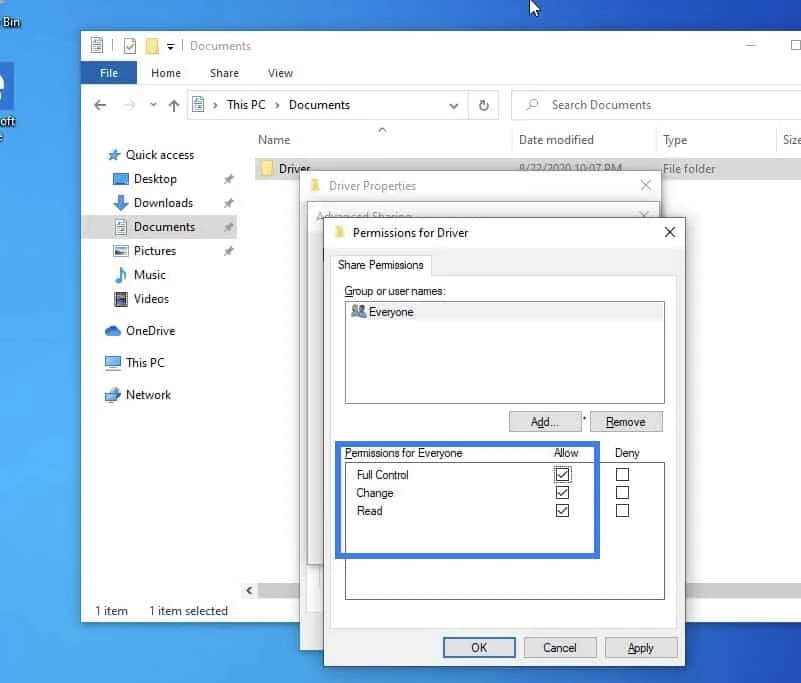
Now the folder is shared, go to Files in Ubuntu and click on Other locations.
In the connect to server address bar, type smb://windows host IP and hit enther.
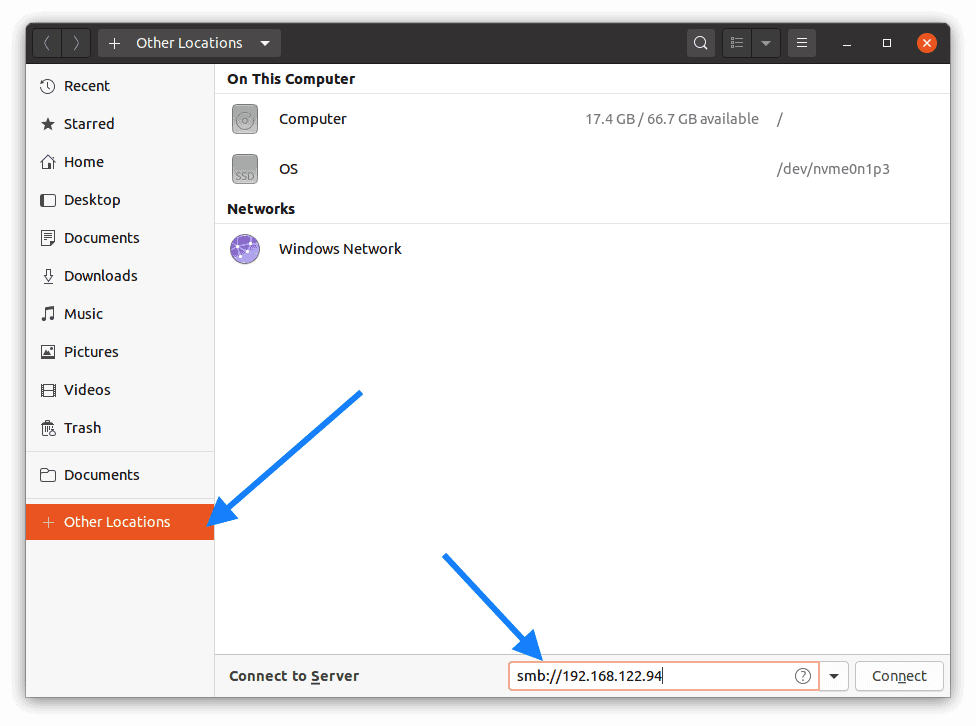
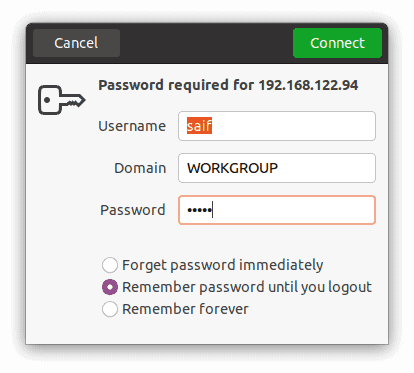
You will be asked to provide the windows 10 credentials, enter it now.
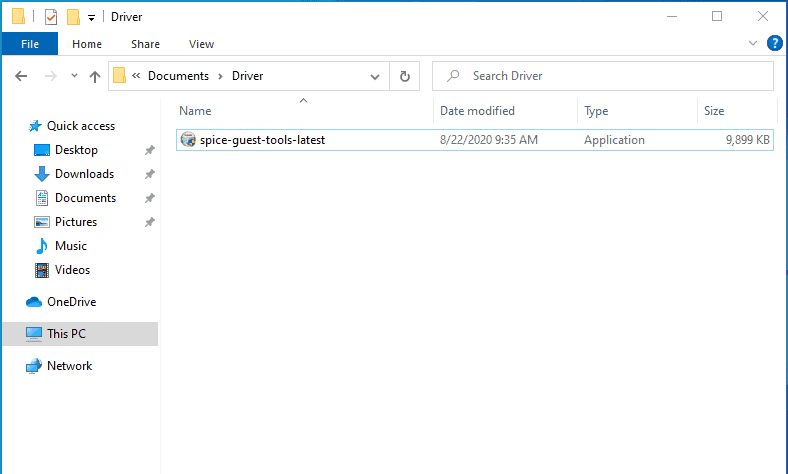
Paste the Spice guest tools here
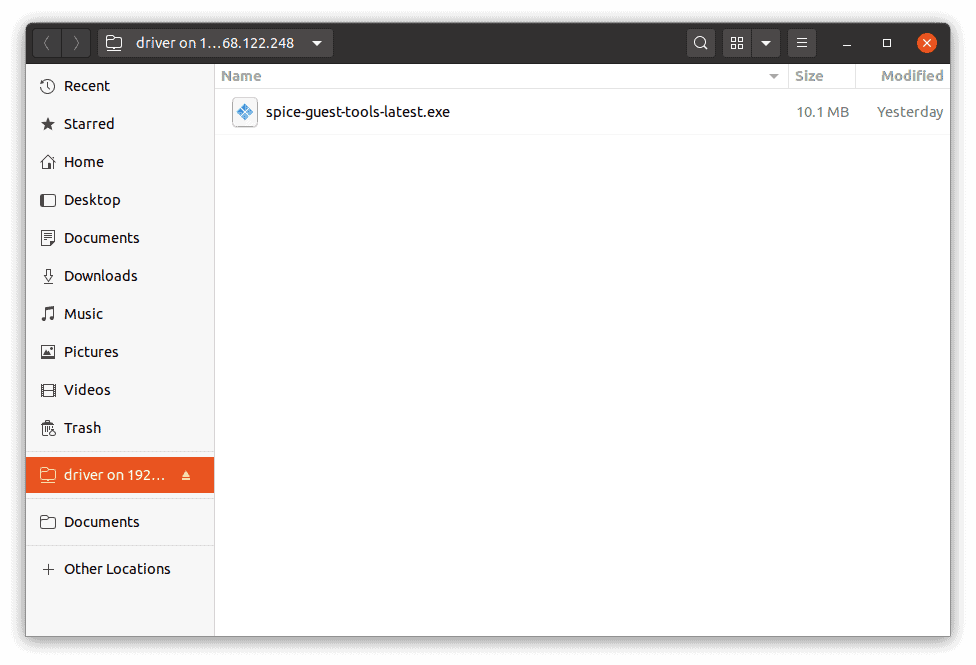
Now go back to the windows 10 and you should be able to see the Spcie guest tools software there, double click on it install the software, and you should be good to go.
11. Detach the CDROM1 and 2.
Awesome! you just installed windows 10 on your Ubuntu KVM. If you wanted to know how you can manage this VM when you wanted to access it, you can check out the article here.
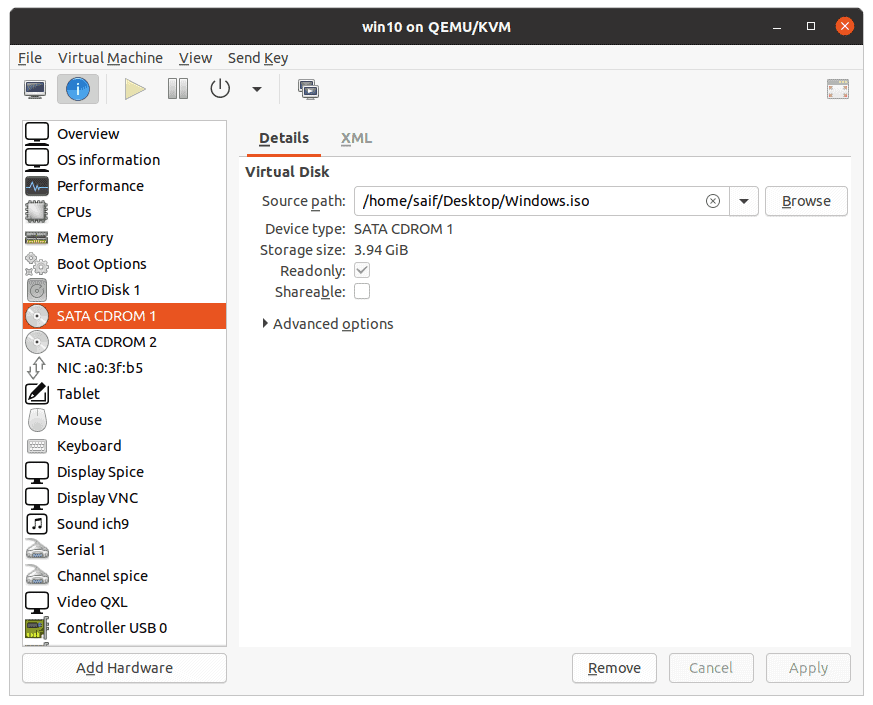
At this point you should be good to go however, next time when you shutdown the Guest VM, you need to make sure that you remove the CDROM drive 1 and two that you had attached during the installation.
In source path, you may click on the x icon to detach.
Below is the video, if you prefer to watch over video.
Alicia
Thursday 6th of February 2025
Hi there
when i type in virt-manager. the window pops up but it shows 'QEMU/KVM - Not Connected'. And when I click on 'create new virtual machine', It gives me an error and says 'NO active connection to install on'.
Alex
Sunday 1st of December 2024
Hi.
Thanks for the post, I was able to install it successfully. One question, how do I enable graphic acceleration?
I have installed Capcut program in this instance ( Win in qemu/KVM ) and it recommends to me enable graphic acceleration.
Regards
goebbe
Monday 28th of October 2024
Thank you for this howto. This was very helpful!
Saifudheen Sidheeq
Thursday 5th of December 2024
You are welcome :) glad it was helpful!
Stephen P. Molnar
Wednesday 27th of March 2024
I am running Debian 12 on my Linux platform.
I have followed your steps using your default values, with two exceptions.
I retained the size of the new virtual machine as 40 GB. The second exception is that I chose virtio-win-0.1.185.iso. That was the choice in the step attaching the VirtIO file. The next illustration shows the version of the iso as 0.1.118.
I went through to the end of the installation without any warning or error messages. However when I restarted Win9ows 10 was 'No Internet' message.
Unfortunately, if I can't solve this problem, I going to have to go back to using Oracle VirtualBox as some of the software I use for my computational chemistry research is not available in Linux.
I would appreciate you assistance in solving this problem.
Thanks in advance.