
When introducing a pfSense firewall into your environment, you initially have complete control over the firewall by default. However, when granting access to the operations team, you need to implement different levels of permissions. This ensures that L1 engineers cannot inadvertently shut down critical components on the pfSense firewall.
Unlike Cisco, where you can utilize privilege levels to assign varying privileges to users, pfSense operates differently. Let’s explore how you can achieve this.
Suppose you have deployed pfSense in your network and now want to provide read-only functionality to specific users. This functionality allows them to perform basic checks such as DHCP leases, IPsec status, ARP table lookups, and ping utility tests. We refer to this user group as the NOC team, which is restricted from making any changes to the network.
Additionally, we’ll create an admin group with read-write permissions.
Use a Complex password for your pfsense firewall.
The primary objective of setting up different user permissions is to enhance security. To begin, ensure you use a complex password and avoid using the default password, which is “pfsense.” Using the default password renders your efforts futile, as anyone attempting to access the pfSense firewall could gain access with admin credentials. Thus, change the password to something more secure.
1. Creating a read-write user (Admin user).
After installing pfSense, the default user group available out of the box is the “admins” group, which has both read and write permissions. By default, the only user, “admin,” is part of the admins group. Therefore, any additional users added to the admin group will have the same admin rights.
To create a user
- Go to “System” -> “User Manager.”
- Click on “Add” to create a new user.
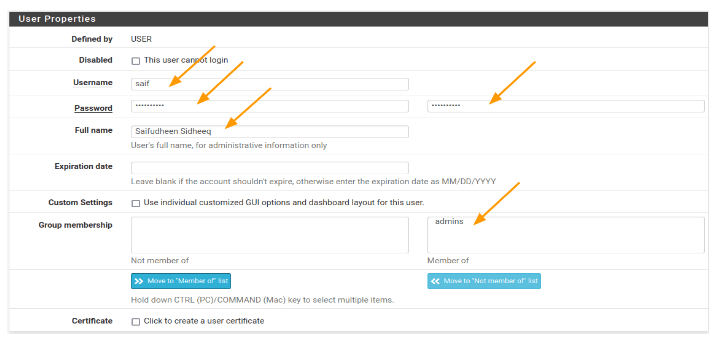
- Username: Enter a username.
- Password: Set a complex password.
- Full name: Enter the user’s name.
- Group membership: Since we want this user to be part of the admin group, click “Move to ‘Member of'” to add the user to the admins group.
Now, you will notice that the admins group has moved from the left side to the right side column. Click “Save” to finalise the changes.

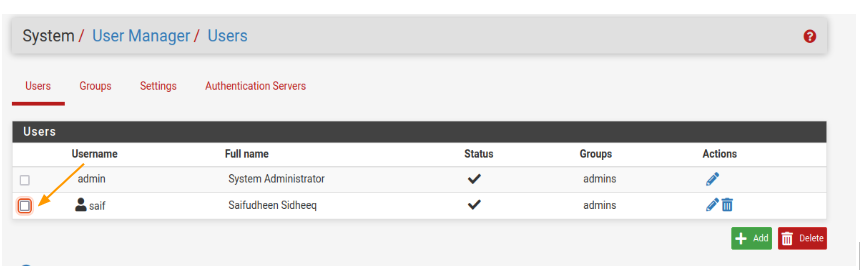
At this point, we have two users in pfSense: the default admin user and the newly created user.
Once you ensure that the new user is able to login and have access to the pfsense system, you can go ahead and disable the admin account.
Test the admin account (Read-write)
Log out from the pfSense dashboard and attempt to log in with the new user account you created. As you can see, I have successfully logged in with the newly created user and can access the same screen as before when using the admin account.


As a security measure, let’s disable the default admin user.
- Go to “System” -> “User Manager.”
- Click “Edit” under the actions for the admin user.

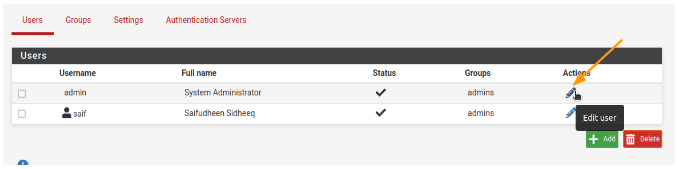
- Under user properties, check the option that says “This user cannot login” and click “Save.”
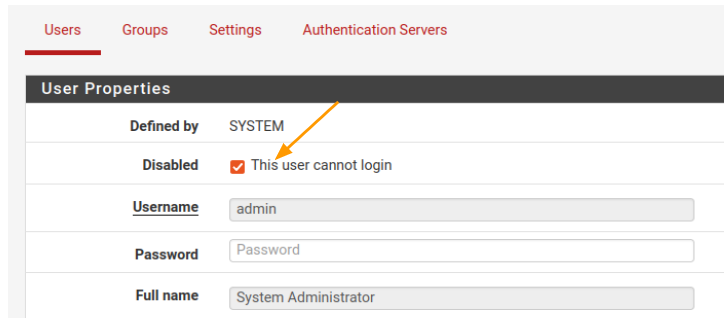

Now, if you try to log in using the admin account, you will receive an error message stating that the username or password is incorrect.
2. Create pfSense read-only Group.
Similar to the admins group, which provides read-write access to pfSense configuration, we will now configure the read-only group for users with read-only access.
- Go to “System” -> “User Manager.”
- Click on the “Groups” tab and then click “Add.”

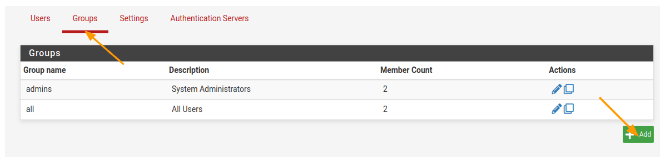
In the group properties.
- Group name: Provide a descriptive name.
- Scope: Select “Local” since we are setting up a local account with read-only access.
- Description: Provide a description for the group.
You will see two users listed, but we won’t add them to the group yet. We need to set permissions for the group. To do this, let’s identify the services.
Identify the read-only services.
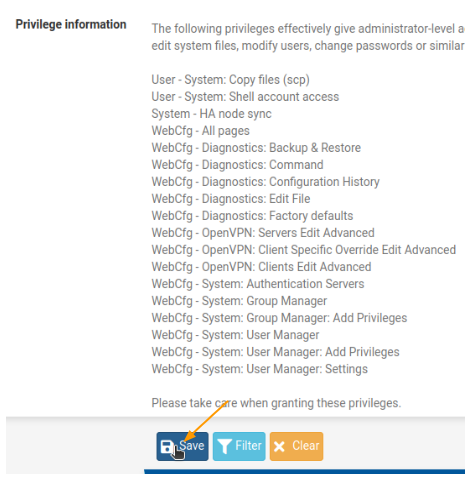
When you provide the privileges in the pfsense firewall, you need to first check what are the privileges that you are going to provide to the read-only-group.
The best thing about the pfsense is that you can customise the account however you like.
So, it is best to login to the pfsense firewall as admin and make a note of the services that you want to assign to the new read only group.
Below is the Dashboard of the pfsense firewall with all the configuration tabs for the admin user.
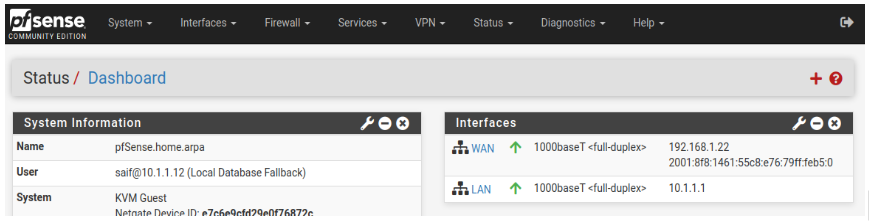

I am making a note of the services that I am going to provide to the read only users by going into each tab, so depending on your requirement, you may make note of the services.
Below is what I am going to assign. Although you can see NAT, Rules and virtual IPs in the firewall section, while choosing the access, I would choose only the read only access not the edit ones.
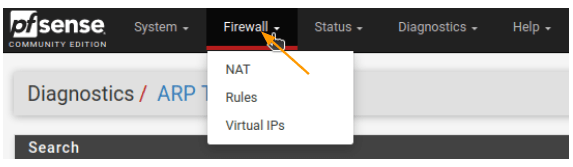
Firewall – NAT,Rules,Virtual IPs
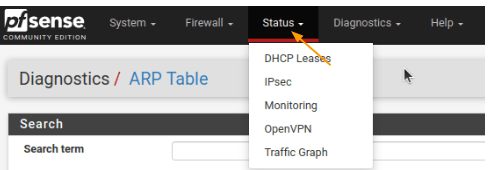
Status: DHCP Leases,IPsec,openvpn, monitoring, traffic graph, system logs
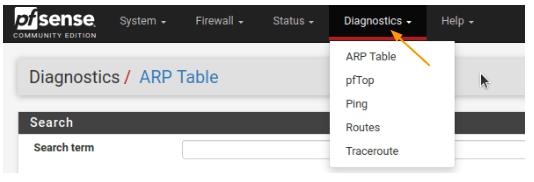
Diagnostic- ARP tabl, Ping, pftop, routes, traceroute
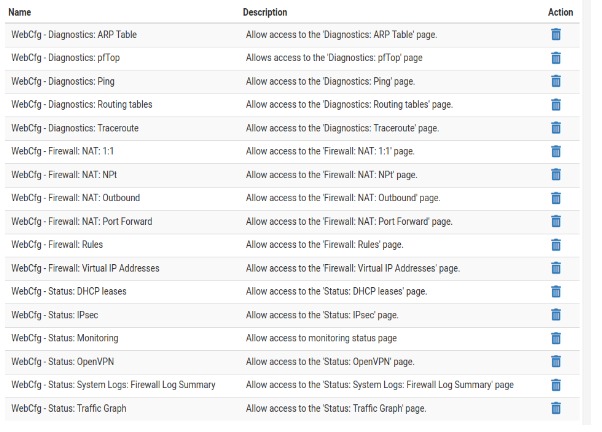
Providing access privileges to the read-only group Now, return to the read-only group configuration:
- Go to “System” -> “User Manager” -> “Groups.”
- Click “Edit” on the read-only group.

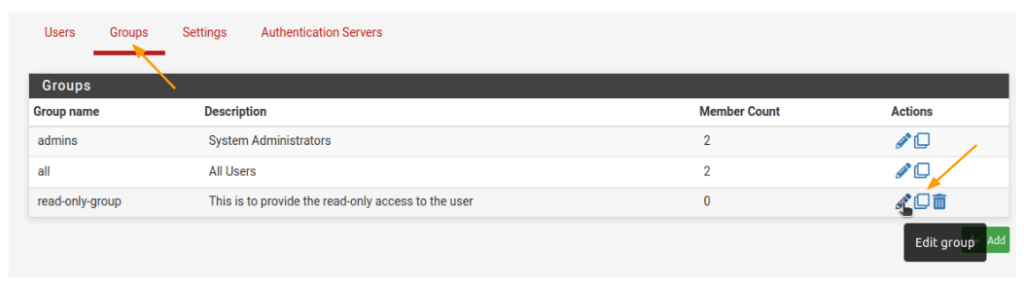
Scroll down to assigned privileges and click “Add.” Choose the appropriate privileges based on the services you identified. You can select multiple items by holding the CTRL button. Once selected, click “Save.”
Below is what I have selected.

Save again to the page.
Creating a pfsens read-only user
With the required privileges assigned to the read-only group, it’s time to add users to this group:
- Go to “System” -> “User Manager” -> “Users.”
- Click “Add user.”
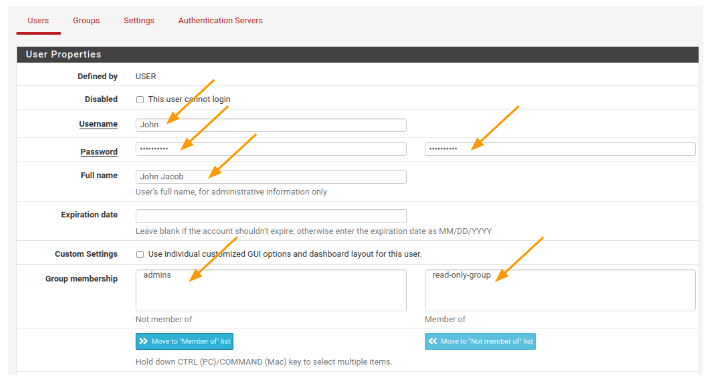
Let’s say our new NOC engineer is named John, and we want to provide read-only privileges to him. Fill in the user details as shown below:
- Username: John’s username.
- Password: Set a complex password.
- Full name: Enter John’s full name.
- Group membership: Select the “read-only-group” and click “Move to ‘Member of.'” This action will move the user to the right column.
Click “Save” to finalize the user creation.

Test the read-only setup
Now that the read-only user is created, log out from the admin console and attempt to log in using the read-only user account. As you can see, I have successfully logged in to pfSense without any issues.
You will notice the new dashboard with new menus, representing the privileges assigned to the read-only group. When clicking on “System,” you will find the logout option for the user John.
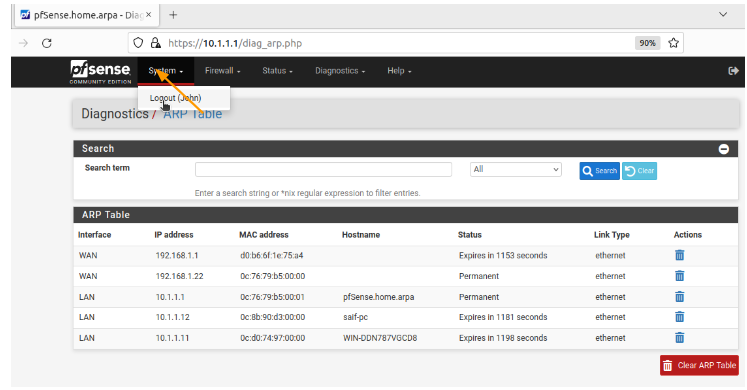

These are the privileges John has been granted in different tabs: Firewall, Status, and Diagnostic.
Firewall tab.

Status tab.

Diagnostic tab.

Conclusion.
This is how you can set up local users on pfSense with different permissions. However, managing users this way becomes challenging as the pfSense management team grows. It requires manual addition and removal of users, which may lead to security issues if users are not promptly removed.
To address scalability, consider implementing centralised authentication using RADIUS. In the next article, we will explore how to set up centralised authentication using a Windows NPS RADIUS service.