When you deploy a cisco ios network infrastructure, we would set up the local account for the initial configuration, and later we would require some sort of centralised radius or tacacs + location that will help you authenticate the cisco devices.
It is not ideal to use a local account, because, as in when the network grows, you cannot really share the local account with everyone, we need some centralised location that would help you manage the user accounts and its access.
To manage cisco devices centrally, we would use something called Cisco AAA(Authentication Authorisation Accounting).
There are multiple radius server providers available in the market, but if you already have a microsoft environment running with windows servers, you would most likely want to try out microsoft NPS server, which will help you setup the radius server for cisco AAA setup.
With the help of this we can set up AAA not only on Cisco devices but also other network vendors including Wireless connectivity.
What is Cisco AAA?
Cisco AAA (Authentication, Authorization, and Accounting) is a security framework that provides a comprehensive set of protocols for controlling access to network resources, managing user privileges, and tracking user activity. It ensures secure user authentication and authorised user actions within a network.
In this blog article, we will point all our cisco devices to talk to the windows server 2019 NPS for authentication. If you have not setup the windows server NPS service, you may follow the article here to learn more.
This is how we are going to set things up,
- We have users who are network administrators, basically doing L3 roles who have full admin rights with the privilege level of 15.
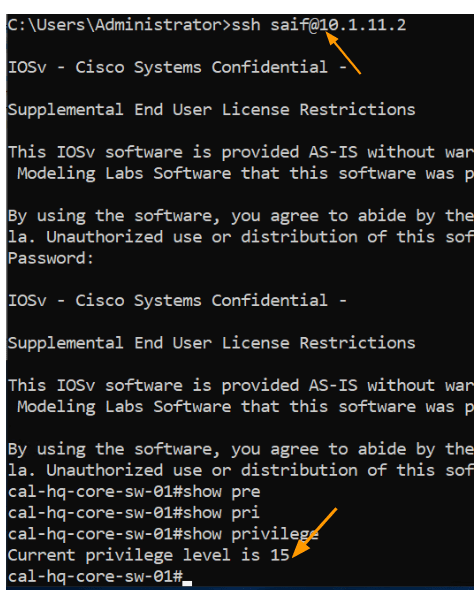
And we would create a user called Saif here.
- And the NOC team, who has less privilege to do basic read only access.
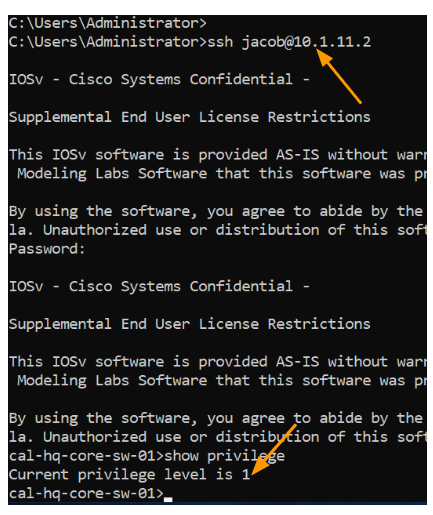
We would create a user called Jacob here.
Add local user for fallback.
Whenever you configure radius it is important that you setup local account on the cisco device as well. We would define with a radius configuration statement aaa authentication login default group radius localwhich will prefer Radius as the primary authentication source and in the event of Radius become unreachable, it will fail back to the local account.
So you always have a back door access in case anything goes wrong.
To create a local account in cisco, enter the following.
username <your username>secret <your secret password>Add a new user group in AD for Admin users and for L1 users.
We are going to create two groups one with read write privilege (privilege 15) and another with read only privilege (privilege 1).
Open active directory, and goto your Object Unit (OU)
In my case, I have created an OU called gld-dev and another two OUs for USers and groups.
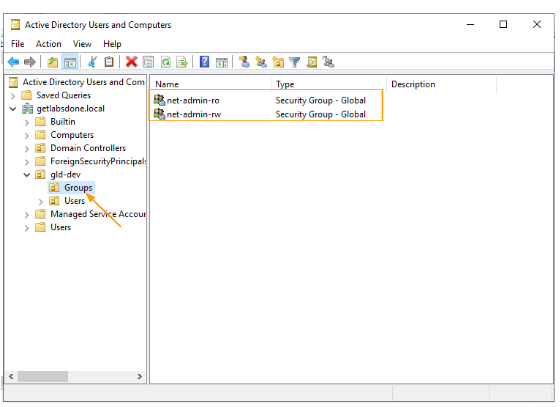
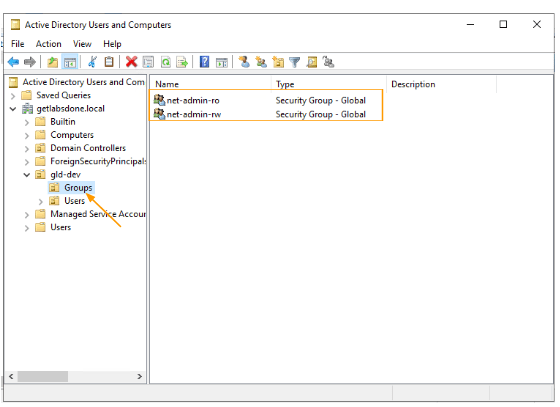
Right click on the group and create two groups.
I have created two groups as shown below.
net-admin-ro → this group will be used for the L1 engineers.
net-admin-rw → This group will be used for L3 users with full privileges.
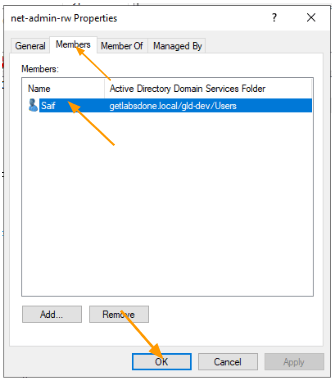
As I mentioned, I would move user Saif to the net-admin-rw group as he would require admin privileges.
And Jacob to the net-admin-ro group, as he is part of the L1 team.
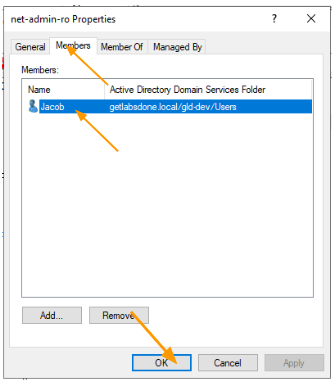
Open the respective group and add the users.
Added Saif to net-admin group

Added Jacob to net-admin-ro group.

Add Radius Secret.
When you want the cisco ios devices to talk to the windows NPS Radius server, you need to have a key defined that is matching on both client and server sides.
We call this key, radius secret.
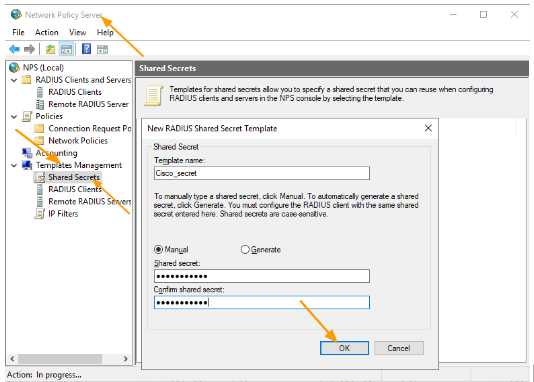
Open Network Policy Server.
In the Network Policy Server, expand Template Management and select Shared Secrets.
Right click -> New.
In the New Radius secret, and your Cisco IOS devices Radius key and click on Ok.
This Radius key will be used across all the Cisco devices, meaning on the Radius client sides.
The key that I am using here for the cisco devices, similarly you will have multiple keys for different vendors.

Setup Radius Client Template.
When you start importing cisco devices into the NPS server, you will have to keep adding the fields one by one.
To save time, you can create a predefined template, which then can be used during the device import.
It is not important to have a radius client template, if you don’t want to use it, you can skip the section, but when you add multiple devices as radius client, you will have to keep repeating the radius secret and the IP,s and vendor information again and again, creating the template will save a lot of time.
Note: Using powershell, you can import multiple clients at once, in case you are thinking about that path.
Under Template management, select Radius clients> Right click- > New.
The only things which are common across all the cisco devices are the secret key and the device vendor which is cisco. However, it is important to have a friendly name and IP address.
So, I would just give Cisco as the name and the Address as 10.1.11.
As you can see, the fourth octet of the IP address is missing.
I intentionally left it blank, because all my management network devices are in the 10.1.11.0/24 network, and when I add the network devices I just have to update the last octet.
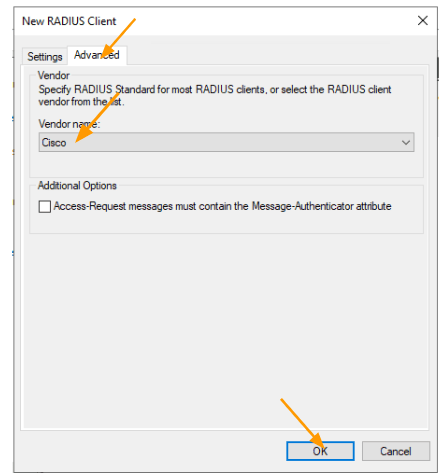
In the Shared secret, choose the secret that we defined from the drop down and click on Advanced.
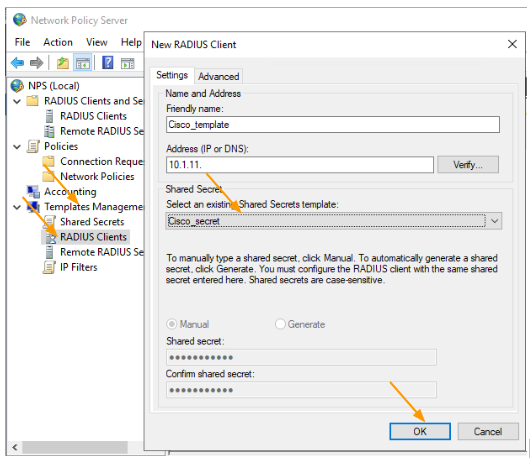
In Advanced, choose Cisco as the vendor name and click on Ok.

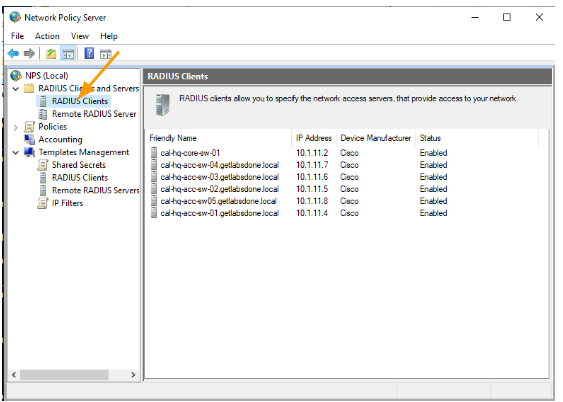
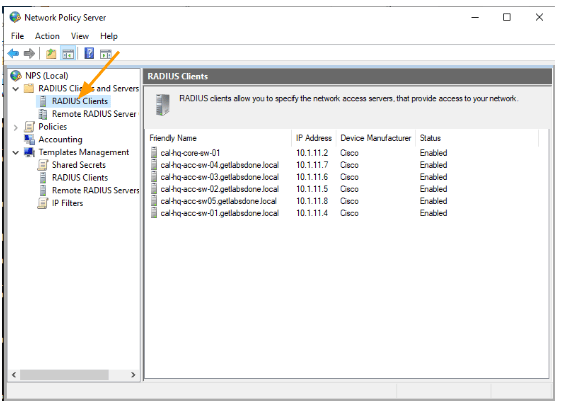
Add the Radius clients.
Whenever we configure Radius, there needs to be a server and the client.
The server is our NPS, and the client is the device that we are going to authenticate.
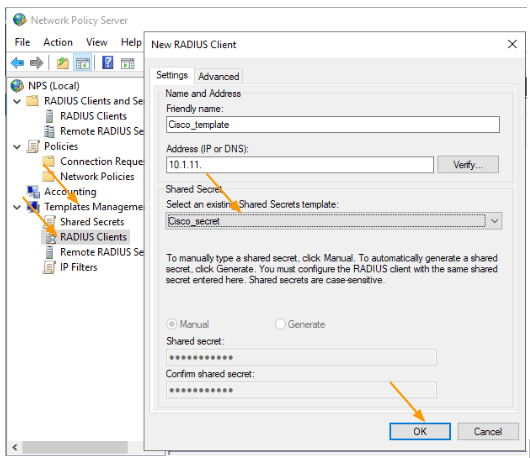
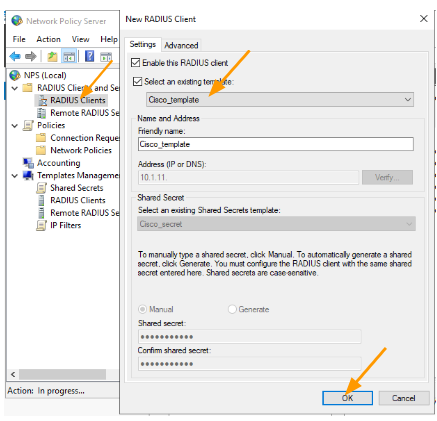
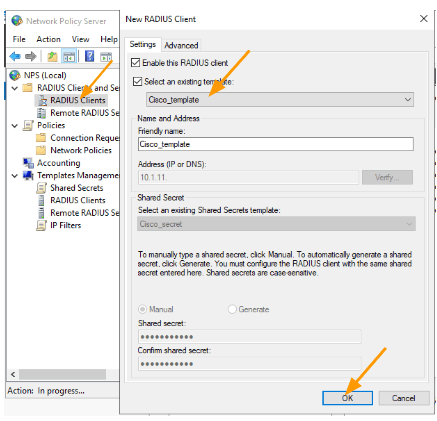
Right click on the Radius clients and click on New.
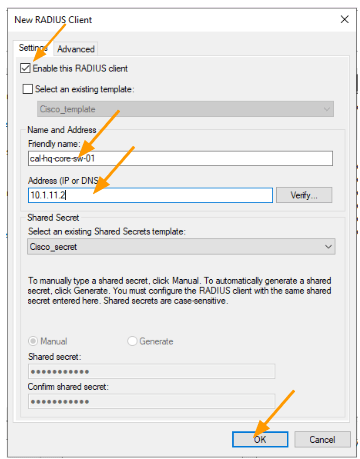
In the new device Check the option that says, select an existing template.
It will inherit all the configurations from the template to radius client, however you are unable to edit the IP address of the Client.
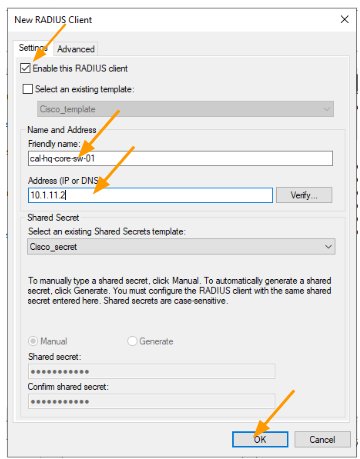
To edit the IP address field, uncheck the option again that says Select an existing template.
This will let you edit the Name and address of the device, as you can see, I just have to add the last octet next to the IP address as the 3 octets, and the device vendor in advanced tab were inherited from the template.
Add the name and the IP address and click on Ok.
Similarly add the rest of the devices that you have.
It also good idea to test one device and then move on to the next, since this is a lab, I am okay with adding all.
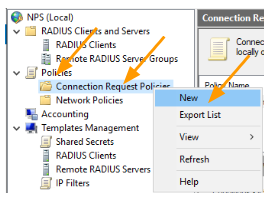
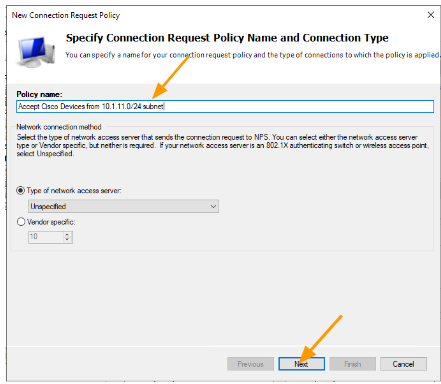
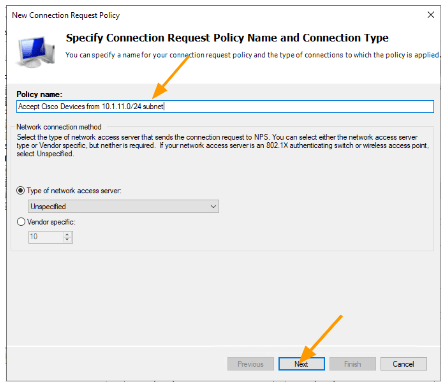
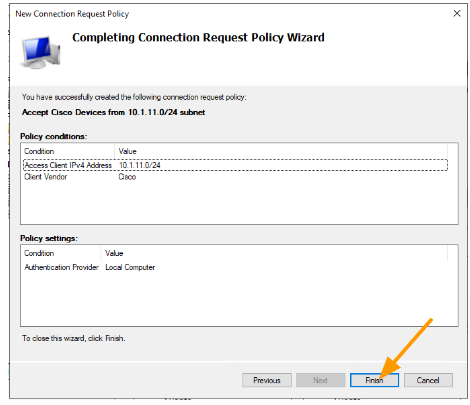
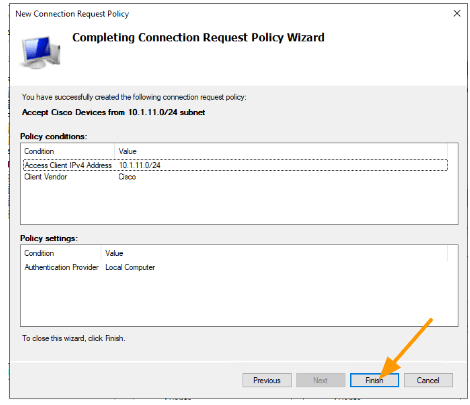
Setup connection request policies.
We are going to define a policy where only the radius client from 10.1.11.0/24 subnet and if it is a Cisco device, can send the radius request to the NPS server. If the condition becomes true, NPS will accept the radius request, else it will just ignore the request.
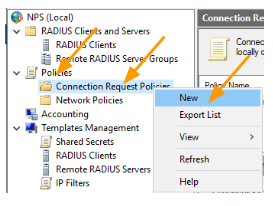
Under Policies -> Connection request policy.
You will by default see, Use Windows authentication for all users policy, leave it as it is.
Right click and click on New.
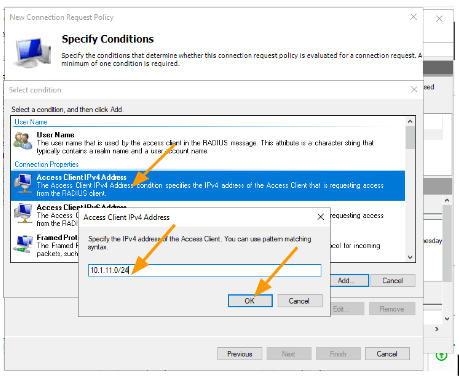
In the conditions click on Add.
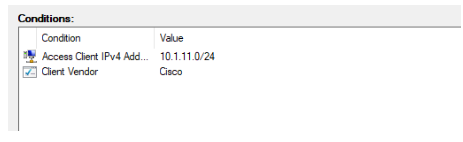
Select Access Client IPv4 Address → Add.
Enter the subnet that you want to add in my case, it is 10.1.11.0/24
Click on OK.

Click on Add again.
This time choose, Client Vendor -> Add.
Select Cisco front eh list and click on Ok.
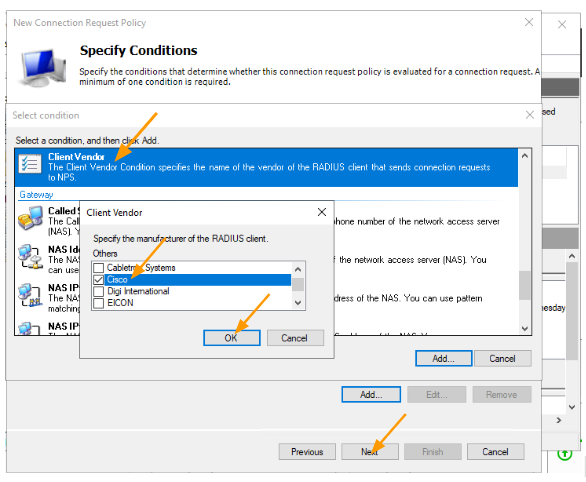

You will see, two roles added, click on Next.

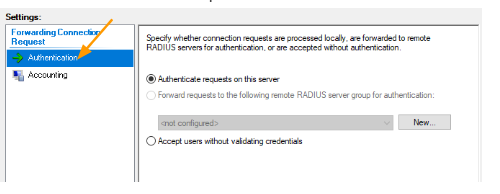
Choose Authentication requests on this server and click on Next.

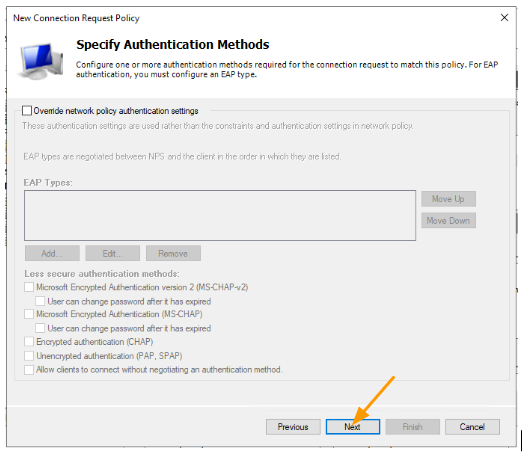
You can override, any of the authentication, parameters, however I am leaving it blank, and click on Next.

I am not making any changes on the configure settings, and click on Next.

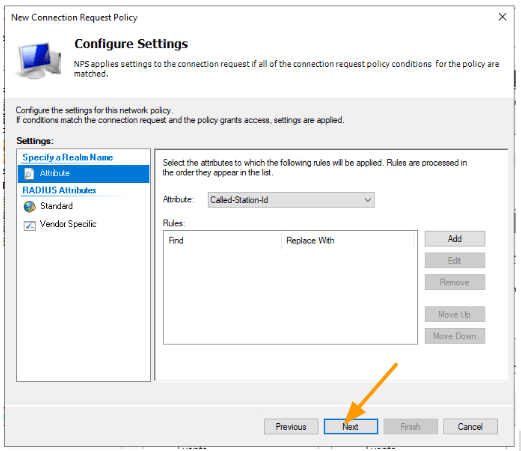
And click on Finish.
Setup NPS policies for CIsco AAA.
Now that we have defined the network devices and connection policies in the radius server, we have to now dictate how we are going to let the users authorise their privileges.
As we discussed, earlier, we would require two privileges, one for the L1 users and another for L3 administrators.
Add policies for L3 users – Network Admins.
Expand Policies.
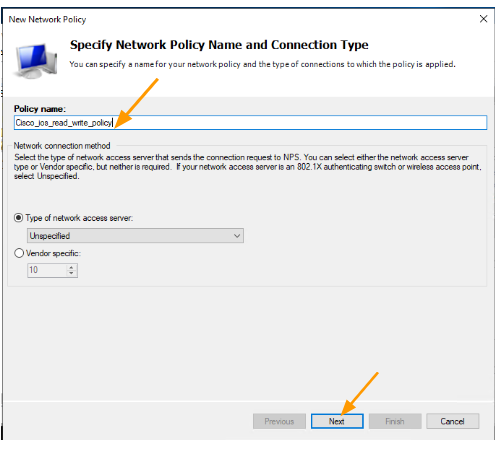
Network Policies-> Right click-> new.
Lets go ahead and create the policies for the L3 role which will get read write access.
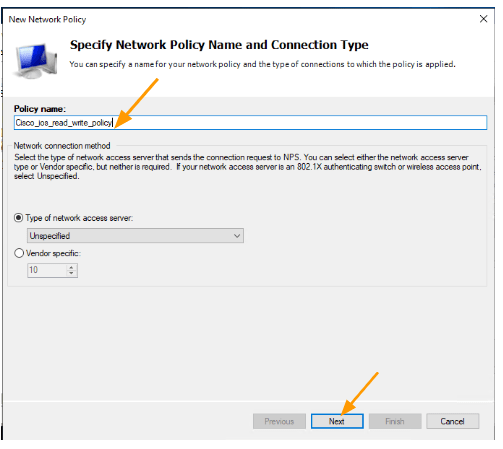
In the New policy definition window, add the name for the policy and click on Next.
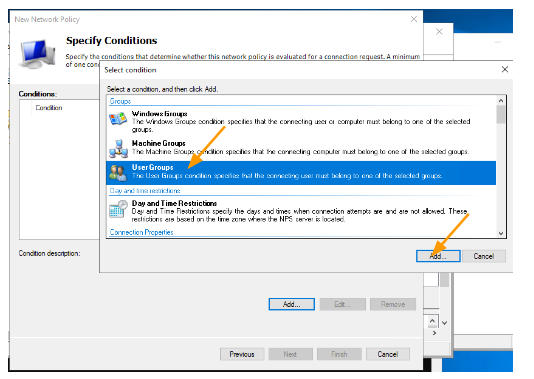
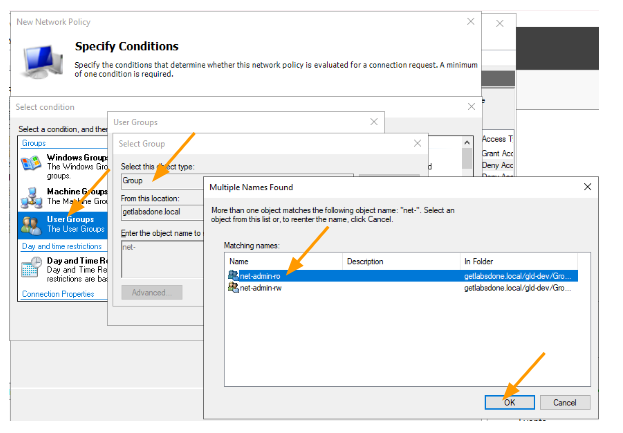
In the Condition click on Add.
Choose User Groups-> Add.

Click on Add Groups.
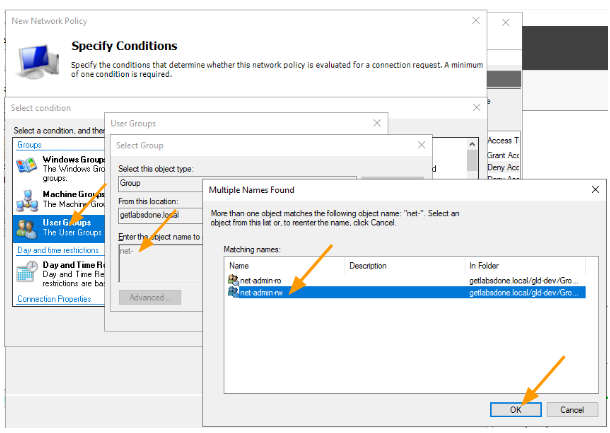
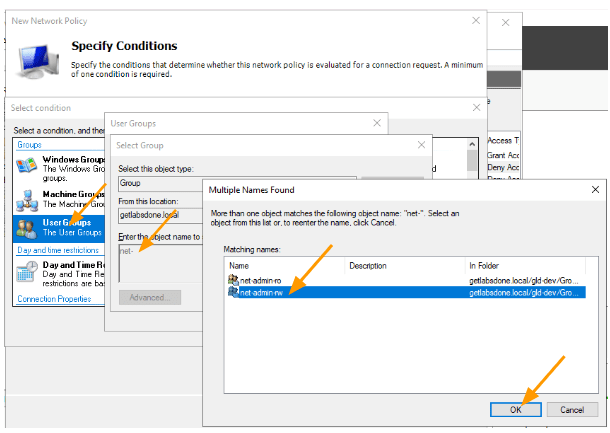
In the Enter the Object name to select, type net and check names.
Note: you may not have the same net-admin-ro or net-admin-rw as the security group, so you will have to choose the one that is applicable to you.
You will get the two groups that we defined.
Select the net-admin-rw role and click on Ok.
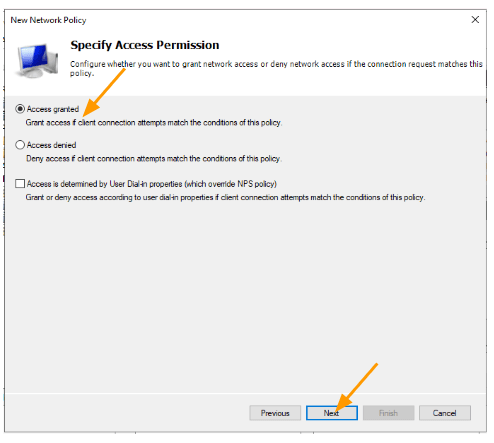
Click on Next on the network policy screen.
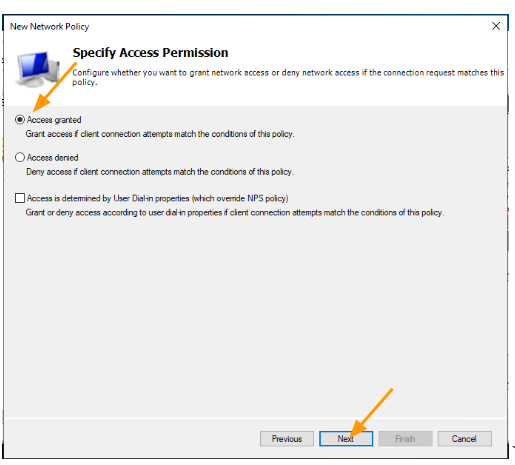
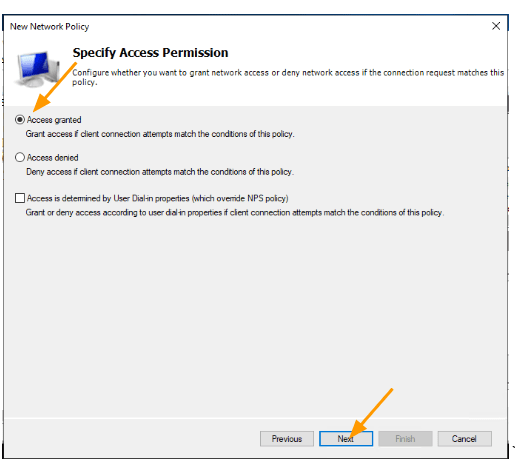
Here you select Access Granted, click on next.
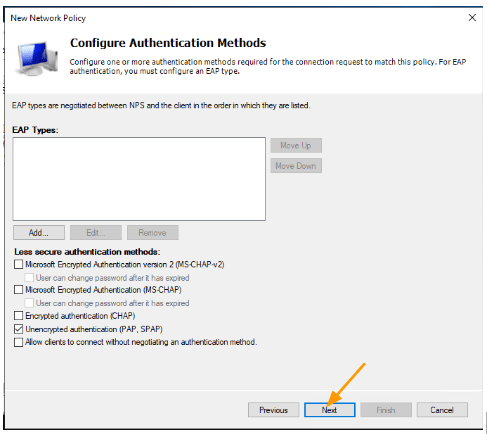
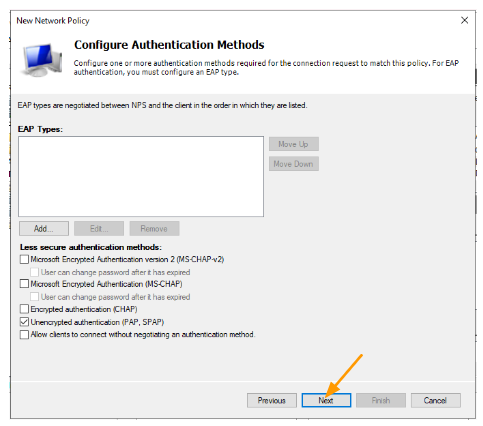
Choose PAP as the authentication method.
Though it says, encrypted authentication it doesn’t really send everything in cleartext.
The username will be in cleartext and the password will be encrypted.
We will check this further during the packet capture, click on Next.

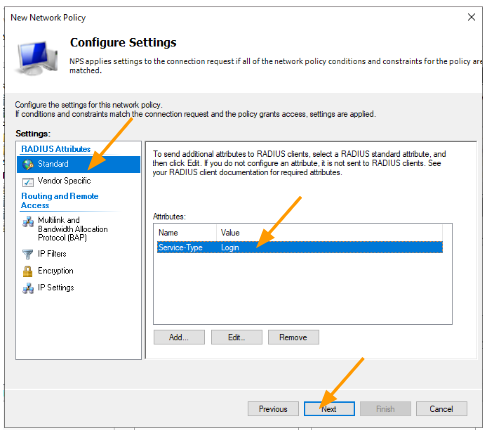
In the Configure Constraints, leave everything default and click on Next.
In the standard, remove the Framed-Protocol and change Service-Type to login.
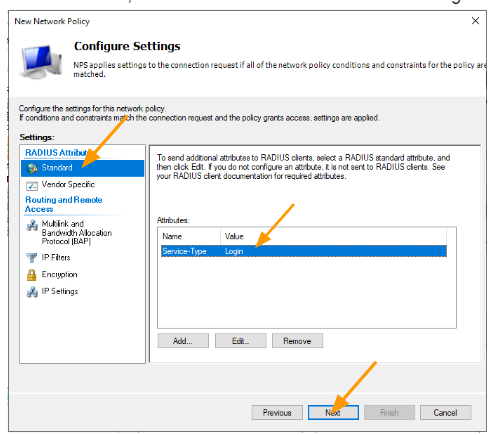

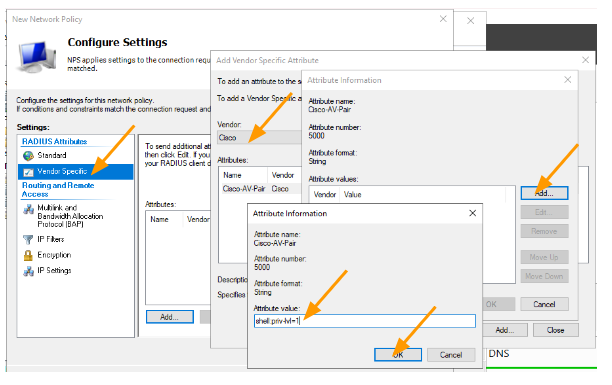
We now have to devise a Radius attribute that will dictate the privileges of a user.
- Under Radius attributes, choose Vendor Specific and Click on Add.
- Choose Vendor Cisco, double click on Cisco-AV-Pair
- In the Attribute information, click on Add.
- Add the Attribute Value as below.
shell:priv-lvl=15
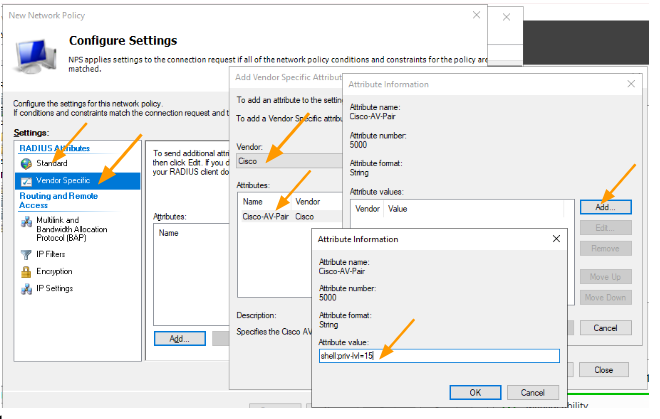

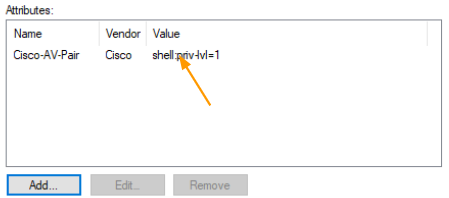
You should now have the Attribute as below.
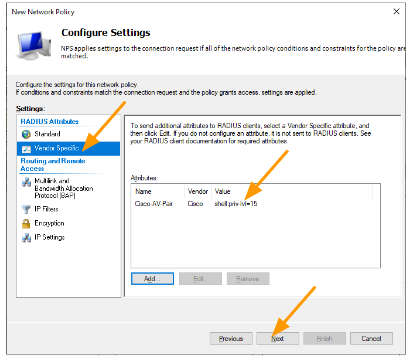

Click on Next and finish.
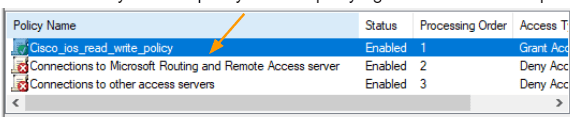
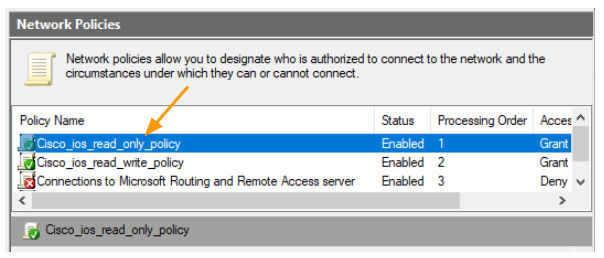
We have now created the read_write policy, by default it will be at the bottom of the default policies,
Move the newly created policy to the top. By right click and Move up.

Configure the L1 policy.
We have created the admin policy, let’s now create the policy for the L1 users.
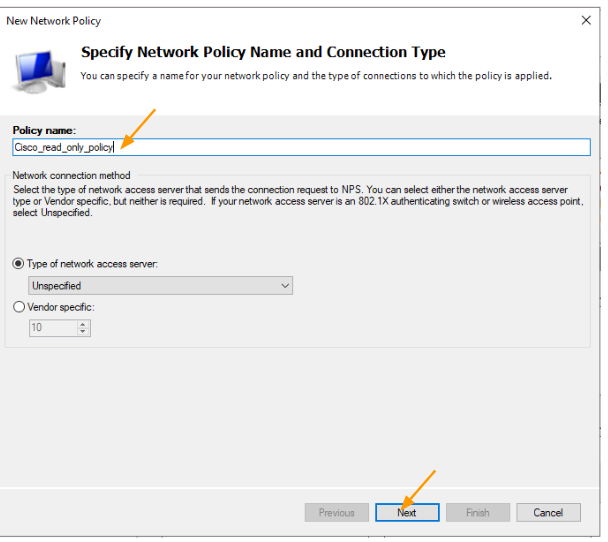
In the network policy, right click and create new policy
Add the policy name and click on Next.

In the condition, click on Add and choose User groups -> click on Add.
In the select group pop up, enter net- and check name and select net-admin-ro from the list of group and click on OK.

Back to the condition screen, you may click on Next.
Choose access granted.

Choose PAP as the authentication method.

Leave everything default on the configure constraints and click on Next.
On the next screen, under standard, remove Framed Protocol and Service Type change it to Login. It will be Others-> Login.

we need to define Vendor specific attributes that will dictate what kind of role the user will get.
- Select Vendor specific and click on Add.
- In the new pop up, choose cisco as the vendor.
- Double click on the Cisco-AV-Pair > Under Attributes Value, add the below Value.
shell:priv-lvl=1

You will have below attributes, click on Next and Finish.

Move the newly created policy all the way to the top.

Allow windows firewall policy to allow radius request.
Though I have enabled the firewall policy during the NPS installation, it is best to check whether the firewall is allowing the traffic or not.
You may check out the article here to allow the radius request on windows firewall.
Configure the Cisco device.
We have setup all the radius server configurations, its now for us to setup the radius client which is the cisco device.
I am using a Cisco switch for the purpose and add the radius configuration as below.
The line aaa authorization exec default group radius if-authenticated will let the radius to authorise the users levels.
aaa new-model
aaa group server radius gld_rad_group
 server name GldRadius
!
aaa authentication login default group radius local
aaa authorization exec default group radius if-authenticated
aaa accounting send stop-record authentication failure
aaa accounting exec default start-stop group radius
aaa accounting connection default start-stop group radius
aaa session-id common
!
ip radius source-interface Vlan110
!
radius server GldRadius
 address ipv4 10.1.16.20 auth-port 1812 acct-port 1646
 key gldrad@$key
Test the network.
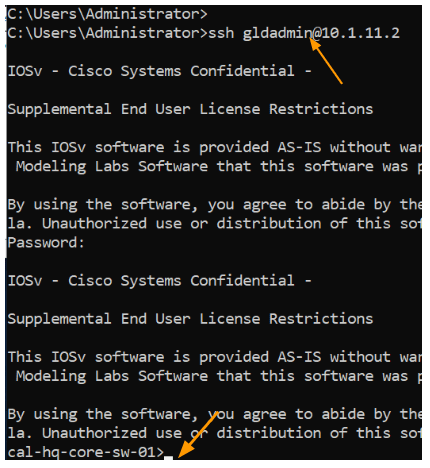
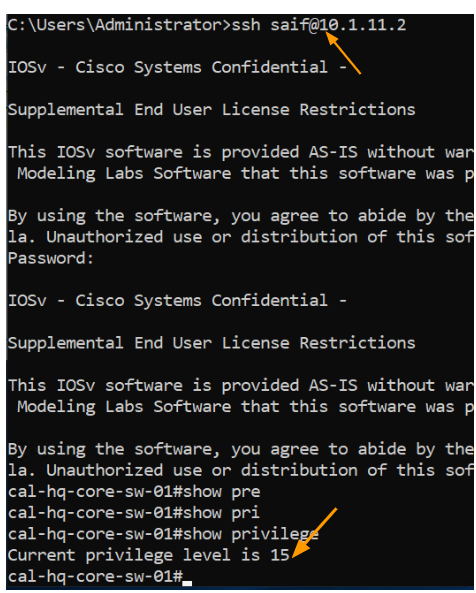
Test the Radius authentication for admin users.
The user Saif we setup is part of net-admin-rw group, which means, I should be able to get into the privilege mode without ever typing enable password.
As you can see, I logged into the device and as you can see, I got the privilege level of 15, which means I am allowed to do any changes on the device.
Test the Radius with read only privilege.
For L1 team we set privilege level 1, and the user Jacob, you should have only the L1 privilege lets login and check.
As you can see, I was successfully able to login and got a privilege of 1, for the user Jacob to make any changes to device, he should require enable password/secret.

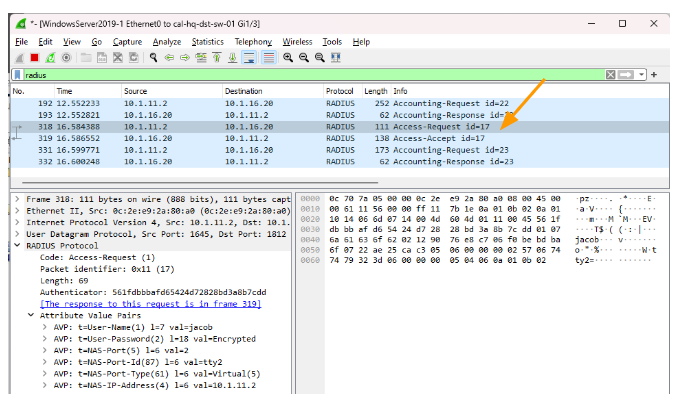
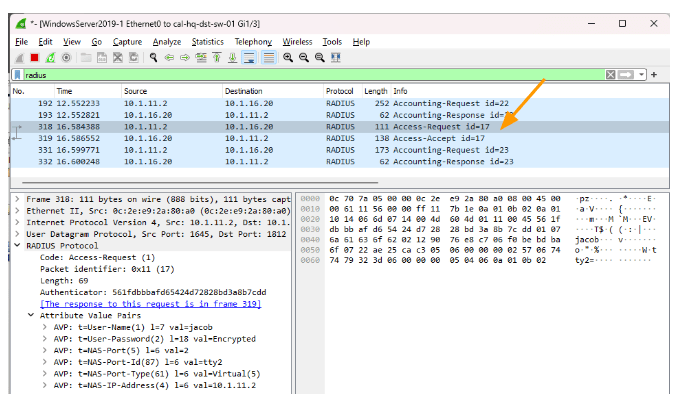
I ran a packet capture for Radius packet which users PAP as the authentication mode, as you can see, the username is in cleartext however the password is encrypted.
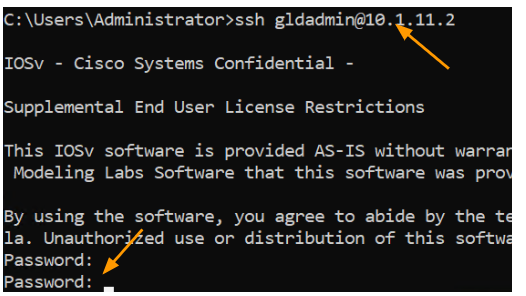
Test the local account access.
When you try to login with the local account now, it will not work, because we told the device to use radius and in the event of radius server not available use local account.
So let’s try to login.
As you can see, it didn’t work, it kept prompting for password.
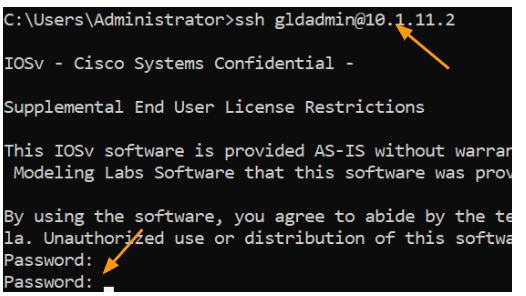
Lets disable the radius client and check again.
Goto radius client and double click on the host you want to modify.
Uncheck the option that says Enable this Radius client, this will disable the radius access to the client.
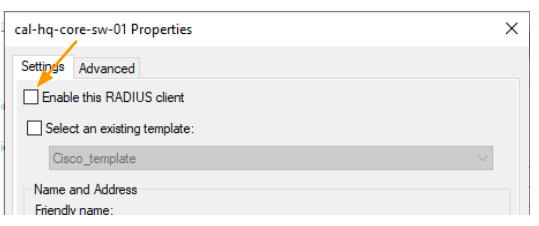

As you can see, when I tried this time, it waited for sometime, because it will try to talk to the radius and when it doesn’t get any response fail back over to the local account.