
Ansible is a powerful automation tool used by many organizations worldwide. Initially, it gained popularity for managing Linux and Windows machines, but network automation was a trend that took some time to catch up. However, in recent times, even networking teams have started adopting the infrastructure-as-code strategy.
There are numerous automation tools available for network automation, but Ansible stands out as a popular choice due to its open-source nature and the backing of Red Hat.
One key advantage of Ansible is its idempotent nature. When defining changes, Ansible ensures that only the necessary modifications are made. If the desired state is already achieved, Ansible won’t make any further changes, allowing for reliable and consistent configurations.
How does Ansible make changes to Network devices?
In Ansible, we use tasks in a playbook to configure network devices, using those tasks inside the playbook, it establish an SSH/API connection to the device to read the configuration or implement changes, when we run the playbook.
It’s worth noting that Ansible provides modules for most of the network vendor equipments such as Cisco, Fortinet, Palo Alto, and more. So, if you’re considering Ansible for networking automation, you can explore those modules.
Ansible tasks utilise modules, such as the “ios_command” module if its a cisco device which enables executing commands like “show version” on Cisco IOS devices. if its a fortigate, then there is module called fortios module, so similarly for other vendors.
When it comes to making changes on Cisco IOS devices, the “ios_configure” module becomes useful. This module, along with others like “ios_ntp” “ios_banner” “ios_vlans” and “ios_l2_interfaces” etc. provides specific functionality for different use cases.
For Cisco IOS environments, Ansible offers a comprehensive set of modules to automate Cisco infrastructure, covering various aspects of network management.
You can checkout all the modules from official documentation here.
In this blog article, we will focus on setting up Ansible control nodes for network automation. This setup will empower you to manage production networks effectively. You can even extend the configuration management to version control platforms like Bitbucket.
By the end of this article, you will have a solid understanding of setting up Ansible for Network automation and its application for a production network management.
Can I install ansible in windows ?
Ansible is based on a python programme and it can install in both mac and linux operating system, however when it comes to windows, you will have to install Linux subsystem for windows in order for you to install ansible.
If you are a windows user, I would recommend you install any linux operating system as a virtual machine and then try using ansible in it.
You can follow the article below to learn more about the installation of Linux on windows.
With that, let’s go ahead and proceed with the installation of Ansible on a ubuntu machine for Network automation.
Step1. Install the ansible software package.
I am using an Ubuntu desktop version 22.04 in this lab, if you have different versions of linux then the commands will be a little different.
Check out the ansible documentation here to follow the installation instructions on other versions of linux.
Enter the below commands to install ansible on your Ubuntu host.
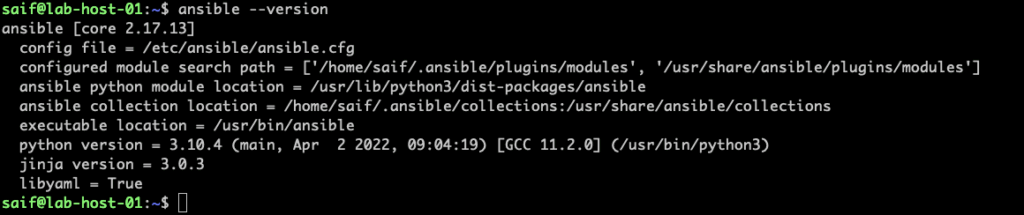
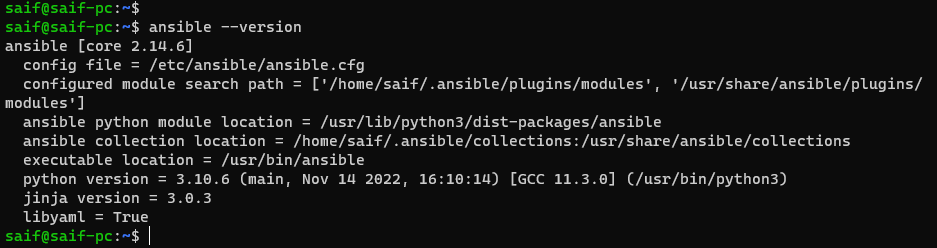
if you already have ansible installed, you can type the command ansible –version to check the version and if its installed or not.
As you can see, its not installed in my host.


sudo apt update
sudo apt install software-properties-common -y
sudo add-apt-repository --yes --update ppa:ansible/ansible
sudo apt install ansible -y
Once the installation is successful you can check the version again with the command ansible –version
As you can see, I am on version 2.17.13 at the time of this writing.
How to fix ansible local encoding error ?
Sometimes, you may encounter the following error message when attempting to check the Ansible version: Ansible requires the locale encoding to be UTF-8; Detected ISO8859-1.


To resolve this issue, follow these simple steps:
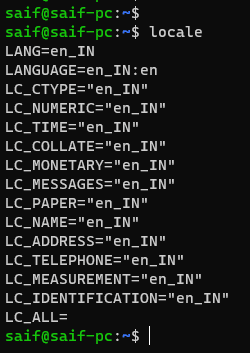
- First, check the locale settings by running the command.
localeIn the output, you’ll observe that the locale is set to en_IN without encoding in my case.

- If you wish to maintain the en_IN locale with UTF-8 encoding, use the following command:
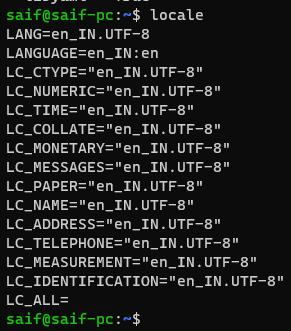
export LANG=en_IN.UTF-8Alternatively, if your preferred language is en_US, utilise the following command:
export LANG=en_US.UTF-8- After executing the appropriate command, check the encoding again. Now, you’ll notice that it has been updated to UTF-8.
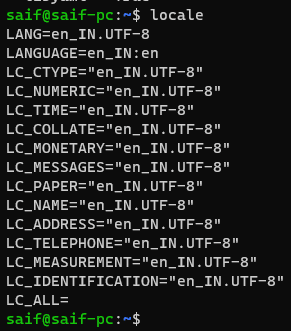
Verify the Ansible version once more. You’ll observe that the error message no longer appears.

Step2. Install or upgrade network modules for Ansible.
When it comes to ansible there are different modules supported by each vendor, and there are some modules that are installed out of the box.
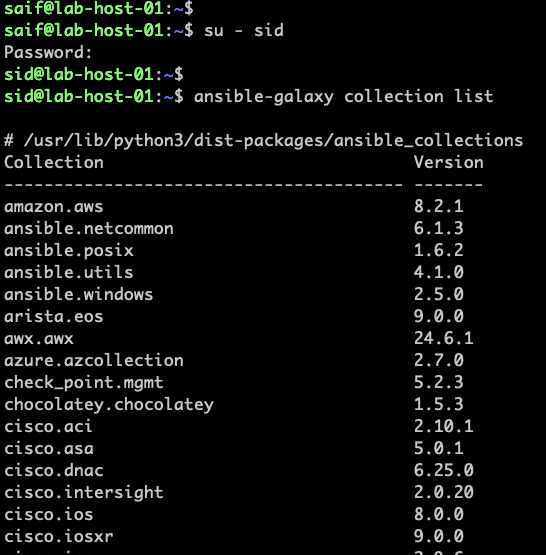
To see the list of modules that are installed alongside ansible, you can issue the below command.
ansible-galaxy collections listThis will show you the list of modules that are installed and the location is /usr/lib/python3/dist-packages/ansible_collections
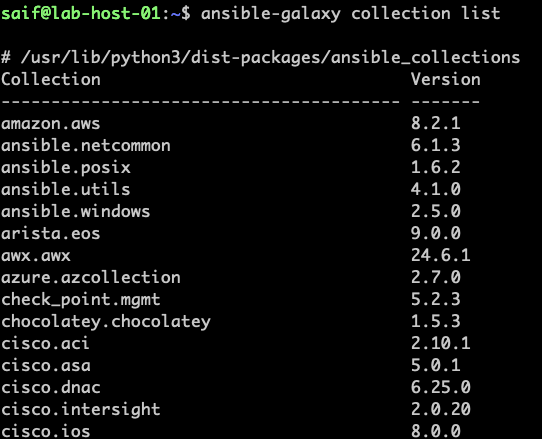
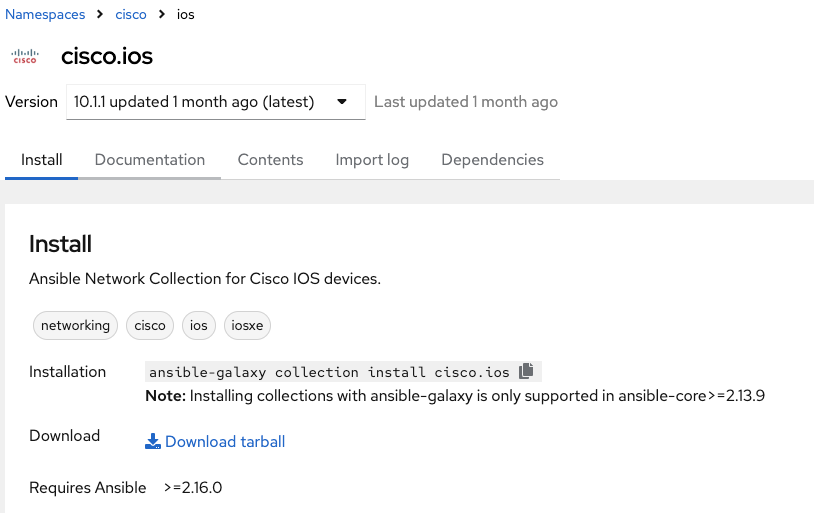
Its a long list, and you can see current cisco.ios module version is on 8.0.0, however the latest version is 10.x.x at the time of this writing.
you can look for specific module if you like as shown using ‘grep’
I have put the grep filter for cisco.ios and fortios, and you can see it has both installed cisco.ios and fortinet.fortios, it also has cisco.iosxr seperate module as well.


The ansible modules are managed by ansible galaxy repository here.
Where you can click on search on the left pane and search for cisco ios, and click on the ios collection.
You should see the latest cisco module version is 10.x.x, you should also see a command to install the module as well.
To see the cisco module usage, you may click here to learn more about it from official ansible documentation.
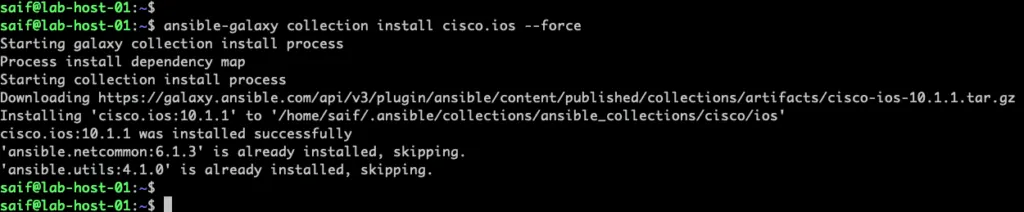
however if you try to install the module, using ansible, you should get an error, its already there, there is nothing to do, ans asking to use –force.


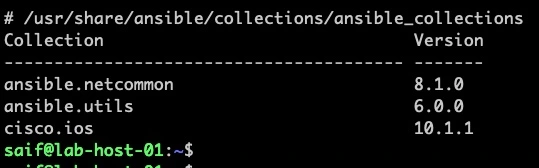
but when you use the force, it install and upgrade the latest version only for the logged in user. As you can see it has installed latest version 10.1.1

And if you check the module collections now, you should see both the version 10.1.1 for specific user, and 8.0.0 is for all the user.
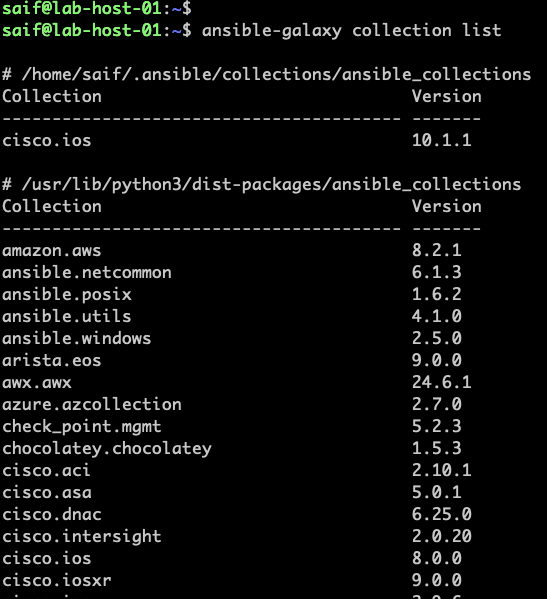

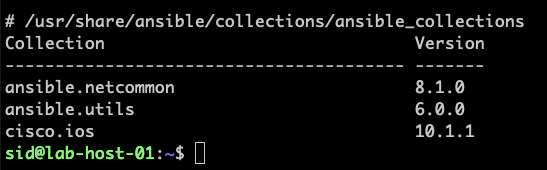
if I switch the user now, and check, you wont see the latest version installed here, instead it has only version 8.0.0.
how to upgrade for all the users?
from our previous output, we know that the ansible collection is installed in /usr/lib/python3/dist-packages/ansible_collections, so after specifying –upgrade, you may point to the anisble-collection directory.
sudo ansible-galaxy collection install cisco.ios –upgrade -p /usr/share/ansible/collections


you can now see the latest version in for both the users.


The same way you can install fortios as well.
sudo ansible-galaxy collection install fortinet.fortios –upgrade -p /usr/share/ansible/collections


Can you install paloalto module the same way ?
yes, you can install the palaolto network module the same way, however its not available out of the box, when you installed ansible on your system.
To install the paloalto ansible module, issue the below command.
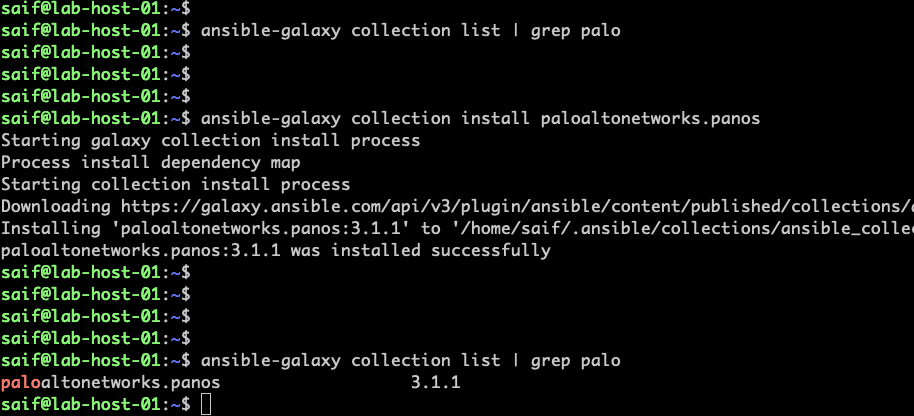

so this is how you can manage modules in ansible, so based on your requirement you can continue to install the required module if its not available in the builit in modules.
Step3. Ansible Directory Structure for Network Automation.
After the ansible installation the important part is to setup the directory structure for the ansible to use, each directories represents different things. Lets set them up.
We are going to follow ansible recommendations to set up directories in our control node. We are not completely sticking with the standard, I modified it according to the network automation setup.
You can learn more about the ansible best practices here.
Below are the directories that we are going to create first.
Host_vars: In this section, we will organise our Cisco running configurations as YAML files within the host_vars directory.
These files act as variables that can be referenced in Ansible tasks when needed.
Within host_vars, you can create subfolders for different environments such as production and staging.
For instance, if you have a Cisco switch named site1-sw-01 with its running configuration, you can create a production folder within host_vars and then add a site1 folder inside it.
Inside this site1 folder, you can store the host_vars as YAML or JSON files as shown below.
/host_vars/production/site1/site1-sw-01.ymlProduction: This directory is dedicated to storing host_var files for production sites, with each site having its own file.
Staging: If you have a lab or staging environment, you can store the lab-specific host_var files here.
Inventories: The inventory file is where we define and store host information such as inventory hostnames, SSH keys, credentials, and other parameters. The structure of the host_var folders (production and staging) is mirrored within the inventories directory.
Group_vars: While Ansible allows creating group vars to hold configuration common to a group, we will not be using that approach. Instead, we will utilise the default folder within the roles directory, which we will look later.
Playbooks: All the playbooks will be stored in this directory.
Roles: This directory is dedicated to setting up roles specifically for each vendor, such as Cisco, Fortinet, Palo Alto, and so on. Create a roles folder to organize and manage these roles effectively.
The overall folder structure should resemble the following:
├── host_vars
│   ├── production
│   │   ├── site1
│   │   │   └── host_vars.yml
│   │   ├── site2
│   │   │   └── host_vars.yml
│   │   └── ...
│   └── staging
│       ├── lab1
│       │   └── host_vars.yml
│       ├── lab2
│       │   └── host_vars.yml
│       └── ...
├── inventories
│   ├── production
│   │   ├── site1
│   │   │   └── inventory.yml
│   │   ├── site2
│   │   │   └── inventory.yml
│   │   └── ...
│   └── staging
│       ├── lab1
│       │   └── inventory.yml
│       ├── lab2
│       │   └── inventory.yml
│       └── ...
├── group_vars
│   └── default
│       └── group_vars.yml
├── playbooks
│   ├── playbook1.yml
│   ├── playbook2.yml
│   └── ...
└── roles
    ├── cisco
    ├── fortinet
    ├── palo_alto
    └── ...
I have three sites, Bangalore(BLR), California(CAL) and London(LON) and here in my lab, this is how I have set it up. Hope it does make sense now.
├── host_vars
│   ├── production
│   │   ├── blr
│   │   ├── cal
│   │   └── lon
│   └── staging
│       └── cal_lab
├── inventories
│   ├── production
│   │   ├── blr
│   │   ├── cal
│   │   └── lon
│   └── staging
│       └── cal_lab
├── playbooks
└── roles
As you can see at the bottom, we just created a roles folder, which we are going to expand now.
Step4. Setup Specific Vendor roles in Ansible.
Now that we have set up the directory structure for networking, let’s now go ahead and add a role specifically for Cisco IOS. The same way you can add other network vendors as well.
Roles allow you to encapsulate reusable configurations and easily apply them to multiple hosts or environments.
In Cisco or any other network vendors for that matter, there are common configurations such as DNS, NTP, Radius, SNMP etc. And unique configuration such as hostname, interface IP configuration, VLAN information and so on.
So we are going to create two roles.
- Cisco_standard – where we keep the common configuration.
- Cisco_unique – where we keep the unique configuration.
You can further call this role into your playbook using different conditions.
Let’s set up the roles in ansible.
Goto roles directory and issue the below commands for each.
ansible-galaxy init cisco_standardansible-galaxy init cisco_uniqueOnce role added, you can see the message Role was created successfully.
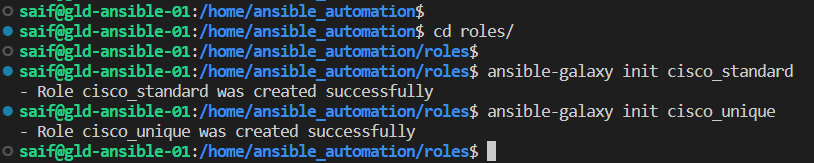

Now you can see, two folders created in roles directory.
if you expand cisco_standard or cisco_unique folder, you can see multiple subdirectories, each representing different items.
We dont require all the subfolders for the cisco ios playbook, We will go through some of them though.
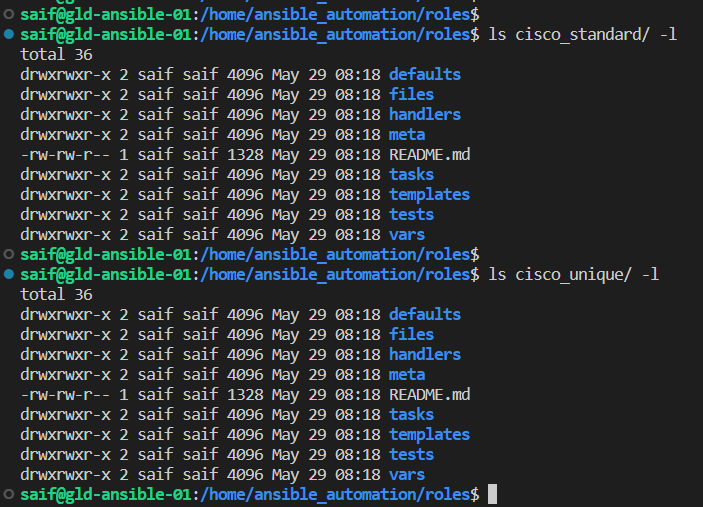

In the “cisco_standard” configuration folder, our primary focus lies in the “defaults” folder. Here, we keep the standard configuration in the “main.yml” file, similar to the structure of the “group_vars” folder.
This means that all the common configuration settings can be conveniently stored here, and they will be applied uniformly to all devices within a specific site.
Furthermore, the corresponding tasks for the standard configuration are also stored in the “tasks” folder.
Now, when it comes to the Cisco unique configuration directory, we solely rely on the “tasks” folder. Here, we specify the tasks that need to be executed, while the variables are extracted from the “host_var” files.
I understand that the connections between these puzzle pieces may still be unclear to you as you’re just getting started with Ansible control node setup for Cisco IOS network automation. However, once you begin running multiple playbooks, everything will start falling into place.
To ensure you’re not left empty-handed, our next step will be to delve into our very first Cisco playbook here. This playbook will enable us to make changes directly on the Cisco switch.