This is the continuation of the last blog article, where we have taken a look at how you can set up redundant IPsec tunnels between two palo alto firewalls with dual ISPs.
So if you have not set up the IPsec tunnels yet, I would suggest you go back to the article here, and set up the IPsec tunnels and come back here.
So the transport has been set up, now it’s time for us to take a look at how you can configure the routing on top of it.
We are going to use BGP routing protocol for the same, and we would configure in a way that the first tunnel will act as primary and the second tunnel will take over when the primary tunnel goes down.
All of the action will happen dynamically using the BGP routing protocol.
As I mentioned in the previous blog, internally we are using OSPF routing protocol, so we would also need to configure the redistribution to BGP, that way both the remote branches will be able to see the internal routes and enable the communication.
How to setup BGP for IPsec tunnels?
For the BGP to establish the neighborship over IPsec tunnels, you need to configure an IP address on the tunnel from which we would manually create the peering.
As we are not routing the peer address to each remote branch and to uniquely identify the IPsec tunnel IP address we are using link local address from 169.254.0.0.
On the California side, we would use 169.254.1.0/30 and in Bangalore we would use 169.254.2.0/30. And we have already configured the same in our previous blog.
And here is the BGP ASN that we are going to use for EACH sites.
California : 64611
Bangalore : 64612
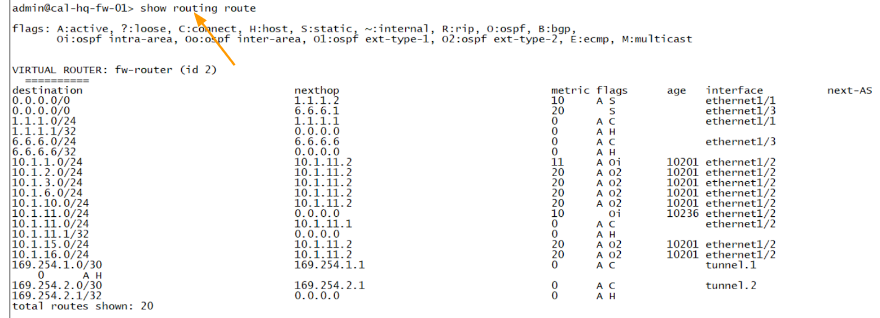
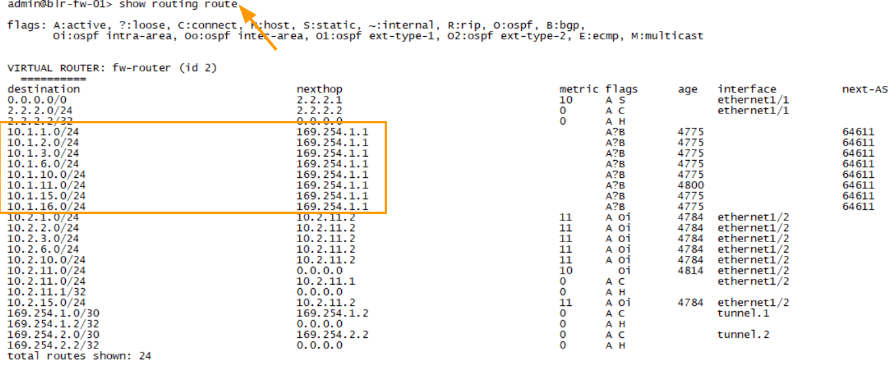
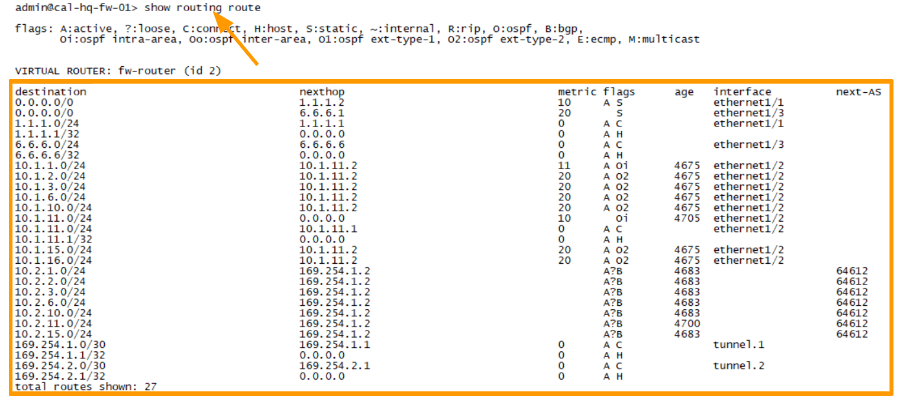
Before we begin with the BGP configuration, it is important to take a look at the current routing table from both the locations.
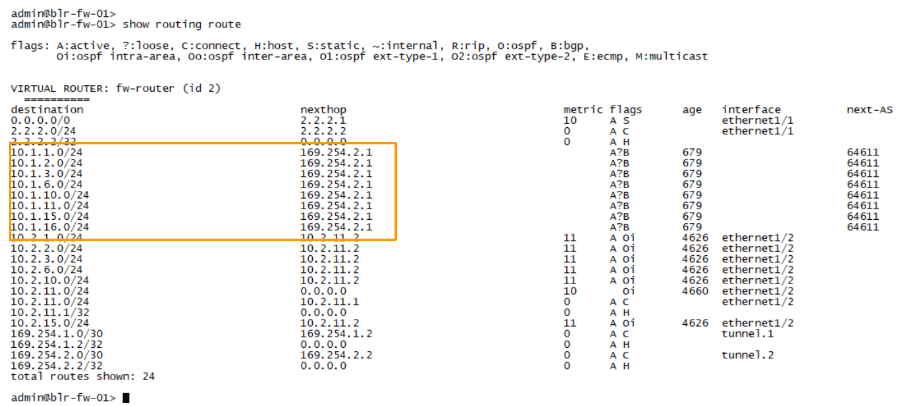
Here is the route table from the Headquarter California firewall, let me explain the routes first.
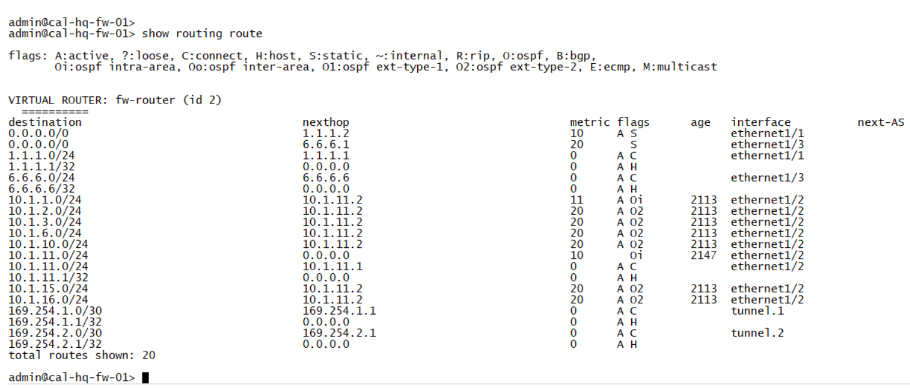

- The first two routes are default routes going to both the ISP’s.where the ethernet1/1 is the preferred route over ethernet1/3 as it has a higher metric. And from 3rd to 6 routes it says it’s part of the local routes of the firewall.
- It has only the internal routes from 10.1.0.0/16 subnet.
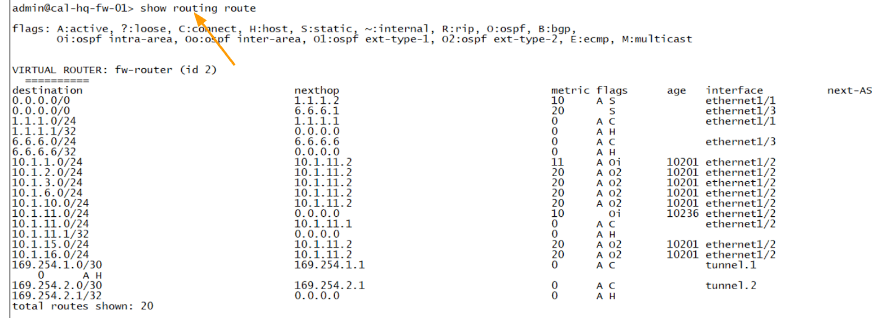
- Finally we have link-local routes in 169.254.1.0/24 which are configured on the tunnel interface. And here is the current routing table at Bangalore.
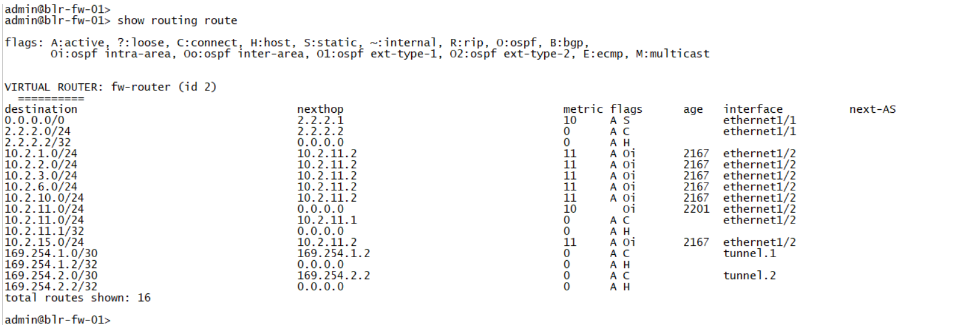
- Same goes with Bangalore site, except we have a single default route towards the internet, because the site is running with single ISP
- Afterwards the route is from inside which falls under the 10.2.0.0/16 subnet.
- And we have a link-local address of 169.254.2.0/30 which we would be using for BGP peering.
Once the BGP configuration is completed successfully, all routes from both branches should be visible at each site.
Before you start to proceed with the BGP configuration, it is important to ensure that the IPsec tunnel at both sides is up.
We made sure it was up in our previous blog, so we should be good.
Configure the BGP on both the IPsec tunnels at the headquarters.
We can configure the BGP on Palo Alto by going into Network-> Virtual Routes
Click on the virtual router
A new virtual router configuration window now pops up.
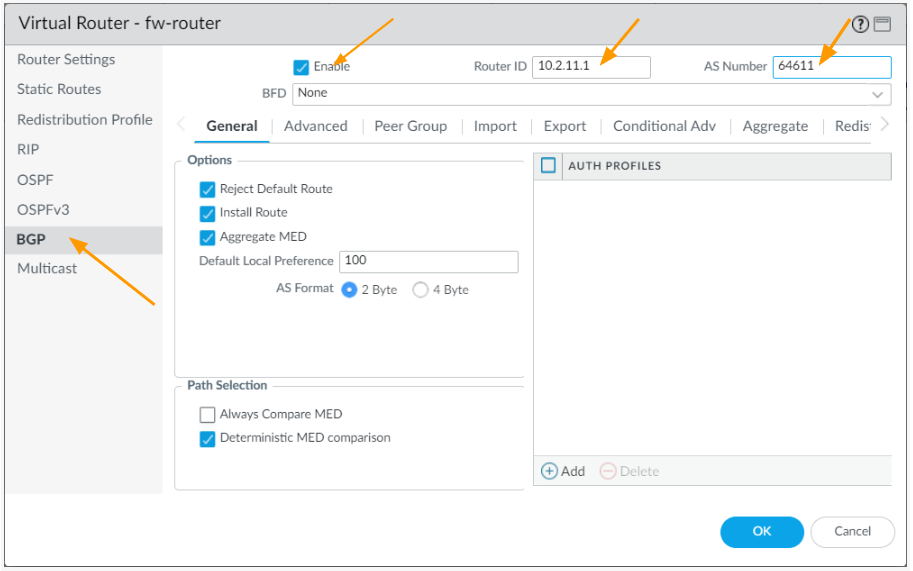
Enable BGP
CLick on BGP on the left pane.
In the Main BGP configuration window.
- Check the enable option.
- Router ID: 10.2.11.1 – You may choose your own router id.
- As Number: 64611
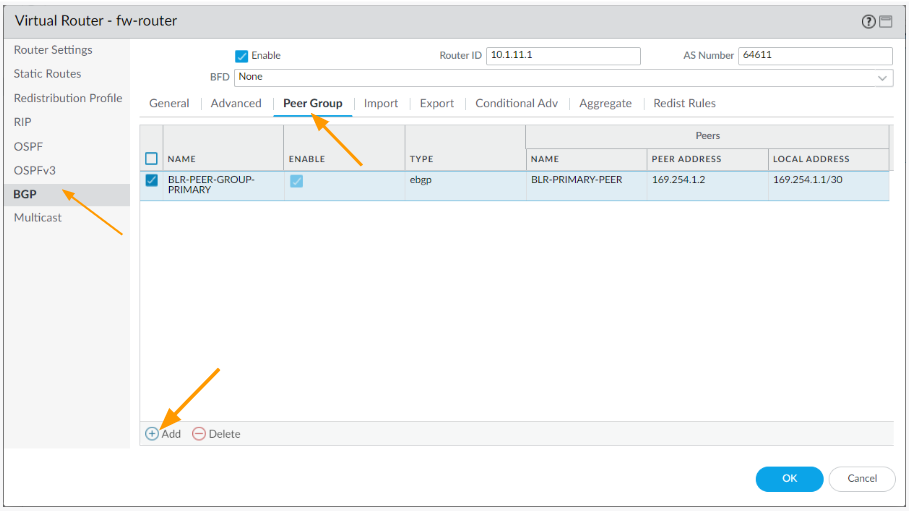
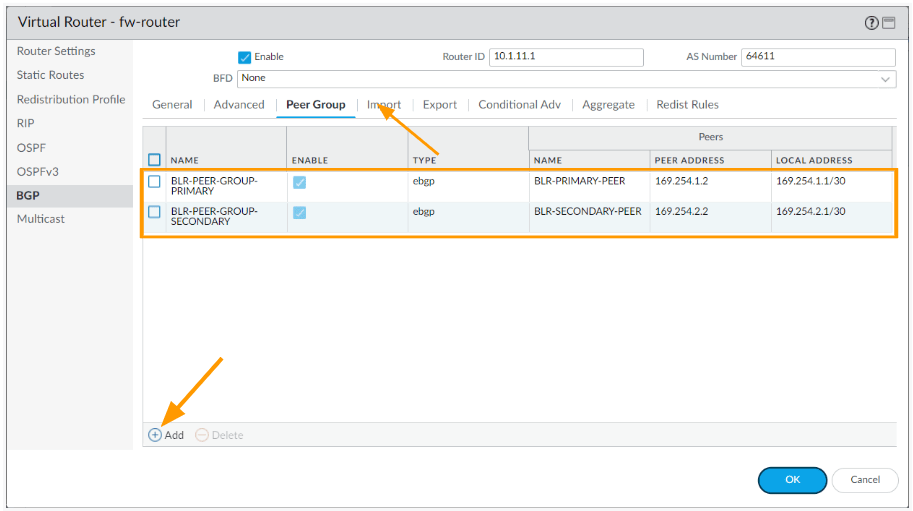
Leave everything else to default and click on the Peer Group tab.

Configure BGP peering.
We would have to create two BGP peering through the IPsec tunnels. One will be, primary and the other would be secondary.
So, let’s start with the primary BGP peering.
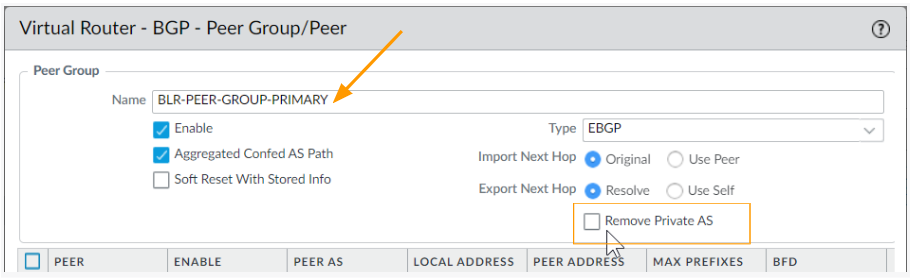
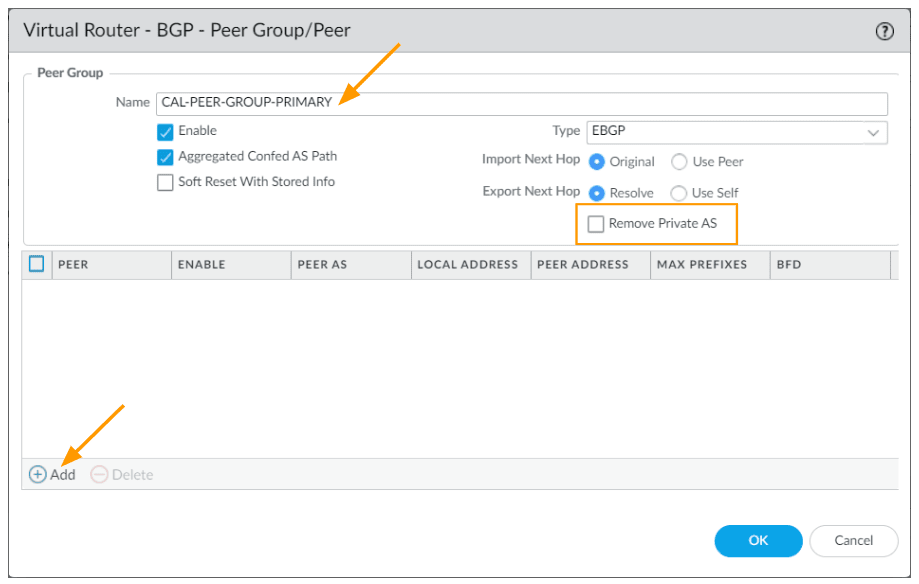
Configure the Primary BGP peer group.
In the peer group, click on Add.
In the new window.
Name: BLR-PEER-GROUP-PRIMARY
Uncheck the option that says Remove Private AS – As we are using the private ASN range.

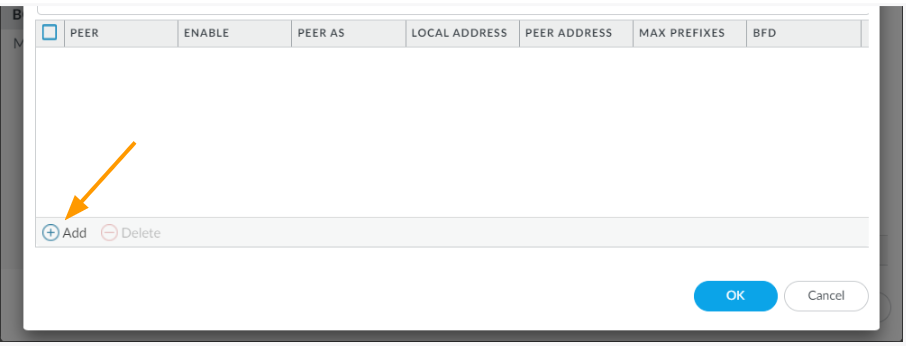
Click on Add to add each neighbour.

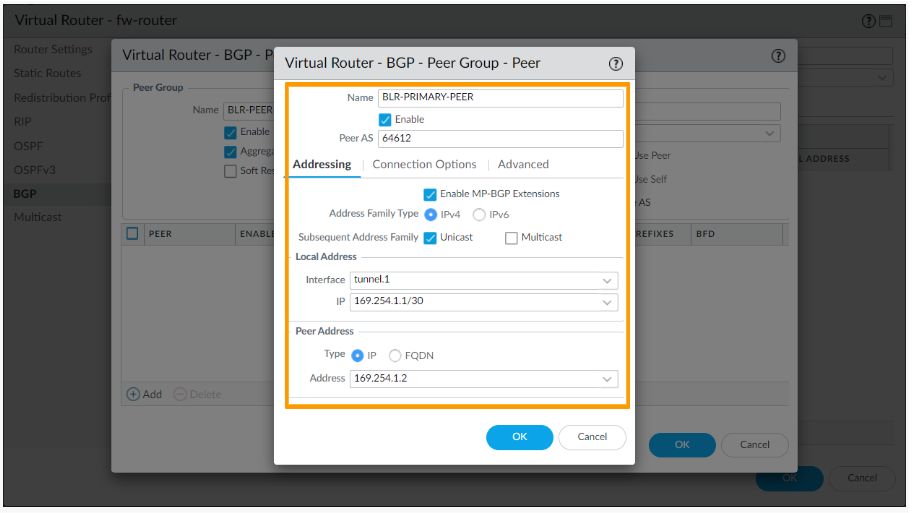
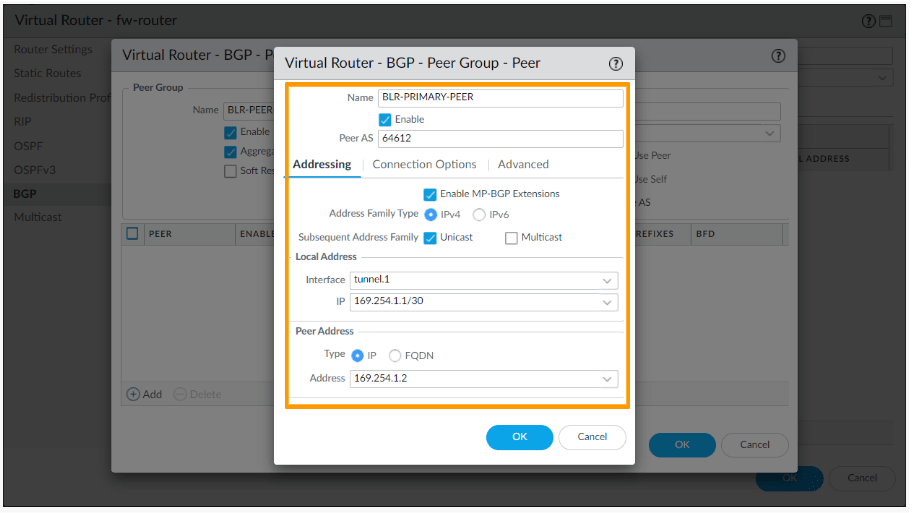
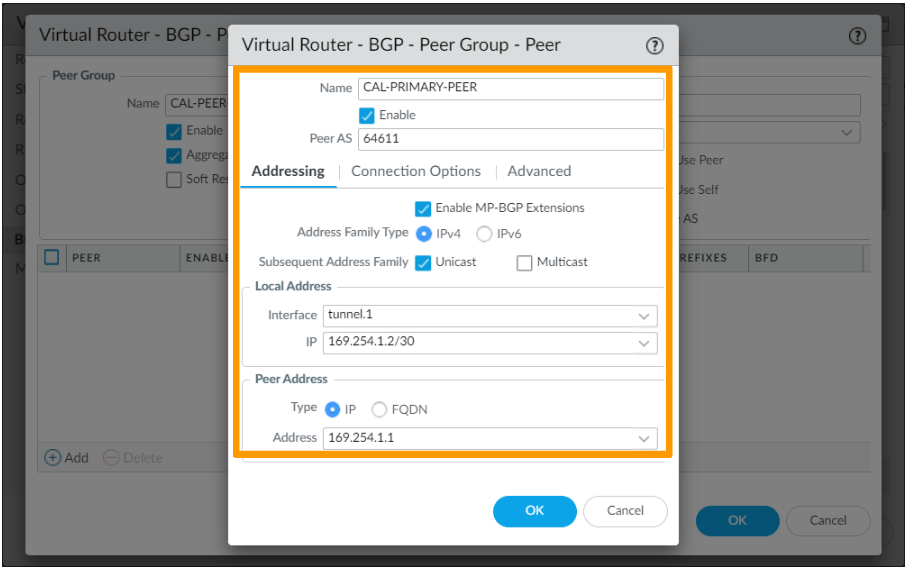
In the new window, add as below.
Name: BLR-PRIMARY-PEER
Check the enable option.
Peer AS: 64612 – This is the remote ASN that we reserved.
Addressing:
- Enable MP-BGP Extensions.
- Local Address:
- Interface : Tunnel.1 – This is the primary tunnel.
- IP : 169.254.1.1/30 – Choose the IP from the drop down.
- Peer Address:
- Type: IP
- Address: 169.254.1.2 – the next available IP.
And click on Ok.
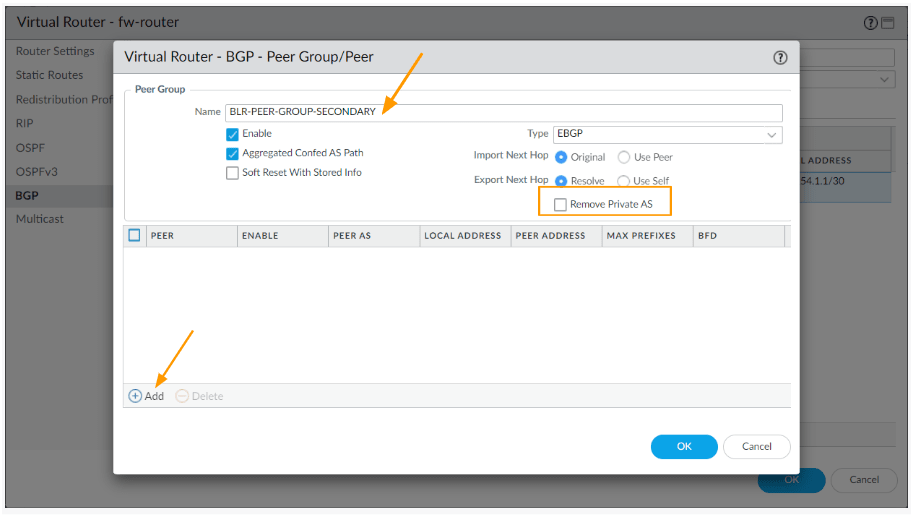
Configure the Secondary BGP peer group.
Go back to the virtual router window – BGP-> peer group.
In the virtual router – peer group tab click on Add again.
Click on Add to add the secondary BGP peer.

In the new window configure as follows.
Name: BLR-PEER-GROUP-SECONDARY
Uncheck the option: Remove Private AS.
Click on Add under peer.

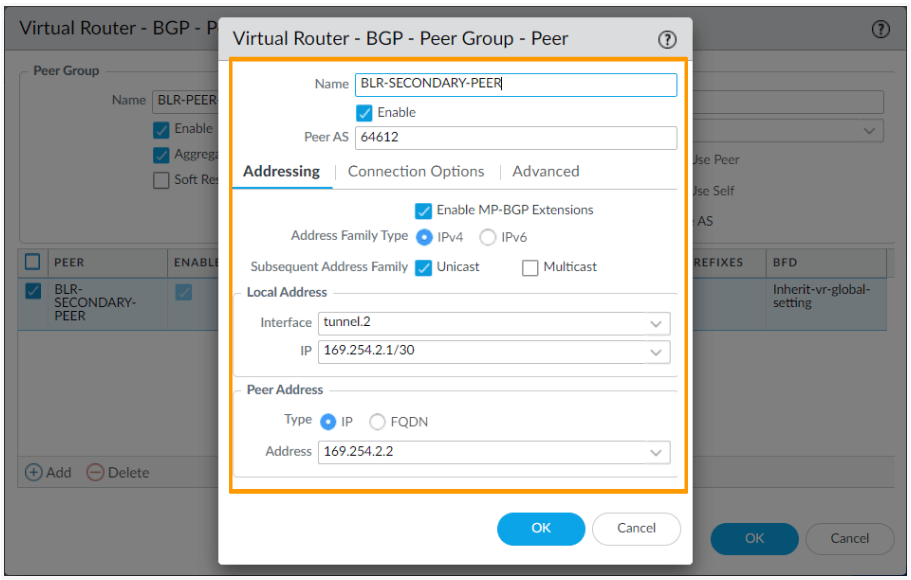
In the new peering window add as follows.
- Name: BLR-SECONDARY-PEER
- Check enable Option.
- Peer AS: 64612
- Addressing:
- Enable MP-BGP Extensions and leave the default setting.
- Local Address:
- Interface: choose the secondary tunnel interface
- IP : CHoose the IP from the drop down.
- Peer Address : Enter the second IP address from the range which is 169.254.2.2 and then click on OK.

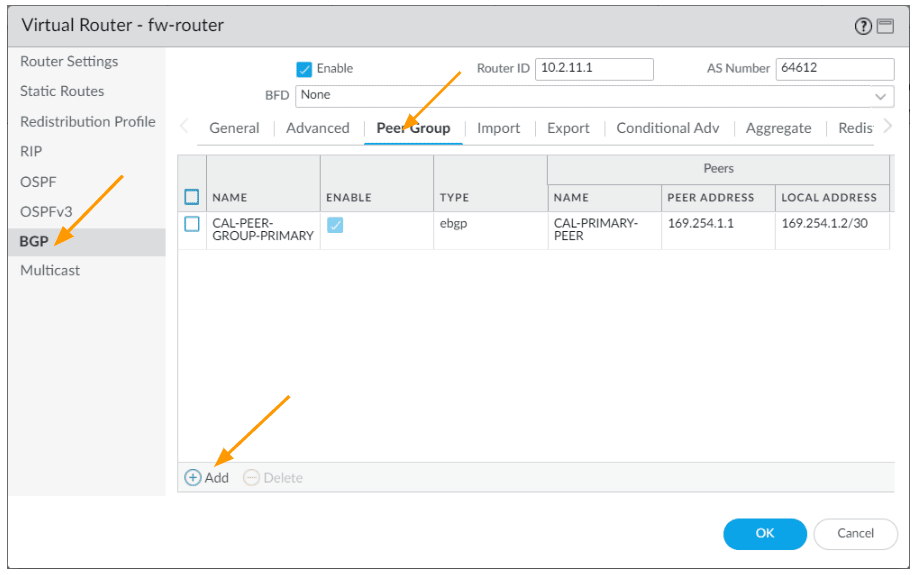
And ok on the Virtual Router-BGP-PeerGroup/Peer window, it will take you back to the virtual router screen.
You can now see, two peer groups are configured.

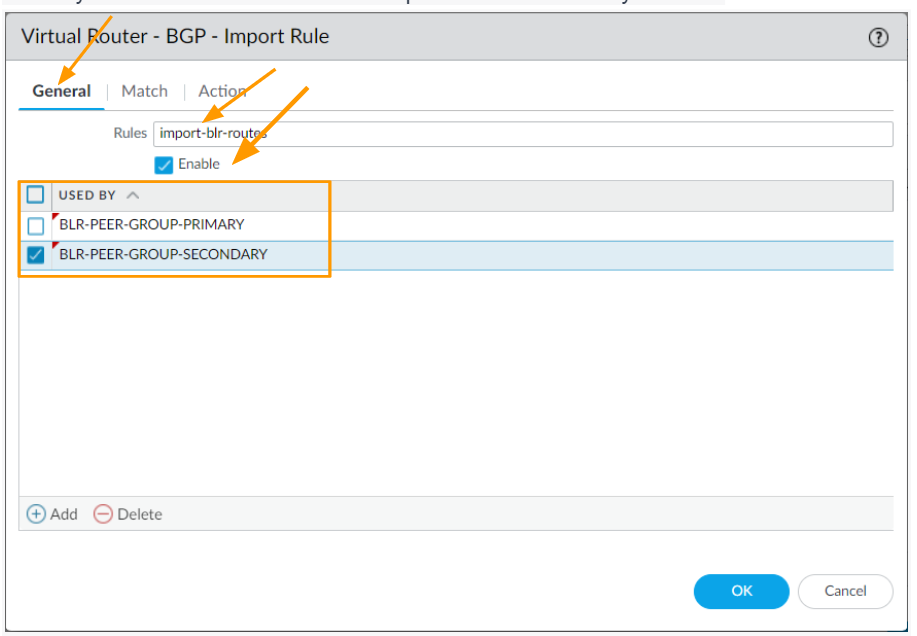
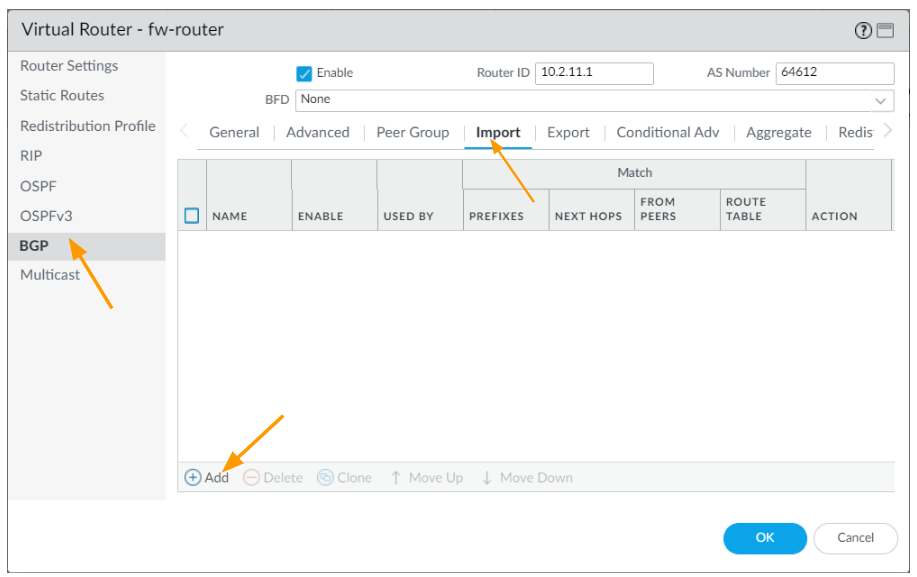
Accept the routes from remote
Once the BGP is established, we want to filter only the routes we want from remote.
While on the BGP configuration page, Click on import tab-> and Add.
In the import rule
Rules: import-blr-routes
Check the enable option.
Used by: Click on Add to add both the peers that we already created.

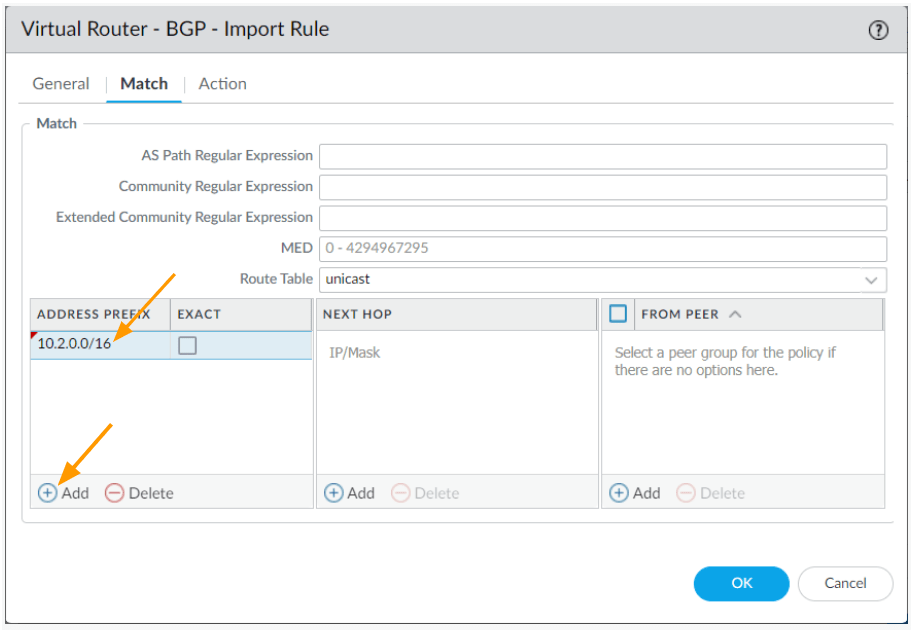
Click on the Match tab.
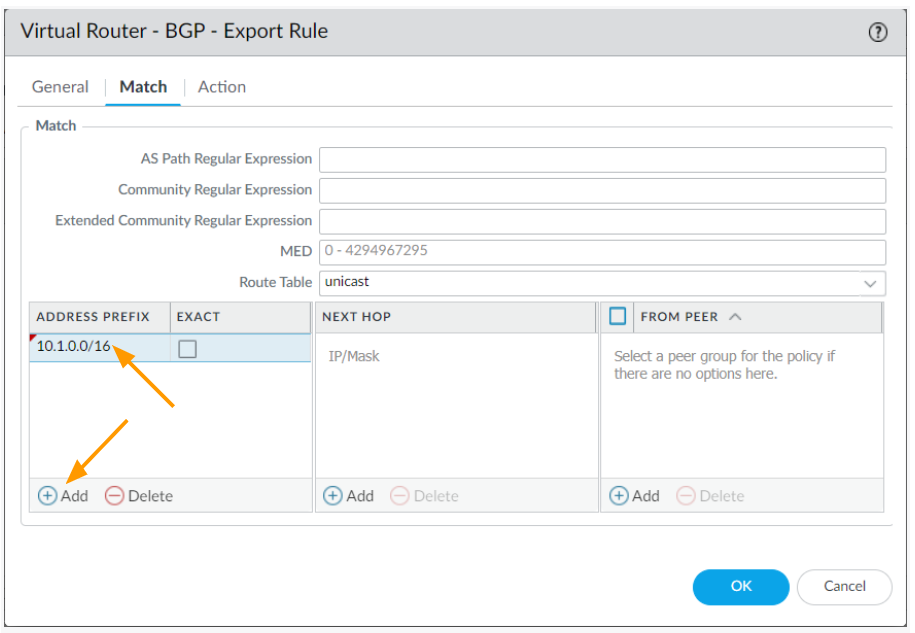
Under Address prefix, click on Add.
Enter the subnet 10.2.0.0/16 as the subnet, we are not using exact as we would be getting small subnets from the remote, not exact 10.2.0.0/16.
And click on Ok.

Export the California routes with BGP AS Prepend.
Like we imported the routes from the remote branch, we are also going to filter and export the California local routes to remote branch Bangalore.
Here is the important part, while exporting the routes to the remote location via primary tunnel, we would just send the prefix without modifying any other parameters.
However, on the secondary tunnel, we would do AS prepend, that way when the Bangalore sites receive the routes.
It will have two routes from California , one with a single asn of 64611, and other with AS prepended of 2 ASN.
So only the routes with single ASN will be in the BLR routing table, and the backup routes will have as prepended, in the event of primary BGP goes down the secondary route with as prepend will take over.
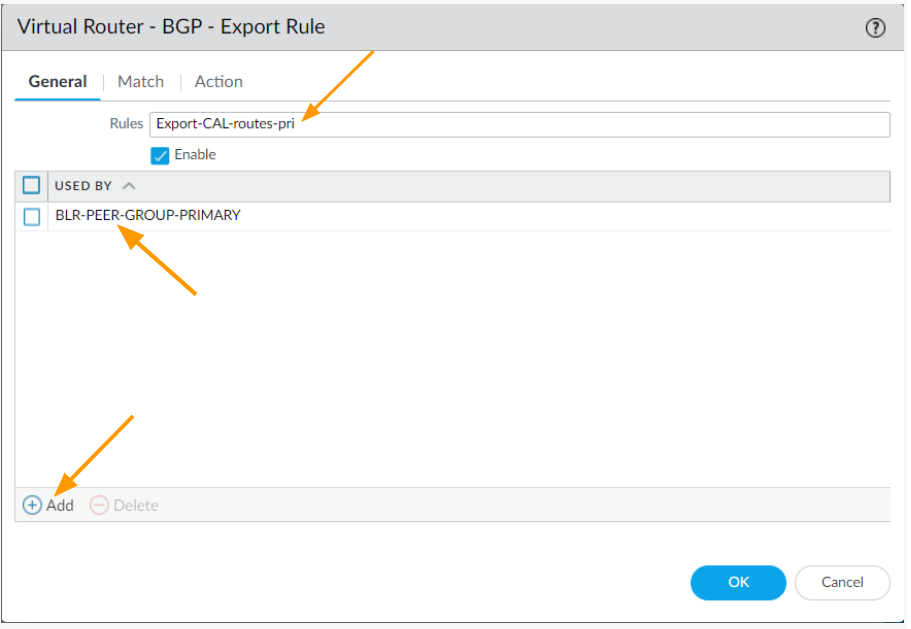
Export the prefix to the primary tunnel.
You may click on the Export tab.
And click on Add.
General
Rules: Export-CAL-routes-pri
Click on Add under Used by, and add BLR-PEER-GROUP-PRIMARY
Click on Match.

In the match tab
Add 10.1.0.0/16 (our local route)as address prefix and click on OK.

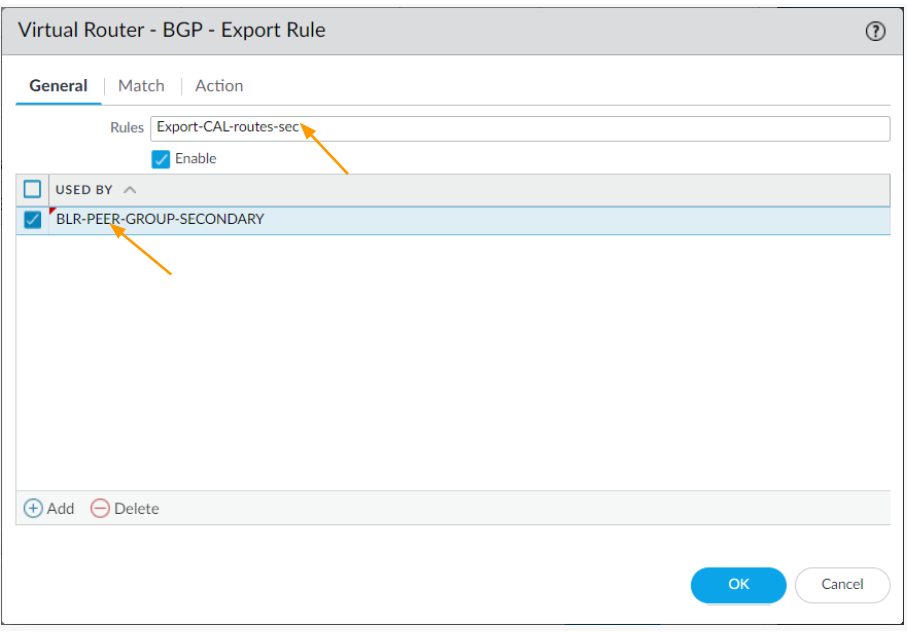
Export the prefix to the secondary tunnel.
In the same export tab click on Add again.
Rules: Export-CAL-routes-sec
Used By: BLR-PEER-GROUP-SECONDARY
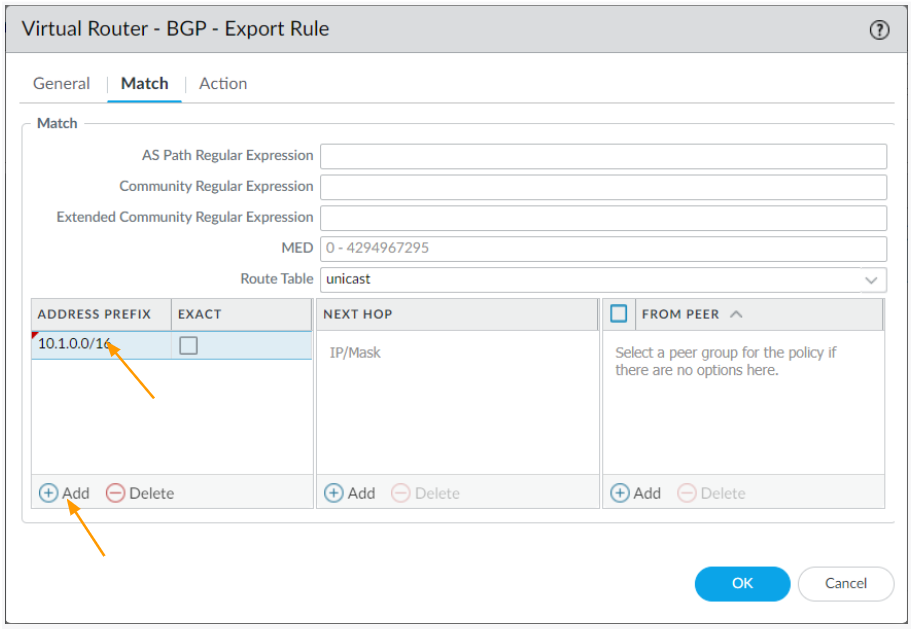
Click on the Match tab.

In the match window, click on Add under Address Prefix.
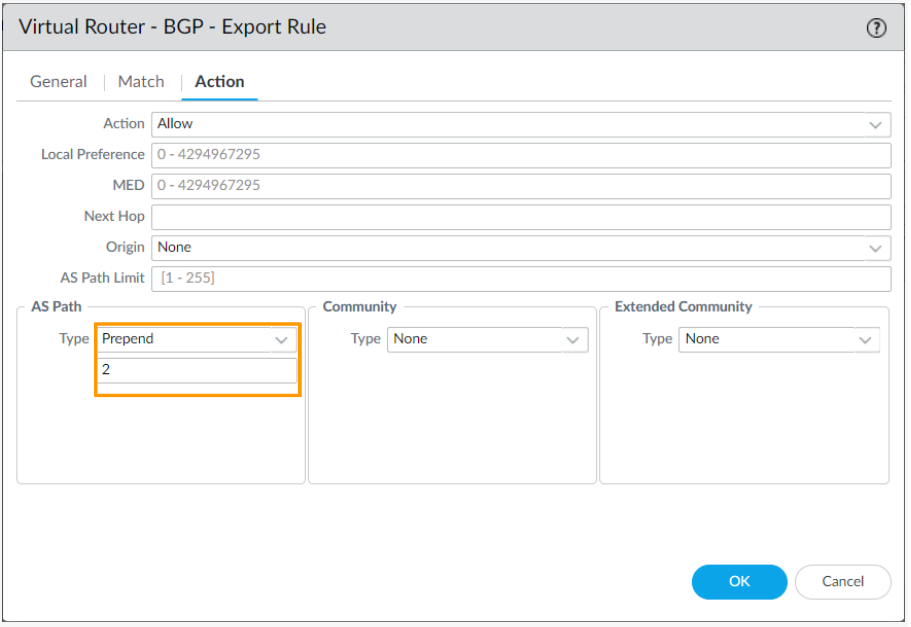
After that click on Action.

Configure the AS-PATH prepend.
In the actions tab, under AS Path;
Type: Prepend and number 2, which means, the ASN will be prepended twice.

You now will have two BGP export rules, verify the same.
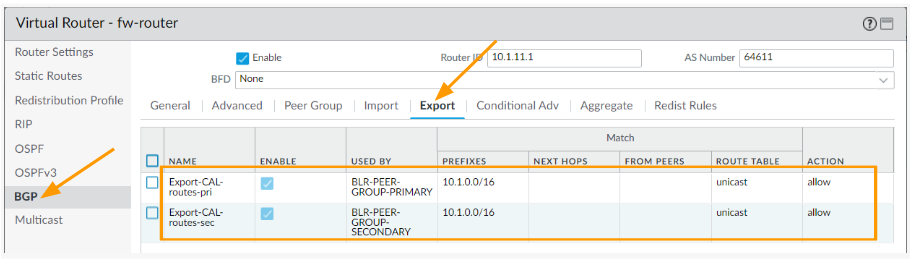
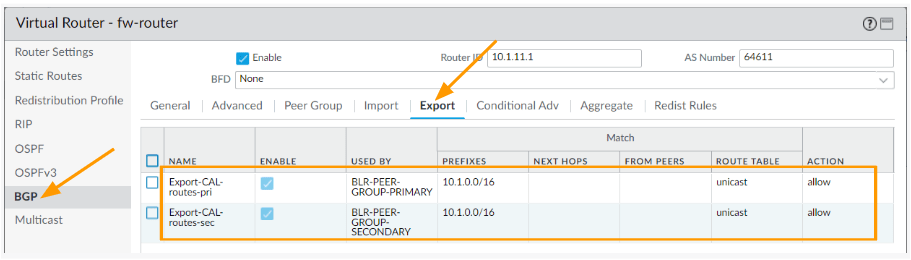
Click on OK and commit the changes.
Configure the BGP on both IPsec in the remote branch.
We have configured the BGP on the California firewall, let’s now move on to the Bangalore firewall to configure the BGP.
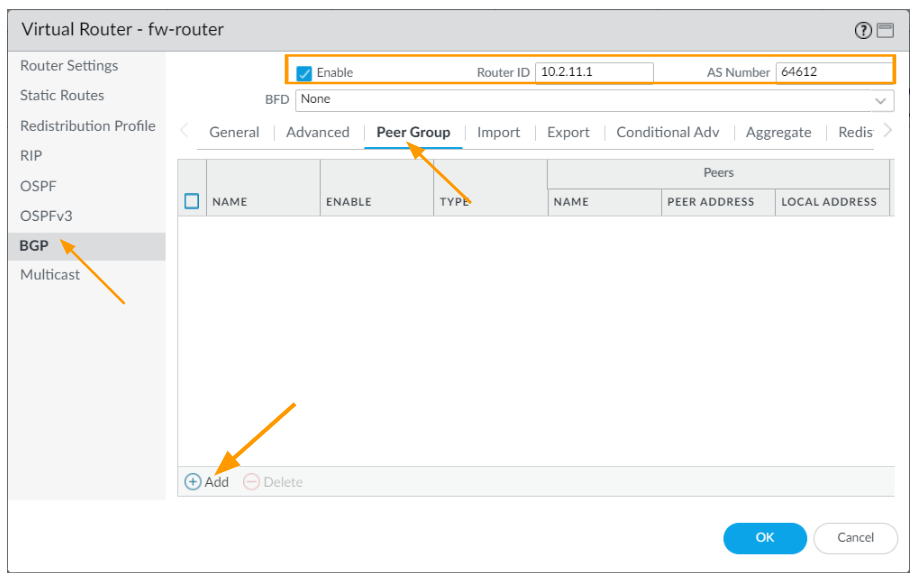
Enable the BGP on Palo Alto.
Click on Network -> Virtual Routes -> click on Add.
In the new window, choose BGP.
- Check the enable option.
- Router ID: 10.2.11.1 or router id of your choice.
- AS number: 64612
Click on Peer group and click on Add.

Configure the Primary Peer group.
Click on the peer-group in BGP configuration window.
Under peer group;
Click on Add.
In the new window add;
Name: CAL-PEER-GROUP-PRIMARY
Uncheck the option, Remove Private AS.
Click on Add under peer.
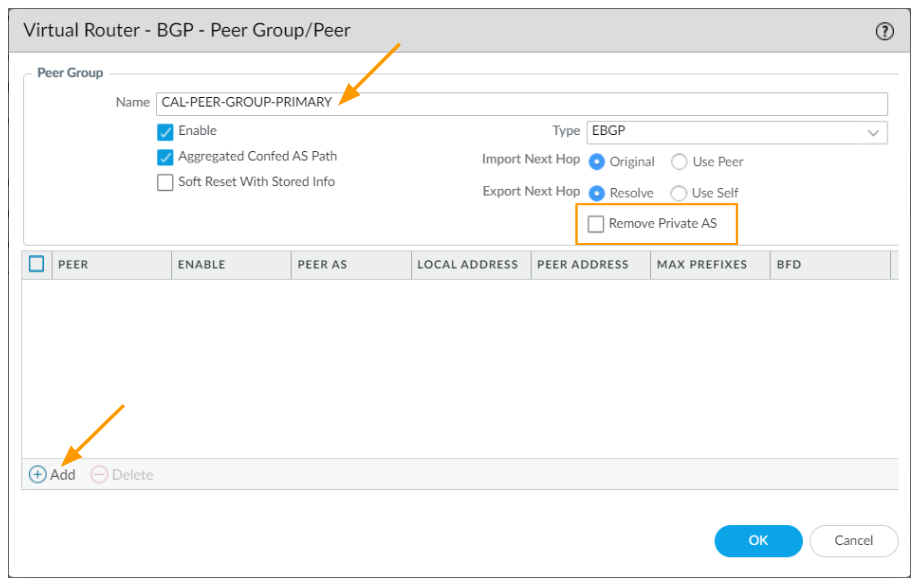
In the BGP peer window.
Name: CAL-PRIMARY-PEER
Check ENable option.
PeerAS: 64611
Address:
Enable MP-BGP Extension.
Local ADdress:
Interface: tunnel.1
IP: choose the tunnel.1 IP from the drop down.
Peer address:
Type: IP
Address: 169.254.1.1
And click on Ok.
And Ok again on the peer screen.
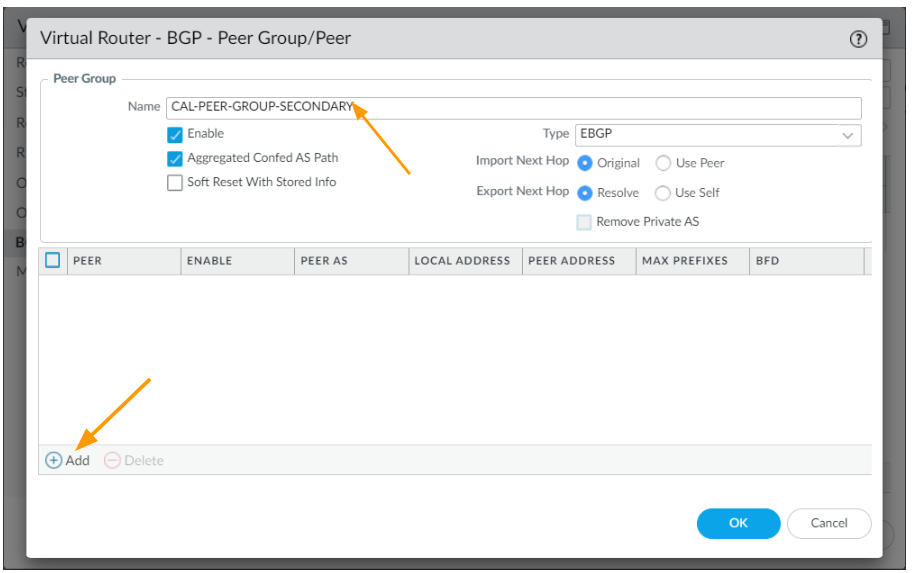
Add the Secondary BGP peer.
Get back to the virtual router screen -> BGP-> Peer Group.
Click on Add again in the BGP peer Group.

In the new peer group window, configure as follows.
Name: CAL-PEER-GROUP-SECONDARY
Leave everything else default and click on Add.

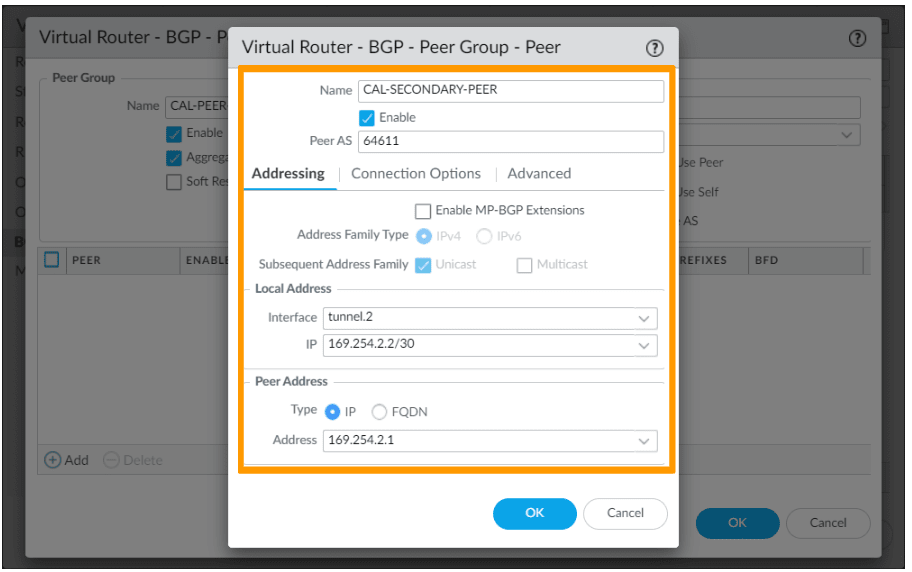
In the new peer window.
Add as follows:
Name: CAL-SECONDARY-PEER
Check the enable option.
Peer AS: 64611
Address:
Enable MP-BGP Exteions.
Local Address:
Interface: tunnel.2
IP: 169.254.2.2/30
Peer Address:
Type: IP
Address: 169.254.2.1
Click on ok. And ok on the peer screen.

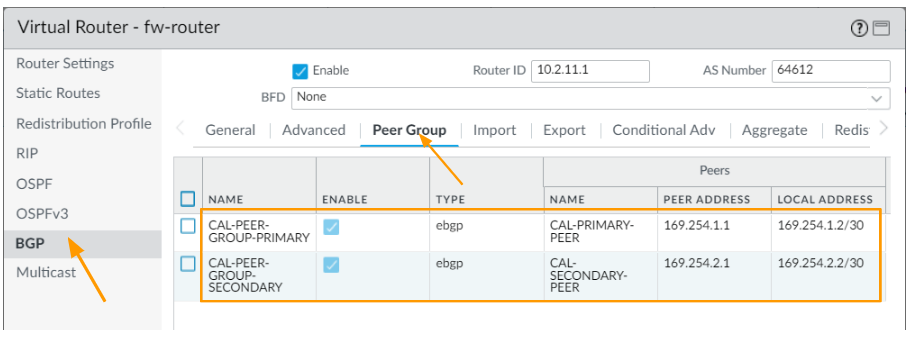
You now will have two peer group, one is primary and the other one is secondary.
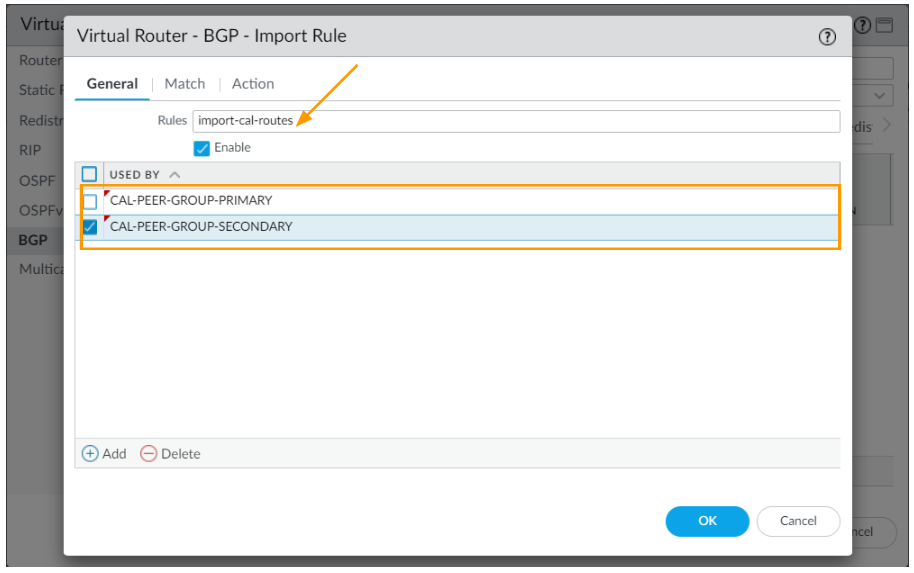
Now click on Import tab

and click on add to filter and accept the prefix from california.

In the new window
Add two peer group like we did before
Rule: import-cal-routes
Used by: Choose both the peers
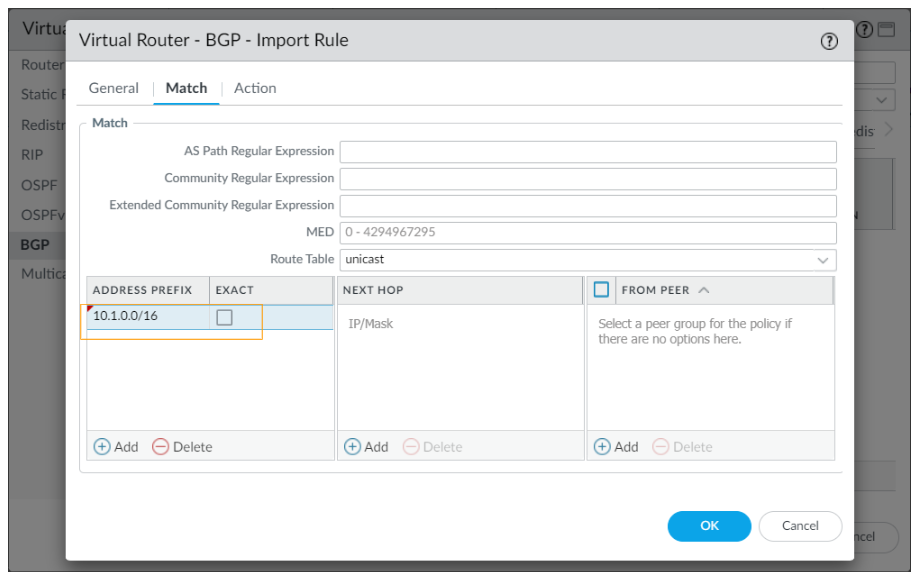
Click on Match tab.

Matching the Address prefix 10.1.0.0/16

Click on the Export tab.
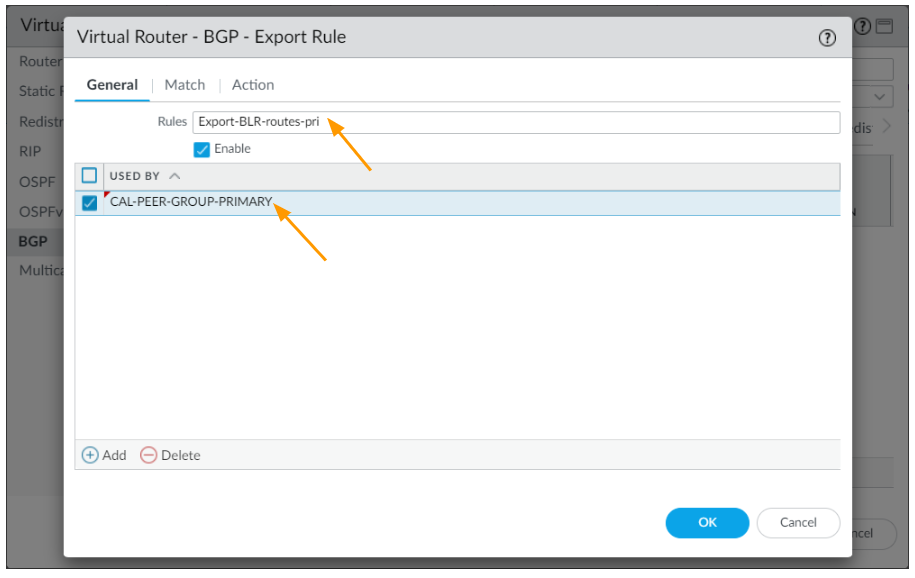
Click on Add to add Primary export rule.


In the export tab,
Rules: Export-BLR-routes-pri
Used by: CAL-PEER-GROUP-PRIMARY

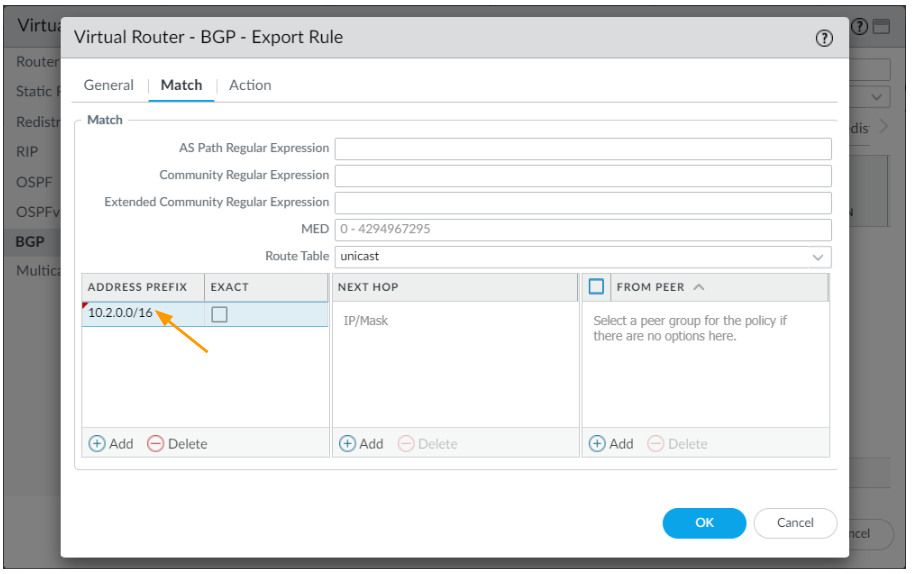
Click on Match, and add the Bangalore subnet 10.2.0.0/16 as the export address prefix and click on Ok.

Click on Add again to add a secondary export rule.
In the new export rule;
Rules: Export-BLR-routes-sec
Used By: Choose CAL-PEER-GROUP-SECONDARY
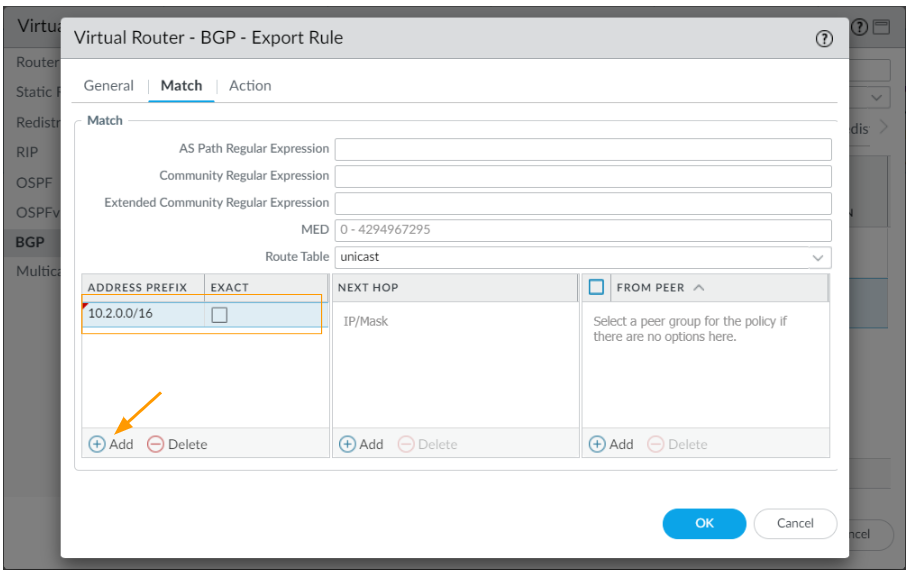
Click on Match to add the prefix.
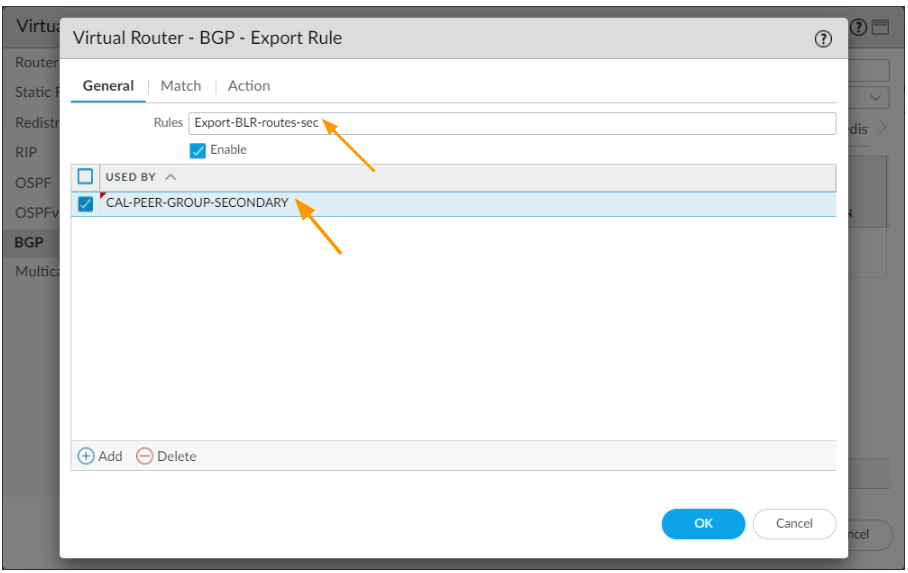

Under Address Prefix add the Bangalore subnet 10.2.0.0/16
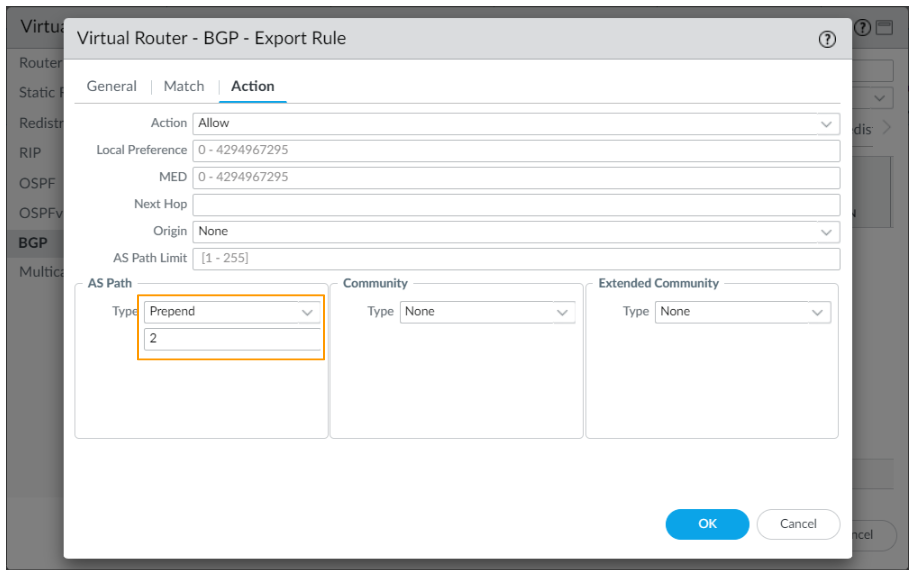
You may now click on Action

BGP AS Prepend on the remote branch.
In the action tab, Under AS path, choose prepend and enter number 2 and click on Ok.

Commit the changes.
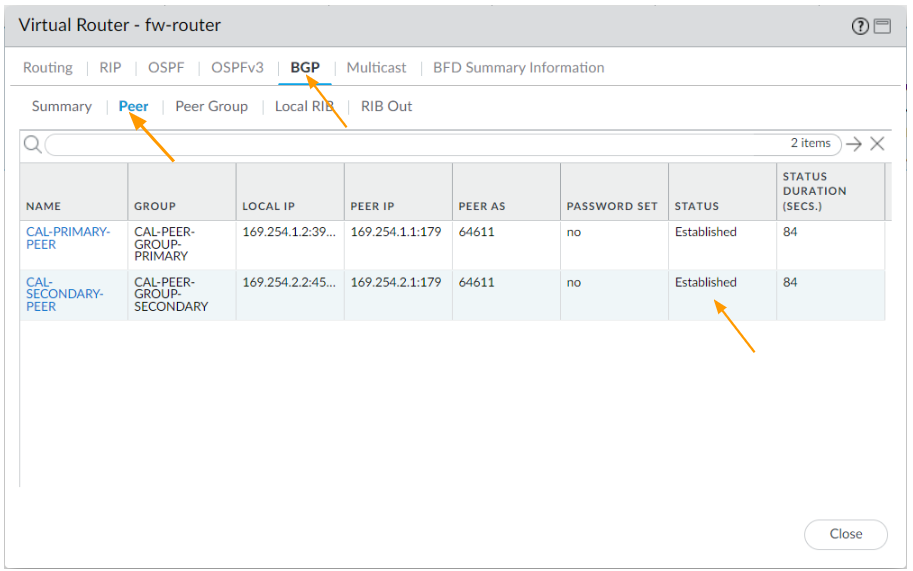
Check the BGP status.
We now configured the BGP successfully, and after the commit you should now able to see BGP gets established.
Check the BGP Status
You can now goto Network-> Virtual Routes-> in the right side click on More Runtime stats in the virtual router.


Click on BGP tab, and click on Peer tab, where you can see the BGP is now established, which is good.

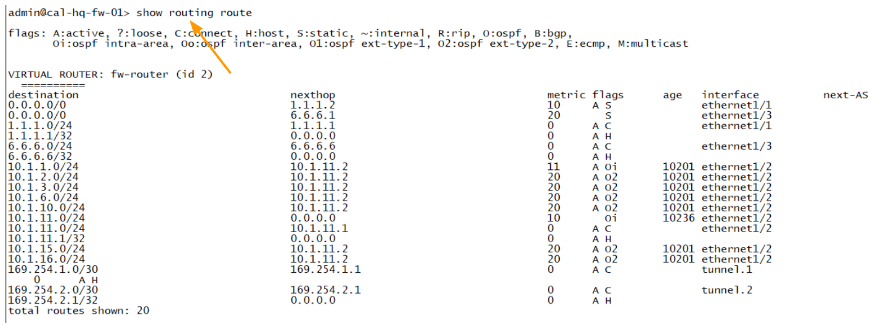
Let’s check the routing table.
To see the routing table in Palo Alto CLI, you can type the command show routing route.
As you can see, there is no change in the routing table, it is exactly the same as before.
California .
Bangalore.

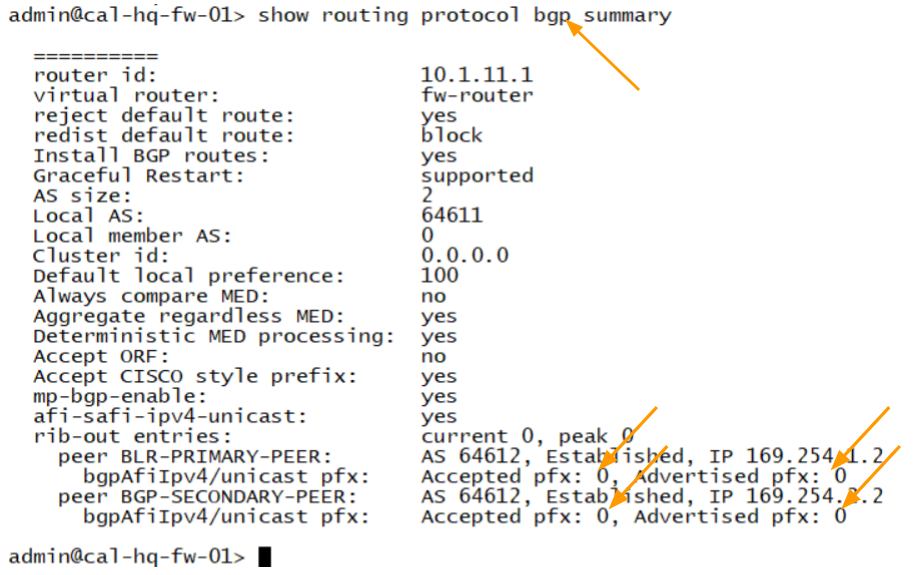
Lets also look at the BGP summary table
Let’s confirm the BGP route exchange from the BGP summary table.
To see the BGP status on the CLI, you can type show routing protocol bgp summary.the BGP peering is established to both the neighbour, however if you look closely, you would see the advertised prefix and the accepted prefix are 0.


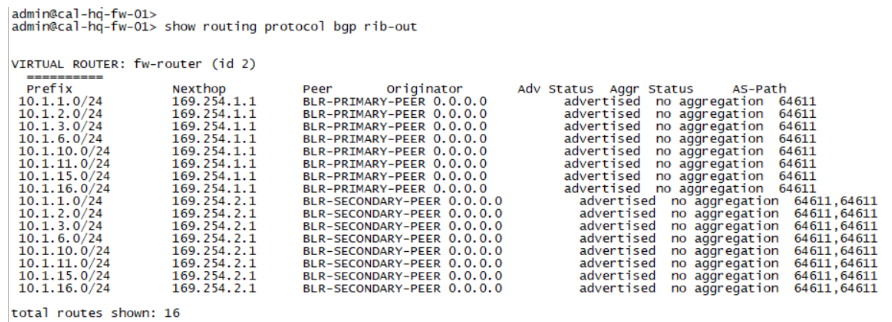
We can also look at the received routes and advertised routes from each side.
California .
You can run the command show routing protocol bgp rib-out peer BLR-PRIMARY-PEER
And for the second peer
show routing protocol bgp rib-out peer BLR-SECONDARY-PEER
As you can see, we are neither sending and route to remote nor from the remote.
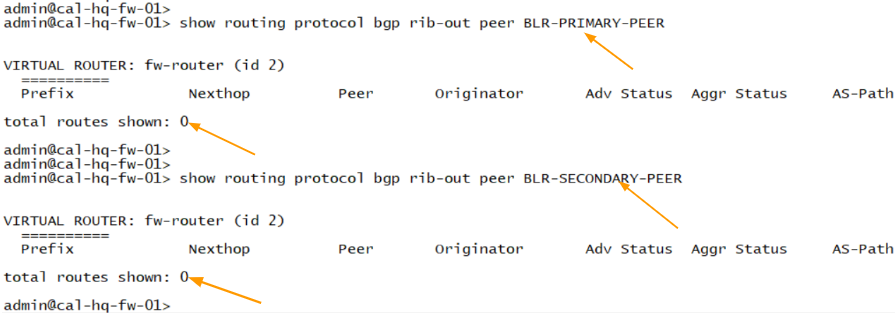
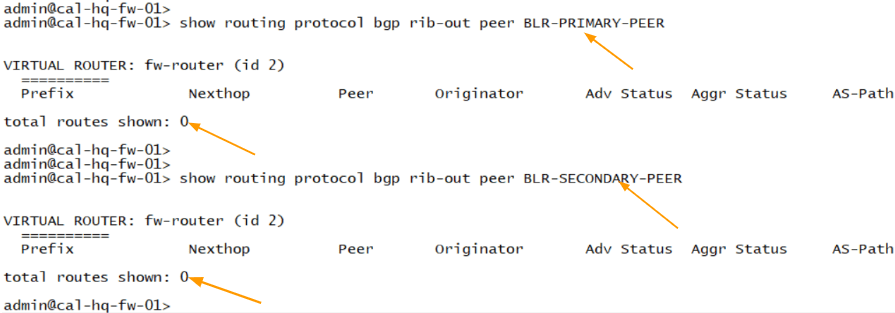
Which means no routes are exchanged, but why is that so?
what’s really happening is that, if you remember correctly, internally we use OSPF as the routing protocol and on the IPsec tunnel we use BGP, so for the OSPF routes to show up in the BGP routing table, we have to redistribute the OSPF route to the BGP, which we have not done yet.
Lets go ahead and fix that now.
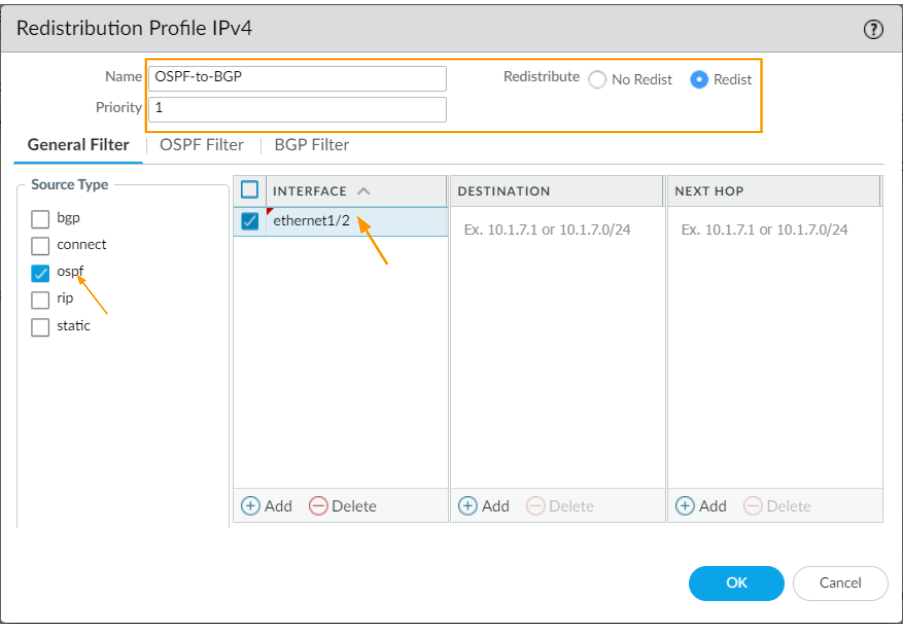
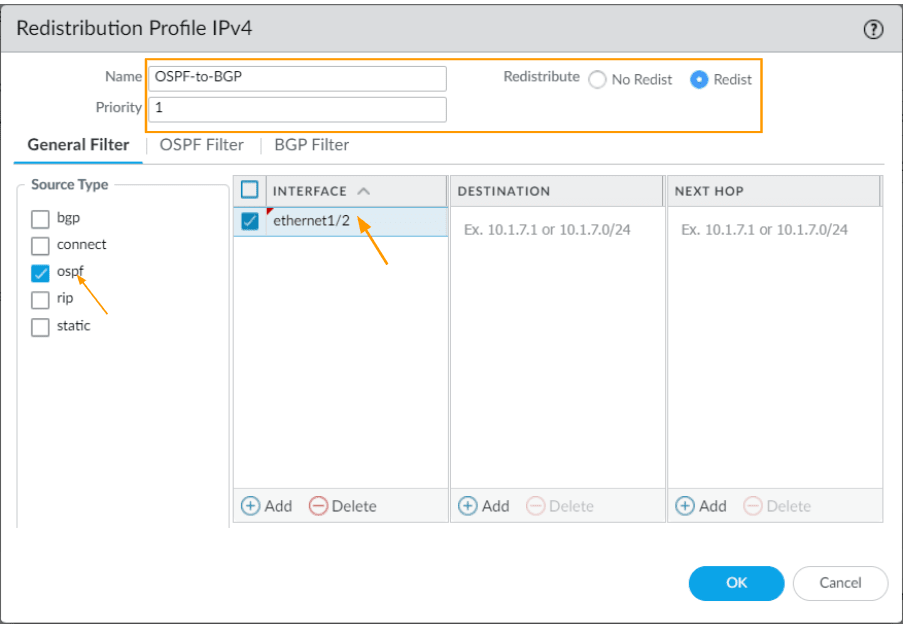
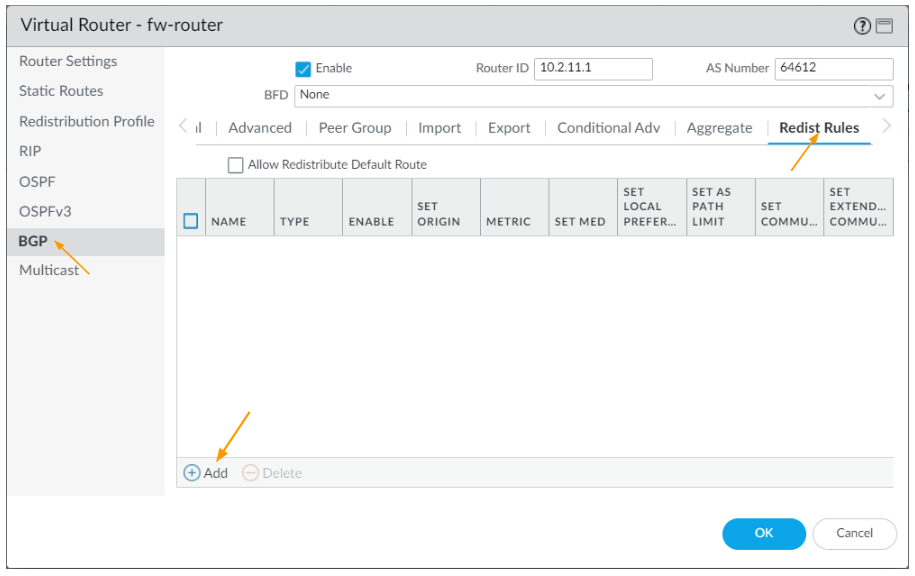
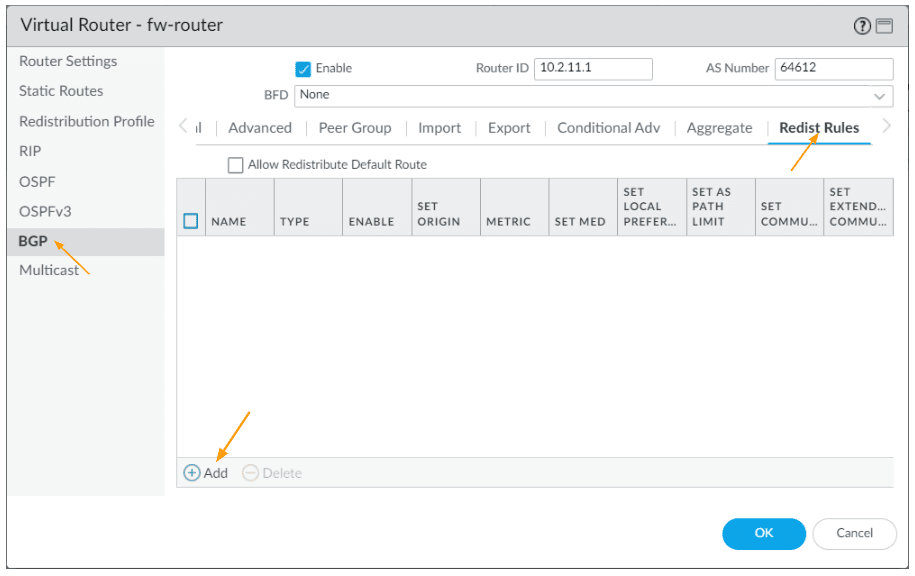
Redistribute OSPF to BGP.
The following changes, you have to do it on both ends.
Goto Network- > Virtual routes-> Click on the virtual router.
Click on Redistribution Profile on the left pane. And click on Add.
Name: OSPF-to-BGP.
Priority: 1
Redistribute: Enable Redist.
Source Type:OSPF
Interface: Inside interface of the firewall, which ethernet1/2 in our case and click on Ok.
Call the redistribution profile to BGP.
We created the redistribution profile, lets now call that into the BGP configurations.
Go back to the BGP section of the virtual router, and click on the Redistribution tab.
Click on Add.
In the new window.
Choose the address family type : IPv4
Name: Choose the OSPF redistribution profile from the drop down.
Route table: Unicast, and check enable option and then click on Ok.

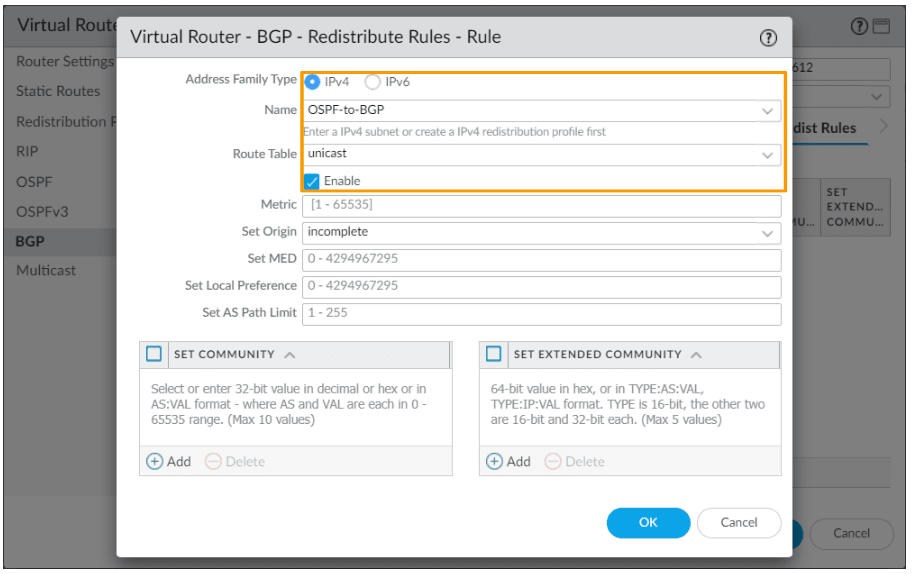
Commit the changes on both sides.
Test the routes and connectivity.
We have redistributed the OSPF internal routes now to BGP, let’s go ahead and verify the same.
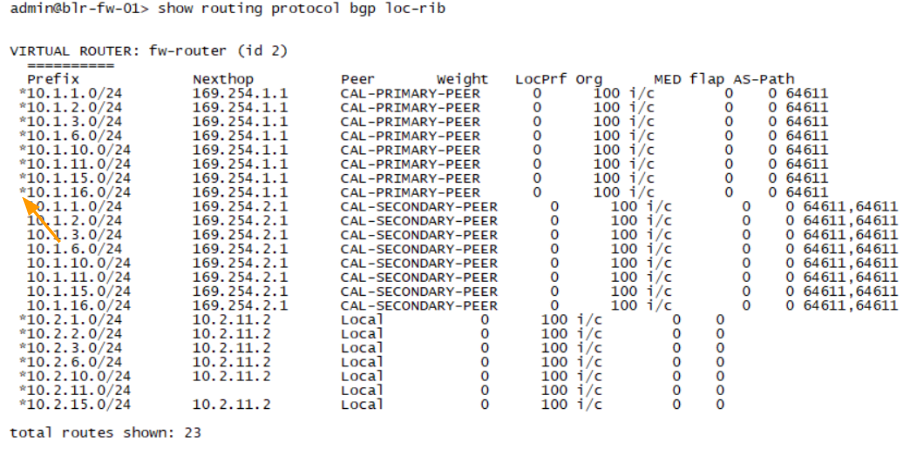
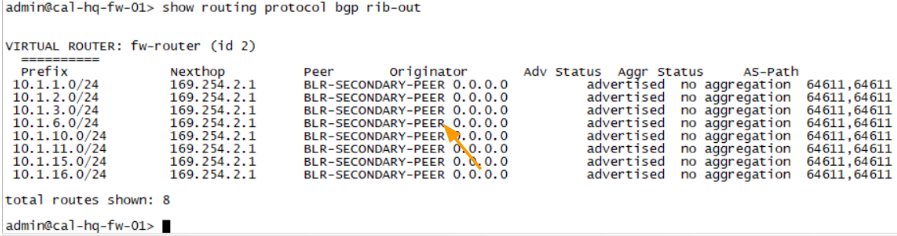
As you can see, in the California BGP route table, we are sending the route 10.1.0.0/16 range via primary tunnel with single asn.
However on the secondary tunnel it has multiple ASN.
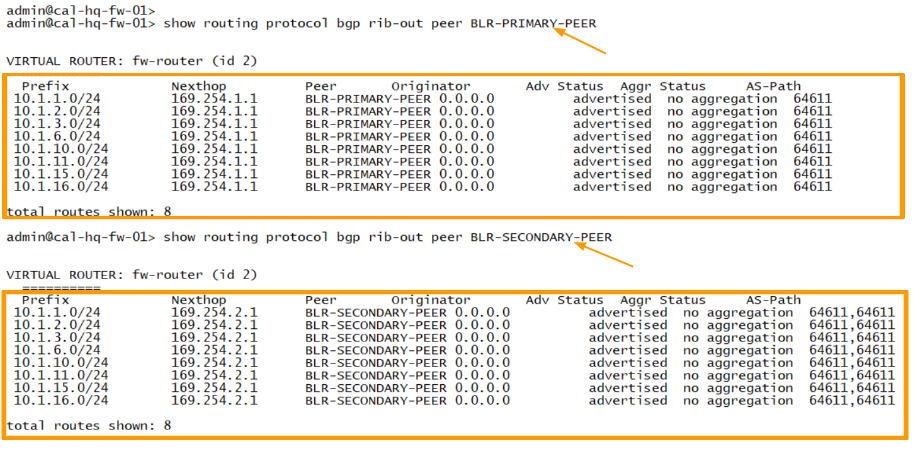

So the routes with single asn will be in the routing table of Bangalore firewall..
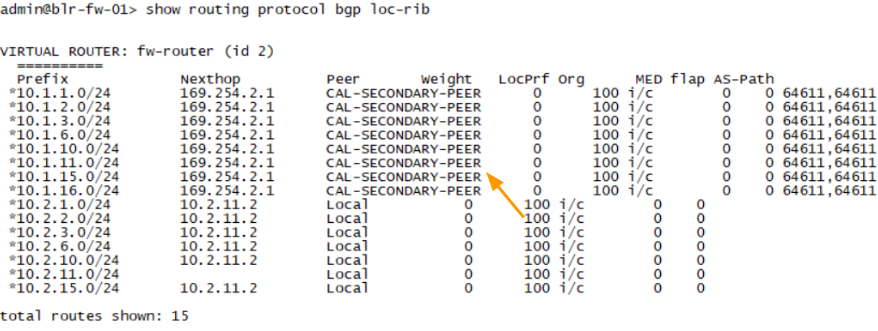
As you can see from the Bangalore route table.
Take a look at the Next hop, which is the primary tunnel interface 169.254.1.1, meaning from california if you would like to go to 10.1.0.0/16 you can take the primary tunnel path.

The same goes with the Bangalore site as well.
Here are the routes that I am sending to the IP sec primary and secondary peer from the Bangalore firewall. One with a single ASN and the other with with AS prepended.


In the routing table, you can see the routes, where to get to 10.2.0.0/16 it says to take the primary tunnel, that has an IP address 169.254.1.2.

Verify the connectivity.
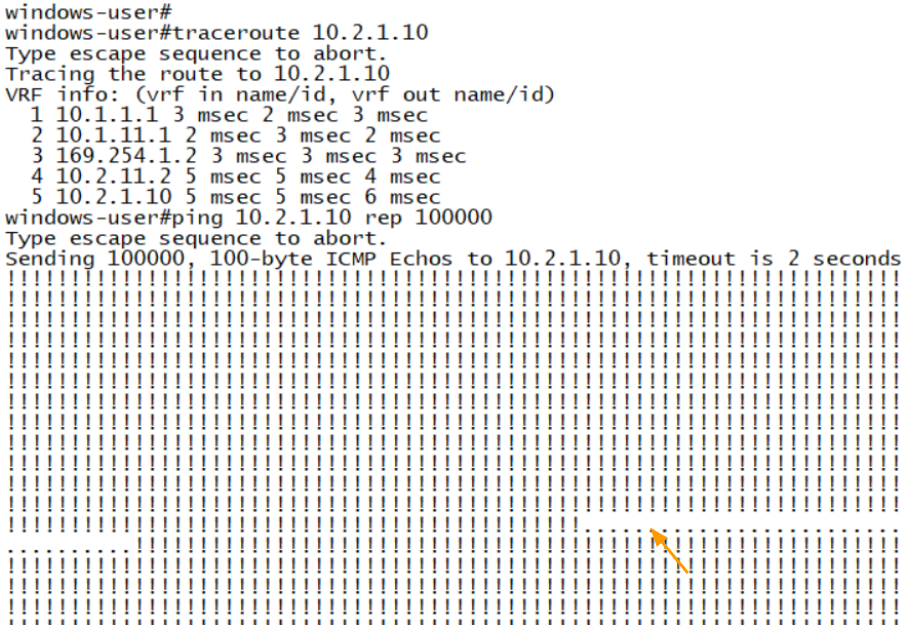
From the routing perspective everything looks good, lets now verify the connectivity by pinging from each side.
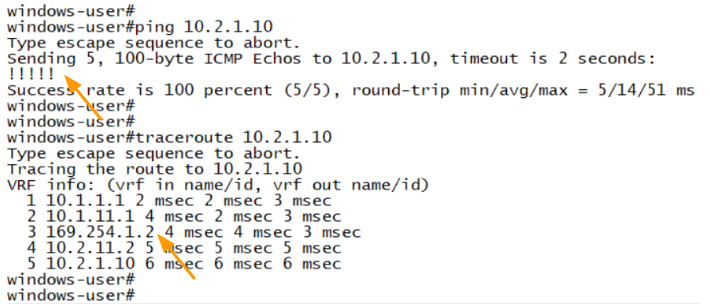
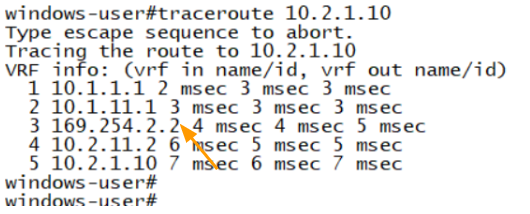
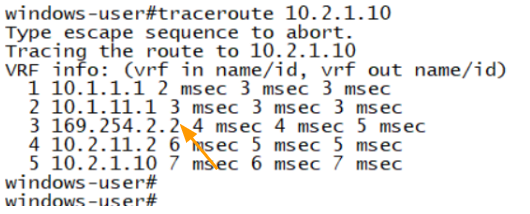
In one of the hosts from California , let’s ping the Bangalore host, as you can see, I am getting a response.
And the traceroute says it is taking the primary path ip, which 169.254.1.2 , the 3rd octet 1 represents IPsec primary Tunnel.

California.
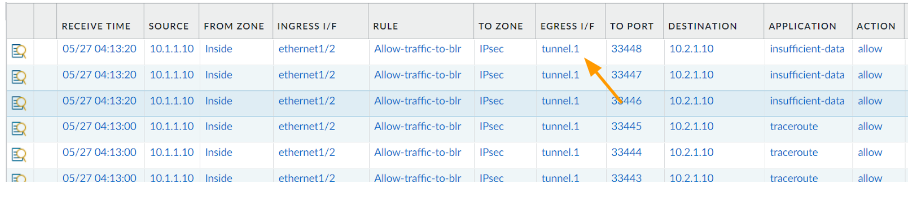
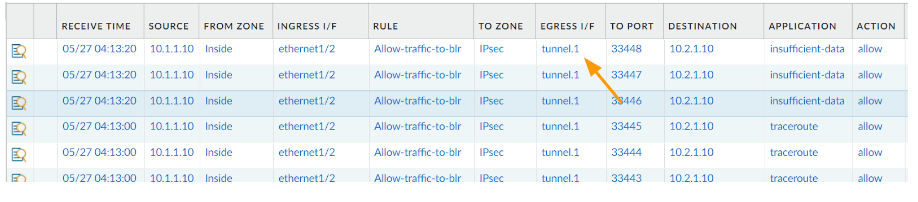
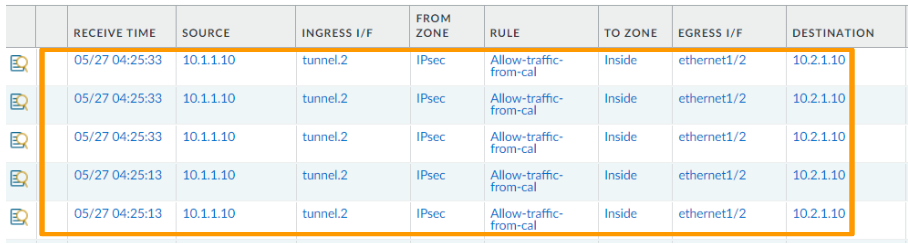
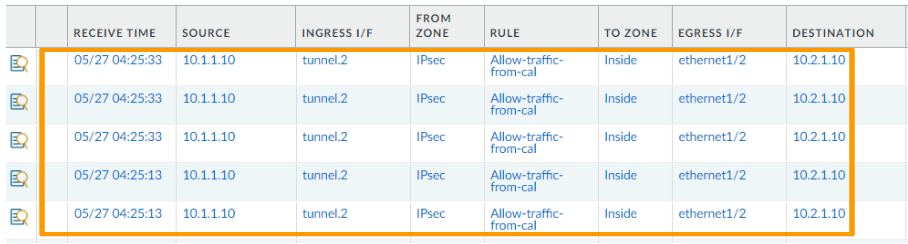
You can also verify the traffic from the palo alto monitor, it is taking the tunnel.1 as the primary path.
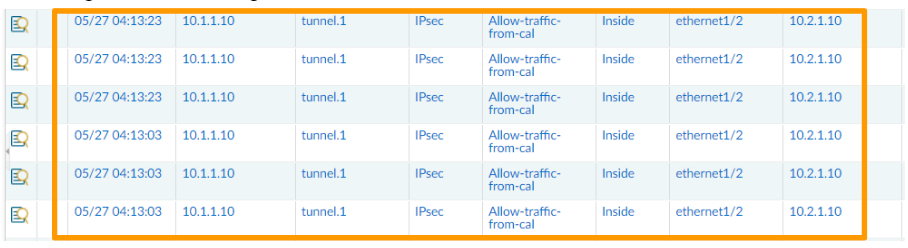
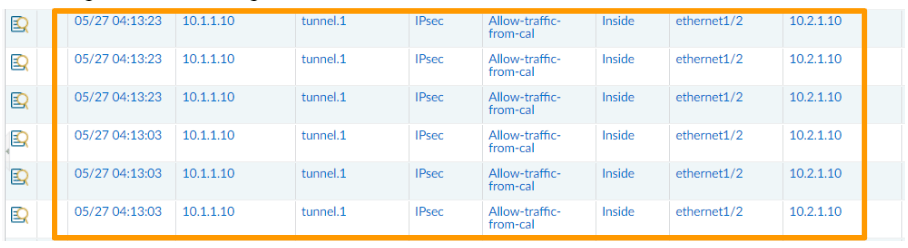
Bangalore
And Bangalore is receiving the traffic on tunnel1 as the source.
Test the IPsec tunnel failover.
To test the failover, I can disable the primary ISP internet link, so I just initiated multiple pings from one of the California hosts and then pulled the primary internet link that connected to the primary ISP.
As you can see, after about 1.10Seconds the routes propagated to the secondary tunnel.

And from the traceroute, you can make out it is taking the secondary tunnel route because the 3rd hop shows 169.254.2.2 as the IP, where the 3rd octet 2 represents secondary tunnel..
Same can be validated from the monitoring console as well.
California.


Bangalore.
And here is the interesting part, let’s also look at the BGP routing table.
California .
We are now sending only routes with AS-prepend, where there is 2 ASNs, you can check the received route from Bangalore, and you can validate the same from the other side.
Bangalore.
The same routes received with AS Path prepended the Bangalore side.
You can check the routing table.
This time, you can see the next hop as 169.254.2.1, where the third octet we configured on the secondary tunnel, and we can confirm that the traffic is passing through secondary tunnel.

Let me plugin the network to restore the network.
Within seconds the BGP route table updated with both the routes.
Let’s verify from Bangalore, which route is preferred.
As you can see, it is preferred the route from the primary tunnel, the * represent an active route.