
In our latest blog article, we successfully set up a control node for network automation. If you haven’t followed the outlined procedure to set up the control node, I highly recommend going back here and reviewing it.
Now, in this new blog article, we will embark on creating our very first playbook for Cisco IOS software running on a Cisco switch.
Using Ansible automation, we will configure important aspects like the Login Banner, NTP, DNS settings, and other necessary components.
With this playbook example, you can begin your own Ansible journey, customizing the tasks according to your specific requirements and implementing them in your Cisco IOS production environment.
Since there are two types of configurations in Cisco IOS, let’s start with the common configuration first. This includes settings that are consistent throughout the network, such as NTP, DNS, SNMP etc.
The second type is the unique configuration, which involves VLANs, port assignments, routing configurations, and more.
So, let’s dive into the standard configuration first and then move on to the unique configuration.
Setup Cisco IOS standard configuration.
To proceed with setting up the standard configuration for Cisco IOS.
First, navigate to the “cisco_standard” configuration folder. In this folder, we primarily work with the defaults variables and task directories.
Now, let’s set up the default variables.
Setup the Ansible Cisco IOS default variable.
In the defaults directory, we will store the standard configuration variables in the “main.yml” file, similar to the group_vars structure.
This means that all the common configuration settings can be defined here, and they will be applied to all devices within a specific group.
To do this, go to the “main.yml” file located in roles -> cisco_standard -> defaults.
Make the following modifications to the file:
Include the standard configuration settings you want to apply across the group. This is just an example of the default configuration, so feel free to add more if you have additional common configurations to include.
The standard configuration we will include in this lab:
- Login banner
- DNS Servers
- NTP configuration
- Enable secret password
- Local user setup
You can also add other common settings like SNMP and RADIUS if they are applicable across the entire site.
Feel free to customize the “main.yml” file in accordance with your specific requirements and the standard configuration settings you want to implement.
Here is my default main file.
---
std_config:
#The login banner of the device
    ios_banner:
    - banner: |
              ╔════════════════════════════════════╗
              ║                                    ║
              ║                                    ║
              ║ Welcome to GetLabsDone Network     ║
              ║                                    ║
              ║ Unauthorized access is strictly    ║
              ║ prohibited.                        ║
              ║                                    ║
              ╚════════════════════════════════════╝

#DNS servers for network device
    dns:
      - fqdn: getlabsdone.local
        dns_1: 8.8.8.8
        dns_2: 4.2.2.2

#NTP servers of the network device
    ntp:
      - server1: time.google.com
        server2: time1.google.com
        logging: true

#enable password for the device
    en_password:
       - password: gld_pass

#The local account.
    local_user:
      - name: gldadmin
        password: testpass
Setup Cisco IOS standard configuration tasks.
Let’s set up the tasks for the standard configuration.
The next directory we’ll be working on is the task directory, where we store all the tasks related to the standard configuration.
These tasks will utilize the variables defined in the default “main.yml” file.
Now, let’s take a look at the tasks in the cisco_standard configuration.
To better understand the purpose of each module, you can refer to the comments provided alongside each module line.
---
# tasks file for cisco_standard
###
## This task will configure the login banner.
- name: configure the login banner.
  cisco.ios.ios_banner: #This is the cisco banner module
    banner: login #you are setting the banner for login
    text: "{{item.banner}}" #calling the banner that you defined in the std_config in cisco_standard->default->main.yml file
  with_items: "{{std_config.ios_banner}}"

- name: configure DNS on the system
  cisco.ios.ios_system:  #This is the cisco system module
    lookup_enabled: yes
    domain_name: "{{item.fqdn}}" #specify fqdns specified the in the standard config.
    name_servers:
      - "{{item.dns_1}}" #calling the first dns server
      - "{{item.dns_2}}" # calling the second DNS server.
  with_items: "{{ std_config.dns }}" # using std_config as the dictionary.
#

#This task will configure the NTP.
- name: setup NTP across the board
  cisco.ios.ios_ntp_global: #This is the cisco ntp module
    config:
      servers:
        - server: "{{item.server1 }}" #specify the ntp servers from the standard config file again.
        - server: "{{item.server2 }}"
      logging: "{{item.logging }}"
    state: replaced
  with_items: "{{ std_config.ntp }}" # using std_config as the dictionary.


#it will configure the previlege password.
- name: setup privilege password
  cisco.ios.ios_config: #Since we dont module specific to setting password, we are using config module.
    lines: enable password {{std_config['en_password']}} # calling the password we have in the dictionary
  no_log: true # we are hiding the logs that is shwon in the ansible to hide the sensitive data like password


##setup local account.
- name: Setting up local account
  cisco.ios.ios_user: #this is cisco ios user module.
    name: "{{ std_config['local_user'][0].name }}" # calling the user from the standard config dictioanry file.
    configured_password: "{{ std_config['local_user'][0].password }}" # calling the password from the same dictionary.
    password_type: password # you can set the password either secrete or password, choose that here.
    privilege: 15 # setting the previlege level.
    update_password: always #each time when you run the play the password udpates.
    state: present
  no_log: true
While it’s possible to achieve the desired configuration using the cisco.ios.config module, we will use specific modules that are designed for each configuration element.
For instance, we’ll use the cisco.ios.ios_banner module for configuring the banner, and the cisco.ios.ios_ntp_global module for NTP settings.
Only if there isn’t a specific module available for a certain configuration, should we resort to using the ios config module.
Setup Cisco unique configuration.
Now that we have completed the standard configuration, it’s time to focus on the device-specific settings, which we refer to as unique configurations.
For the unique configuration, we will primarily work with the tasks folder, where we define the specific tasks that need to be executed. Additionally, the variables for this configuration will be read from the host_var files.
Before diving into the unique configuration setup, it’s crucial to create and populate the host_var file.
The host_var file will contain all the interface information and other specific details relevant to the individual Cisco switch/router being configured. This allows us to tailor the configuration to each individual device.
Setup Cisco IOS host_var file.
To ensure that the unique configuration can access the specific variables for each Cisco IOS device, whether it’s a switch or a router, you need to have the Cisco running configuration in YAML format. This configuration should be stored in the host_var file.
Typically, when migrating a production switch to code, we extract the running configuration and convert it into a YAML file. This YAML file is then used in the host_var file, such as “sw1.yml” or “sw2.yml,” depending on the device.
In this case, since we are setting up a brand new switch, we don’t have an existing source file to convert from. Therefore, the host_var file will only contain basic configurations, such as the site name, hostname, VLANs, and so on.
If you have a running config template for deploying new switches or routers, you can even convert those into YAML files and store them in the host_var directory. When you plan to deploy a new switch using Ansible, you can fill in the template, if necessary, and proceed with the deployment.
Feel free to customize the host_var file according to your specific requirements and the configurations you need for your new switch deployment.
Cisco unique configuration in host_var.
Now, what exactly do we need to include in the host_vars configuration file?
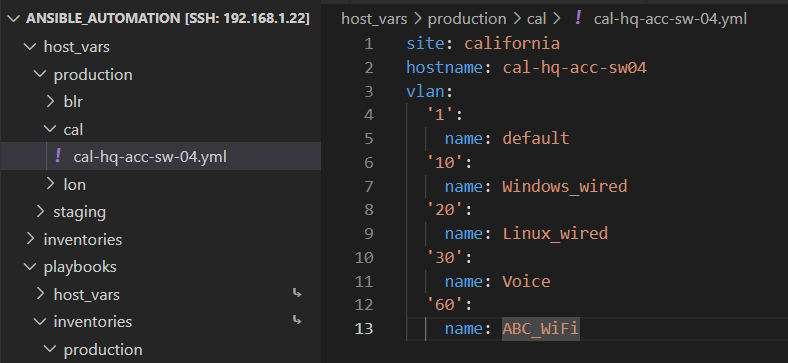
Since this is a lab environment and a Cisco IOS playbook example, we don’t need to incorporate an extensive amount of configuration. Our focus will be on adding a hostname and VLANs to the switch. To do this, simply add these details in YAML format within the host_vars -> production -> cal -> cal-hq-acc-sw-04.yml file.
Here is a basic switch configuration example for my California site:
In this file, you have the opportunity to include additional information such as interface details, ACLs, and more. However, we will cover those aspects in a separate article. For now, let’s begin by configuring these two items.

Setup the task for cisco IOS playbook.
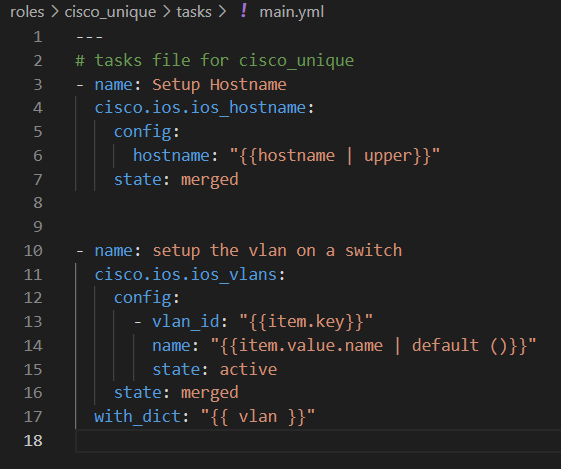
We have successfully configured the device variable in the host_vars folder. Now, let’s explore how to utilize this variable for the Cisco device. We need to set up tasks for it in the roles -> cisco_unique -> tasks -> main.yml file.
We will focus on calling two variables based on host_vars: the hostname and the VLANs. Let’s proceed with setting up tasks for these variables.
Open the main.yml file to edit the tasks.
Here are the two tasks we are going to implement:
In the first task, we will use the cisco.ios.ios_hostname module to set the hostname. We will retrieve the value of the hostname variable from the host_vars.
For the second task, as we have multiple VLANs defined in the VLAN dictionary, we can utilize the with_dict option to iterate over each item in the dictionary.
By using these tasks, we can effectively configure the hostname and handle multiple VLANs. You can refer to Ansible’s documentation to learn more about with_dict and other looping mechanisms in Ansible.
Now, you may wonder how these tasks know how to communicate with the specific host_vars and retrieve the required information. This is where inventories come into play. Let’s explore inventories further to understand this process.

Setup the inventory file.
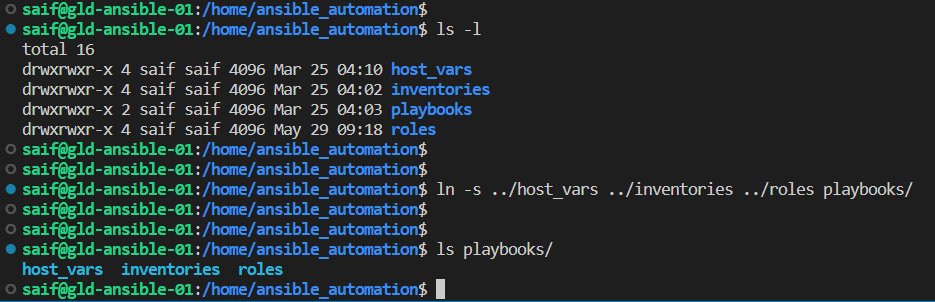
Before proceeding with setting up the inventory file, it’s important to ensure that the host_vars, inventories, and role folders are added in the playbook directory as shortcuts. These shortcuts will be used to reference these locations when updating the inventory file.
Navigate to the main ansible_automation folder.
Execute the following command to create folder shortcuts within the playbooks directory:
ln -s ../host_vars ../inventories ../roles playbooks/
You will now notice that the host_vars and inventories folder shortcuts have been successfully created. These shortcuts will facilitate easier access and organization within your playbook structure.

Let’s proceed with setting up an inventory file specifically for the California location. To do this, go back to the inventory folder and navigate to inventories -> production -> cal.
Create a new file called “inventory.ini” for the inventory. Note that although you have the option to create the inventory file in YAML format, for this lab, we will stick with the INI file format.
Now, let’s add the necessary content to the inventory file:
The first line should be the group name, and underneath it, you can add the specific devices belonging to that group.
In our lab setup, we will only add one device, so the group will consist of a single device.
In my configuration, I’ve assigned the group name as ‘cal,’ which represents the site code for California.
Next, you need to define the variables for the devices within the ‘cal’ group. These variables should be added as ‘cal:vars’.
To dynamically define the environment and site in the playbook, you must specify them in the inventory as shown below:
- ansible_ssh_user: [SSH_USERNAME] (Replace [SSH_USERNAME] with the actual SSH username for the device)
- ansible_ssh_pass: [SSH_PASSWORD] (Replace [SSH_PASSWORD] with the actual SSH password for the device)
- ansible_network_os: ios (Since it is a Cisco IOS device, we specify it as “ios”)
- ansible_connection: network_cli (We use “network_cli” as the connection type)
- ansible_become_method: enable (We use “enable” as the become method, which means Ansible will send the enable command to enter privilege mode)
- ansible_become: true (This tells Ansible to enter privilege mode)
- ansible_become_password: [ENABLE_PASSWORD] (Replace [ENABLE_PASSWORD] with the actual password to enter privilege mode)
Make sure to replace the placeholders [SSH_USERNAME], [SSH_PASSWORD], and [ENABLE_PASSWORD] with the appropriate values specific to your environment.
By setting up the inventory file with these details, we can configure the playbook to interact with the devices in the ‘cal’ group effectively.
[cal]
cal-hq-acc-sw04 ansible_host=10.1.11.7


[cal:vars]
env=production
site=cal
ansible_ssh_user=[SSH_USERNAME]
ansible_ssh_pass=[SSH_PASSWORD]
ansible_network_os=ios
ansible_connection=network_cli
ansible_become_method=enable
ansible_become=yes
ansible_become_password=[ENABLE_PASSWORD]
Setup your first Cisco IOS Ansible Playbook.
Let’s go to the playbook folder and proceed with configuring our first playbook. We will use a single playbook to handle all the tasks.
If you have both Cisco switches and routers, you only need to add two playbooks, for example, “cisco_switch_playbook.yml” and “cisco_router_playbook.yml”.
Since I’m focusing on managing the switch infrastructure as code in this lab, I’ll create a playbook called “cisco_switch_playbook.yml”.
Now, navigate to the playbook directory and create the playbook file.
Here are the important elements to include in the playbook:
- Hosts: Specify the hostname where you will run the playbook. You can either manually edit the playbook to include the host or use “vars_prompt” to prompt for the hostname during execution. I prefer the second option, which allows me to enter the hostname when prompted.
- Gather_facts: This option can be enabled to collect facts that can be utilized in the playbook. Currently, I’m not gathering facts.
Now, let’s take a closer look at the basic playbook and its tasks.
The first task will include the “host_var” YAML file only if you specify the hostname in the inventory file during the playbook prompt; otherwise, it will be skipped.
For example, if you enter “cal-hq-acc-sw-04” as the “vars_prompt” input when running the playbook, it will add “cal-hq-acc-sw-04.yml” in the “host_vars” directory as shown below:
- “Cal”: skip the “host_vars”
- “cal-hq-acc-sw-04”: include “host_vars”
This feature is particularly useful when executing the playbook against individual devices, as it allows the inclusion of host-specific variables for those devices.
Additionally, notice that the file name reflects the path for the “host_vars” file defined using the inventory (env and site).
The common configuration defined in “cisco_standard/default/main.yml” will be applied when the hostname is included in the group names within the inventory file.
For example, if you run the playbook with just the host group name, such as “cal”, the common configuration will be applied and run on all devices within that group.
- “Cal”: the standard configuration will apply
- “Cai”: skipped as the group name doesn’t exist
- “Cal-hq-acc-sw-04”: skipped as it is not a group, therefore the standard configuration won’t apply
This feature is useful when executing the playbook against a group of multiple devices simultaneously.
In the third task, when you specify the hostname, both the “cisco_standard” and “cisco_unique” configurations will be applied to the playbook and executed.
- “cal”: skipped as the inventory name is not equal
- “Cal-hq-acc-sw-04”: both standard and unique configurations will be added
This feature is beneficial when deploying a brand new switch with both standard and unique configurations or for migrating existing infrastructure.
Feel free to customize the playbook according to your requirements and the specific standard and unique configurations you need.
From the Ansible perspective, we have everything ready.
Setup the Cisco device for Automation.
Although Ansible allows us to automate various tasks, there are a few manual configurations that need to be set up on the device beforehand.
As you may know, Ansible utilizes SSH to establish a connection with the switch. Therefore, it’s crucial to ensure the following configurations are in place:
- SSH enabled on the device.
- Local account or RADIUS setup for logging into the device.
- IP address and default gateway configured, enabling communication between the switch and your Ansible host.
Once these prerequisites are met, you’re ready to configure your first playbook.
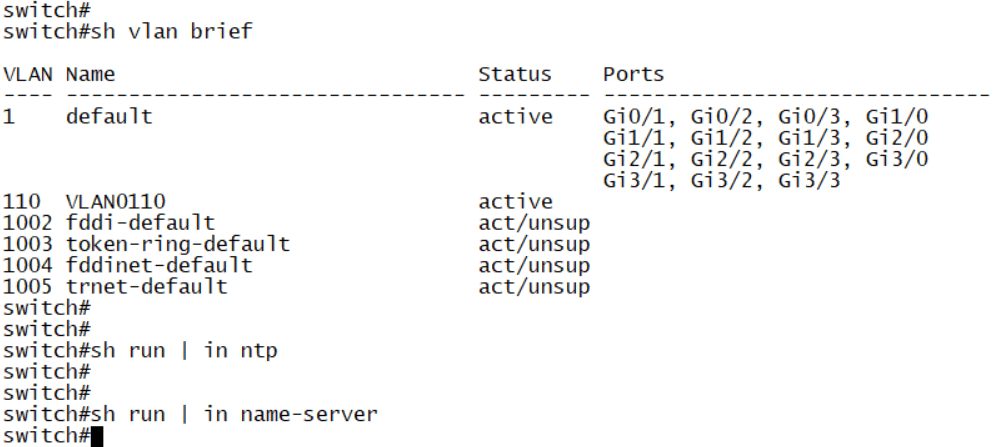
Currently, if you SSH into the switch, you’ll notice that it only has the default VLAN and the management VLAN configured. Additionally, there is no NTP or DNS configuration, and the hostname remains as the default switch name.
However, after running the playbook, you’ll witness the transformation and see the noticeable differences in the switch’s configuration.

Deploy your first Cisco IOS Playbook.
To run your very first playbook, navigate to the playbook folder.
Then, enter the following command:
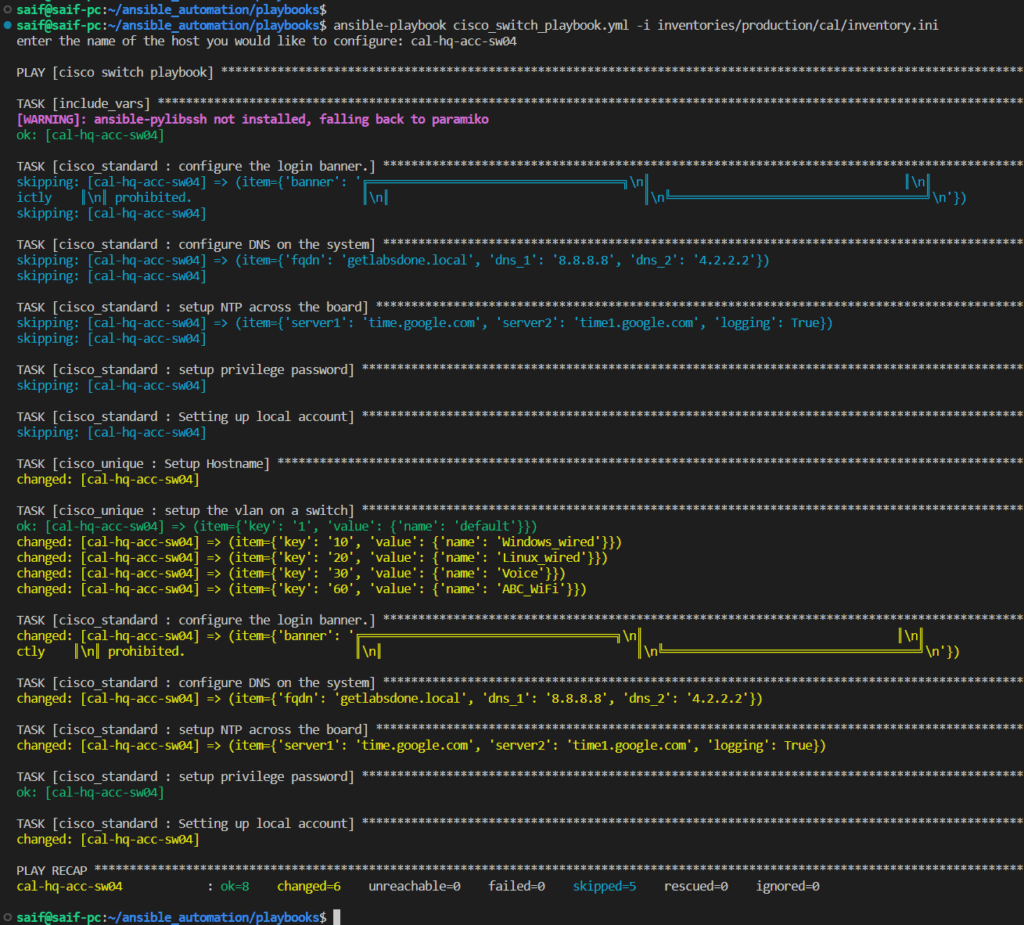
ansible-playbook cisco_switch_playbook.yml -i inventories/production/cal/inventory.ini
As you can observe, the playbook was executed based on the defined conditions, resulting in 6 changes being made.
In the integrated development environment (IDE) that I utilize, the color scheme represents different outcomes:
- “Skip” is represented by the color blue.
- “Green” indicates that no changes were made.
- “Yellow” signifies that changes were successfully implemented.

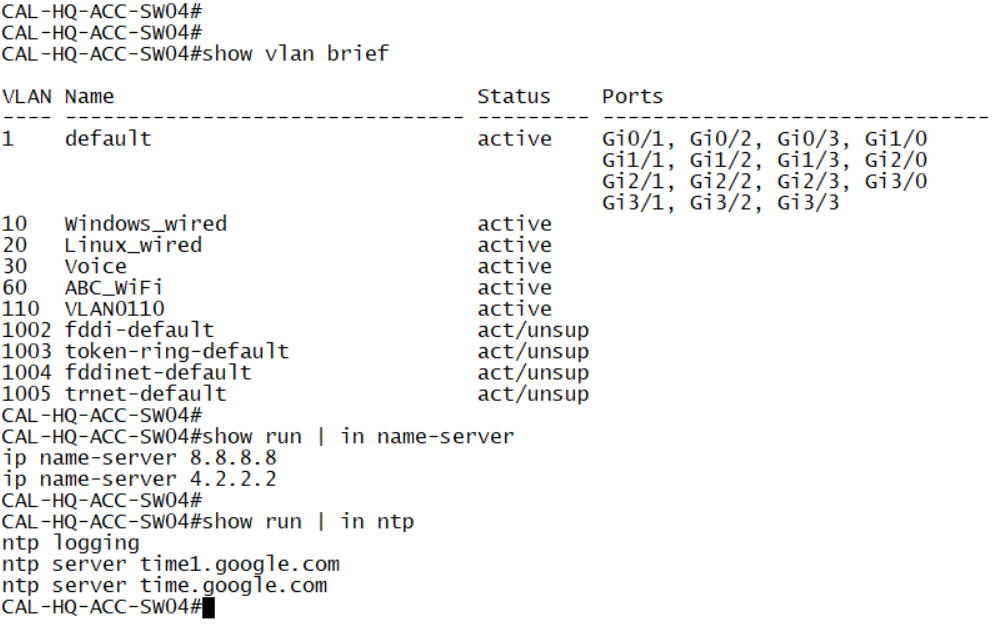
Now it’s time to log in to the switch and verify the applied settings.
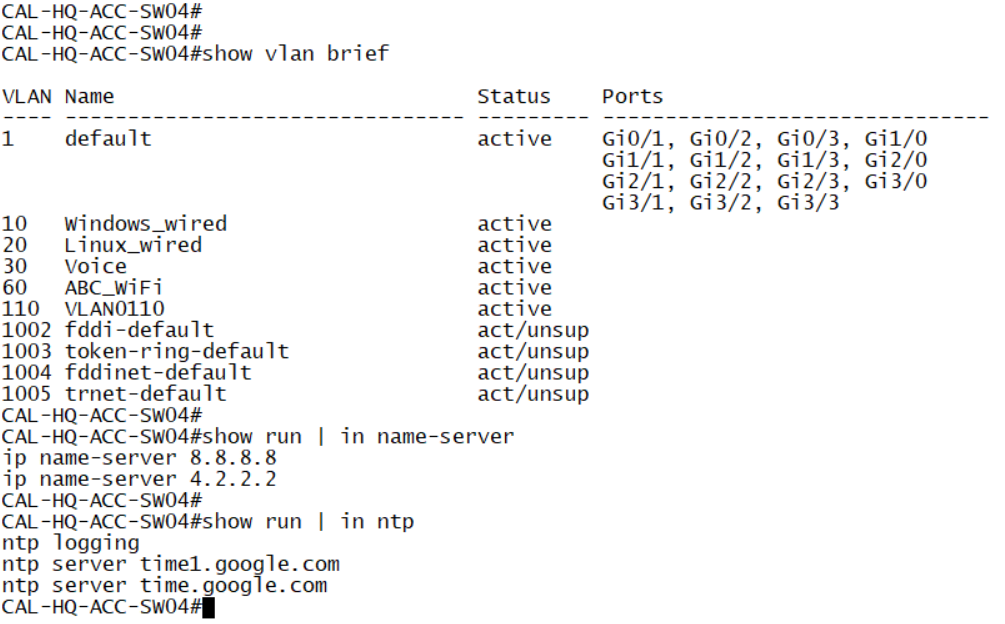
Upon logging in, you’ll notice that the hostname has been successfully changed. Additionally, all the specified VLANs have been created as intended. Furthermore, the NTP configuration has been updated to point to the new NTP server.
Take a moment to explore the switch and ensure that everything is functioning as expected.
And that’s how you run a playbook on a Cisco IOS device using Ansible. This is just the tip of the iceberg; there are many more possibilities with Ansible. In the next article, we will explore how to add a new switch to the network and delve into the process of switching to code.