
Palo Alto Networks is a leading provider of next-generation firewalls, and in my previous blog article, I have covered several topics related to the Palo Alto Firewall.
In this article, I will provide a step-by-step guide on how to set up a basic DMZ configuration in the Palo Alto Firewall. By the end of this article, you will have a working DMZ setup with a web server listening on port 443.
What is the need for a DMZ in the Palo Alto Firewall?
In most networks, traffic initiates from the LAN (inside) side to the outside, known as outbound traffic. It is predominantly allowed with http/https and DNS traffic, allowing users to access the internet.
However, if you have public-facing servers such as a web or email server, traffic may be initiated from the outside to these hosts, known as inbound traffic.
We would be required to handle such inbound traffic, which is by default blocked by the palo alto firewall.
Keeping these public-facing servers on the LAN side and allowing traffic is not a good idea.
If a LAN public-facing server ever gets compromised, it will affect all hosts in the LAN segment.
Therefore, it is best to keep these servers in a separate zone, known as a DMZ network.
In the DMZ network, inbound traffic is allowed, enabling internet users to access resources securely. In this article, we will add another zone called DMZ, and in DMZ, we have a web server listening on port 443.
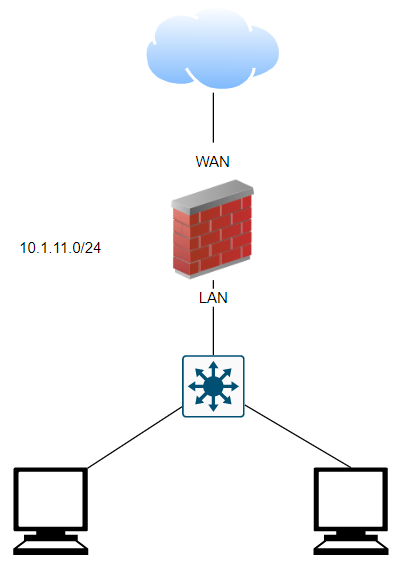
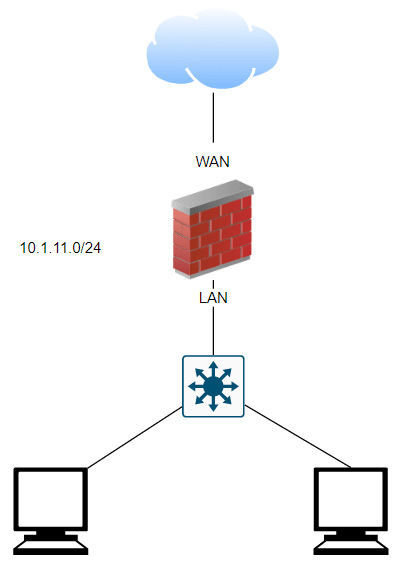
Below is my current network, where I have basic LAN network with subnet 10.1.11.0/24, and it is working fine and all the users can go out to the internet.
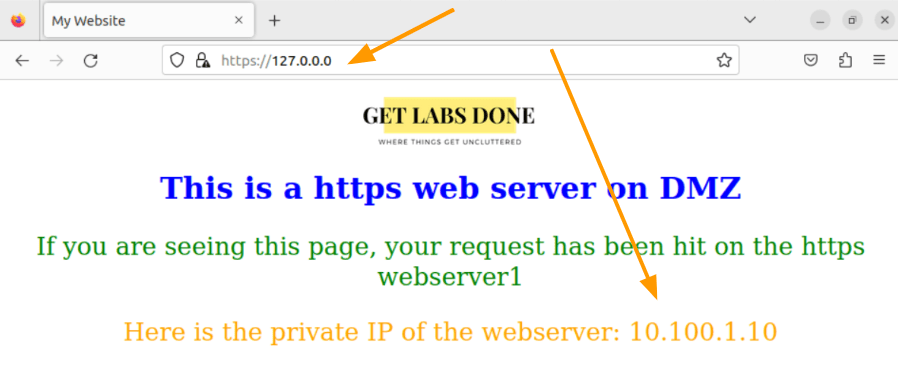
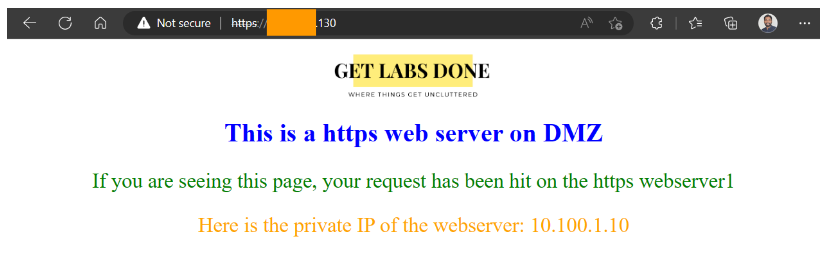
Here is the snip from the web server, where I accessed the URL using loopback IP, and it shows the below static site, which shows the IP address of the web server as 10.100.1.10.

This is what we are going to do.
- Set up a DMZ network using the 10.100.0.0/24 subnet.
- Allow all incoming https traffic from the internet to reach the DMZ server on port 443.
- LAN users will can either use the public or private IP address to access the web server.
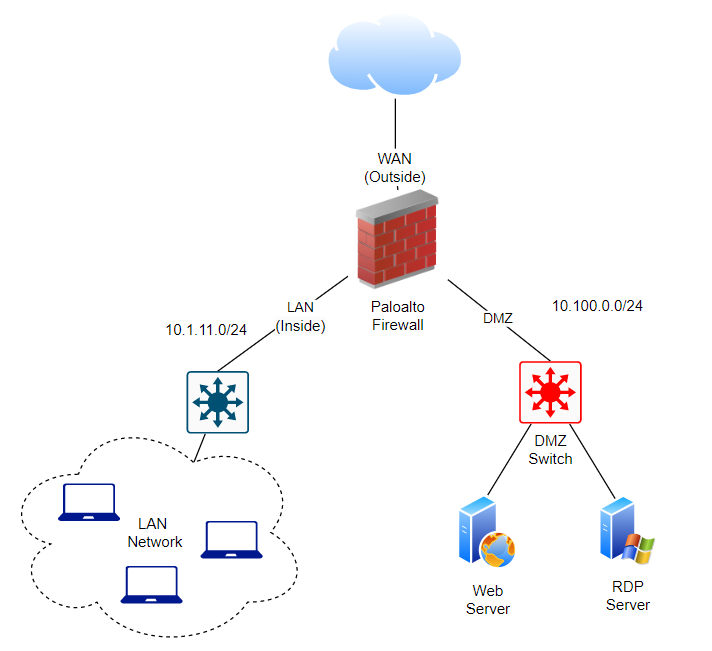
Shown below is the topology with the DMZ added. I added another switch to handle DMZ traffic, but if you don’t have an extra switch, you can still use a single switch and separate the LAN and DMZ zones using VLANs.

Setup DMZ Network in Palo Alto.
Configuring the DMZ network in Palo Alto starts by configuring the zone and we will configure an interface with Ip address and put it in the DMZ zone that we created.
Goto Network-> Zone
As you can see, there are only two zones at the moment.
Inside is for the LAN and Outside is for WAN where the ISP is connected.
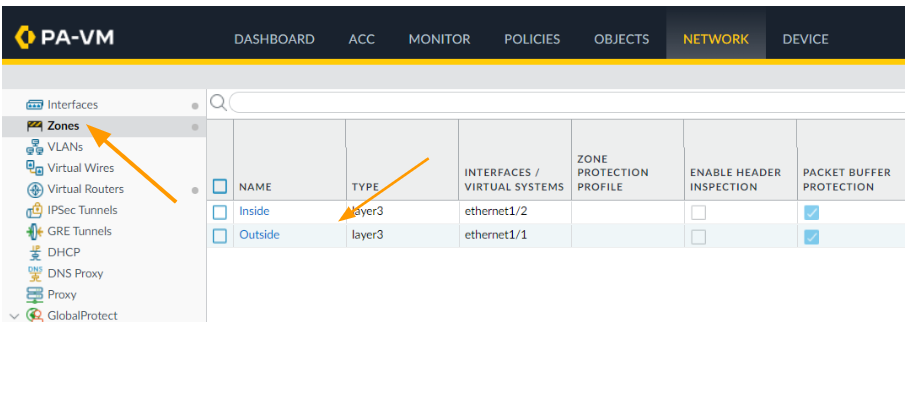

Click on Add at the bottom left.
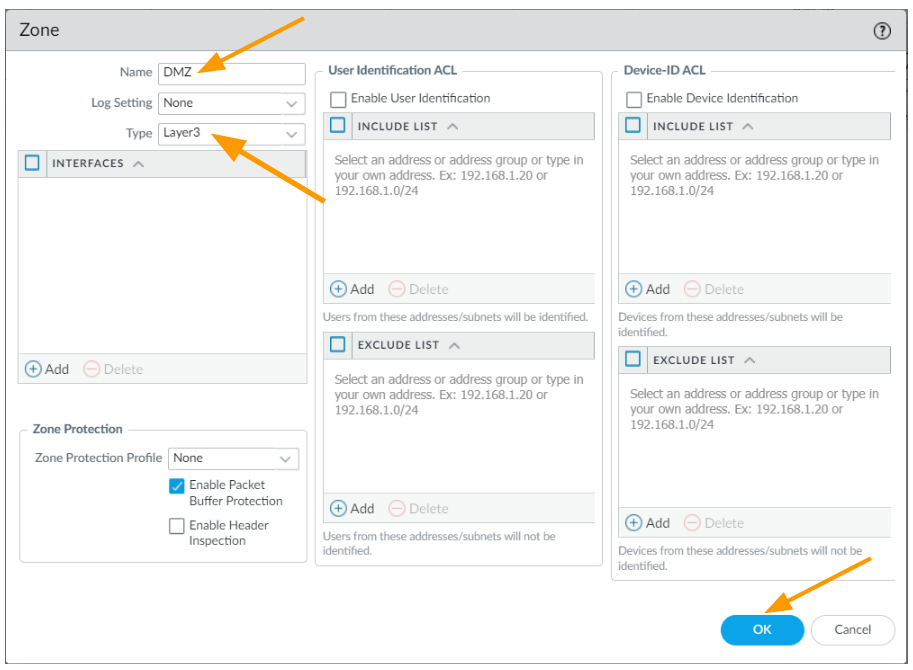
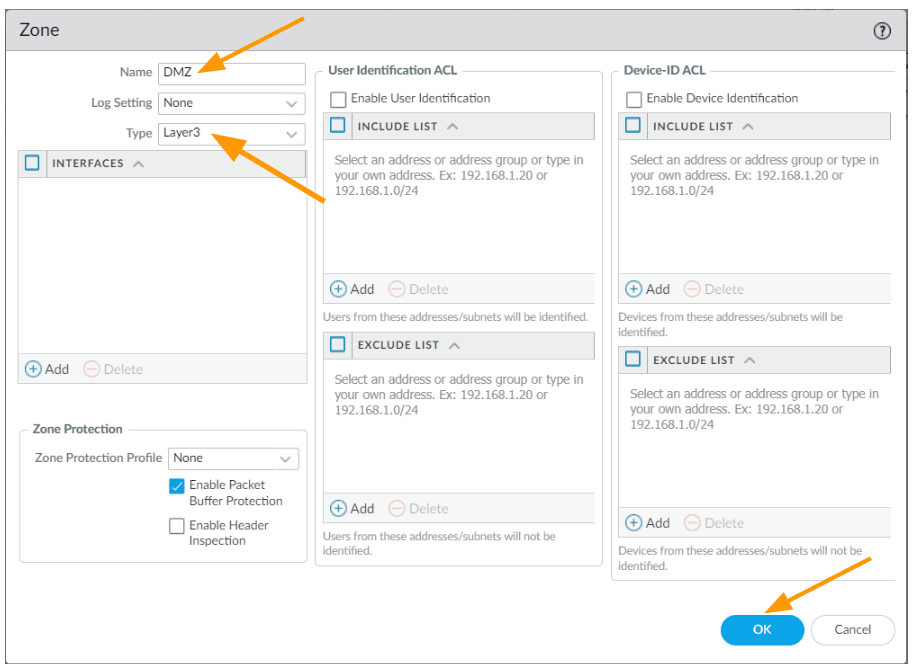
A new window will pop up.
Name: DMZ
Type: Layer3.
And click on Ok.
Configure the DMZ Interface.
Next we are going to configure the interface that will act as a default gateway for the DMZ hosts.
Goto Network-> Interface
As you can see, the first interface is configured as outside that is connected to the ISP.
Second interface takes care of the LAN traffic.
Keeping two interfaces for future use, we are going to use the 5th interface which is ethernet1/5 for the DMZ network.
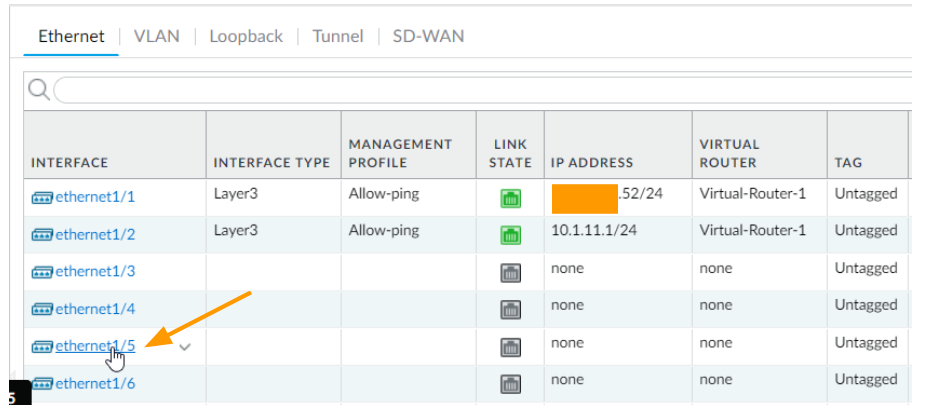
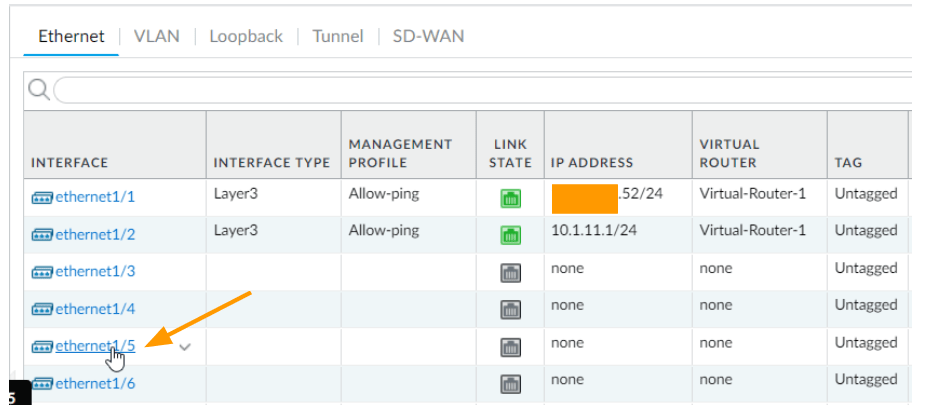
Click on the interface ethernet1/5
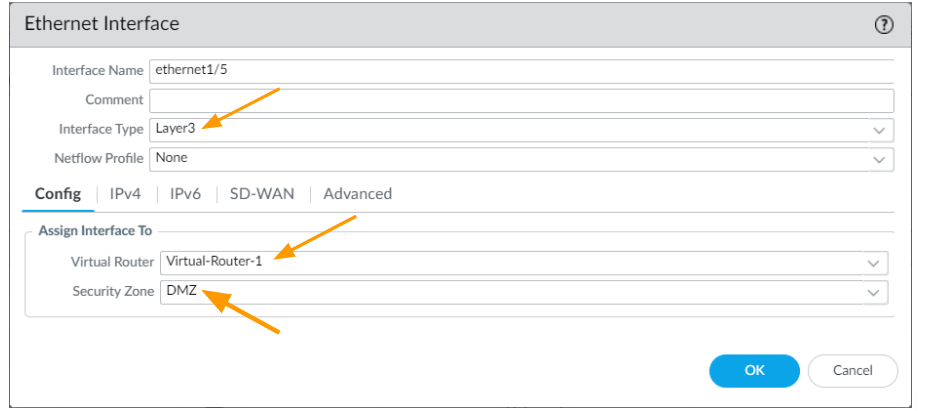
In the interface configuration window, update it as below.
Interface type: change the interface type to Layer3.
Virtual Router: Select the virtual router that you are using.
Security Zone: Choose the DMZ as the security zone from the drop down.

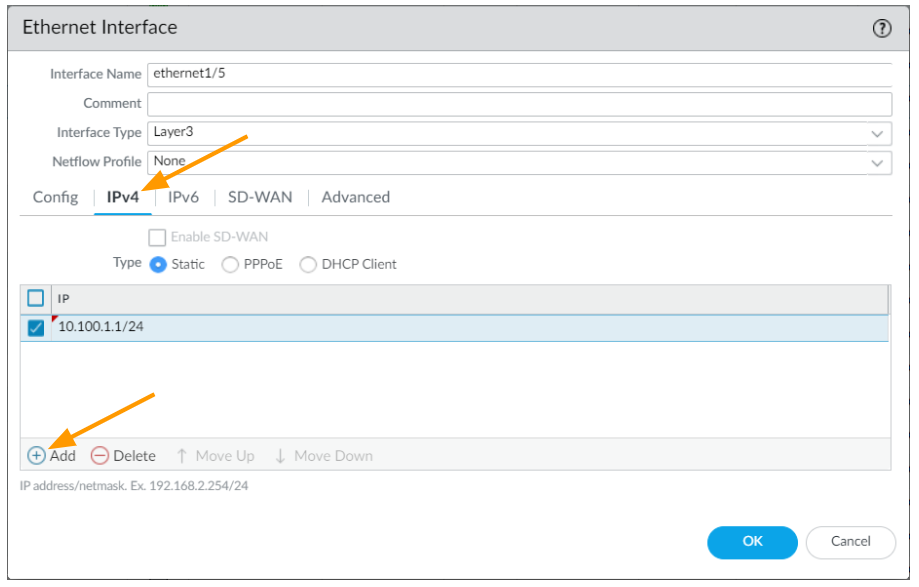
Click on the IPv4 tab
Choose static, and click on Add.

Allow ping
On the same window click on Advanced
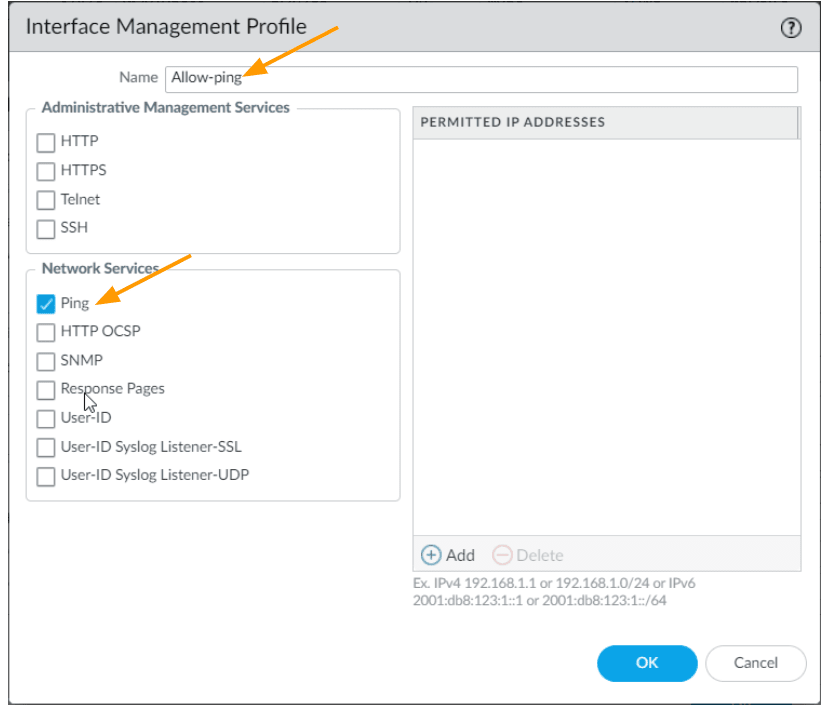
For troubleshooting and administrative purposes, I am also going to allow ICMP traffic to the interface.
In the management profile drop down click on New management profile.
Name: Allow-ping
Under Network Services, select ping as the option and click on Ok.

Ensure Allow-ping is selected for the management profile and click on Ok.
Commit the changes.
Test the network from the DMZ host.
I already configured the IP address 10.100.1.10 as the IP and 10.100.1.1 as the default gateway on the DMZ web server.
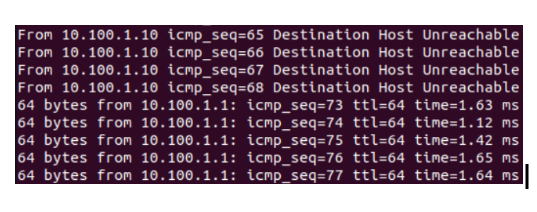
Login to the DMZ server, and try to ping the default gateway, you should now get an ICMP response.
Note: Some enterprise networks that I have worked with have strict security regulations on even allowing ICMP, so you may check this before enabling the ICMP in DMZ.
While making changes, I continuously pinged the default gateway and committed the changes. As you can see, I am now able to ping the default gateway from my DMZ server.
Allow Web traffic to DMZ.
As we have tested, our web server is currently only accessible locally on port 443.
To allow users on the internet to access the web server, a public IP address is required.
In this case, a static public IP address of x.x.x.130 will be used.I have hidden the first three octets.
To make the web server accessible, any incoming traffic to x.x.x.130 should be directed to the DMZ server.
However, by default, the firewall will block any incoming traffic from the outside, so we need to configure it to allow traffic to come in.
To allow the traffic from outside to the web server located in the DMZ using destination port 443, We need to create a security policy for that.
In Policy-> Security.
Click on Add.
- General
- Name: Allow HTTPs traffic to DMZ.
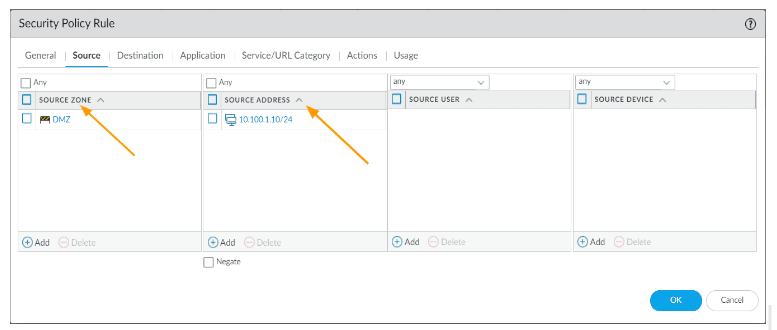
- Source:
- Source Zone: Outside
- Source address: any
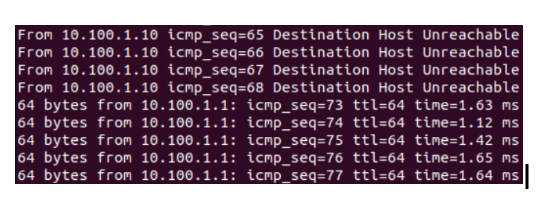
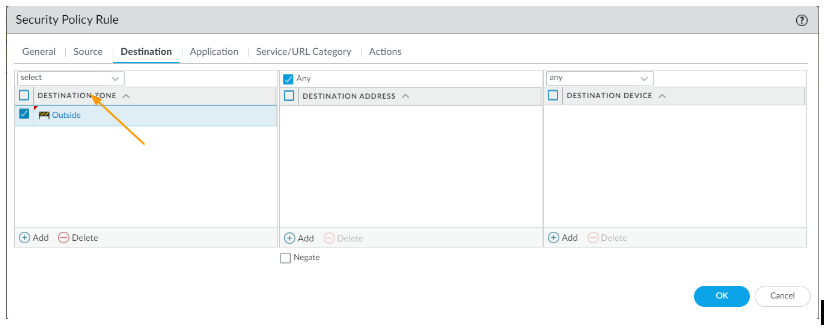
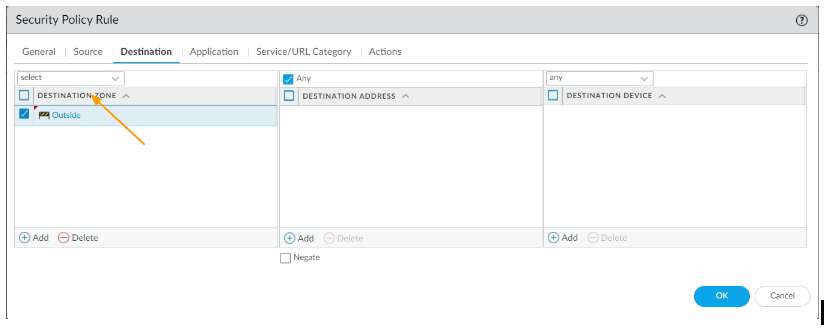
- Destination
- Destination zone: DMZ
- Destination Address: x.x.x.130 (Your DMZ server public IP)
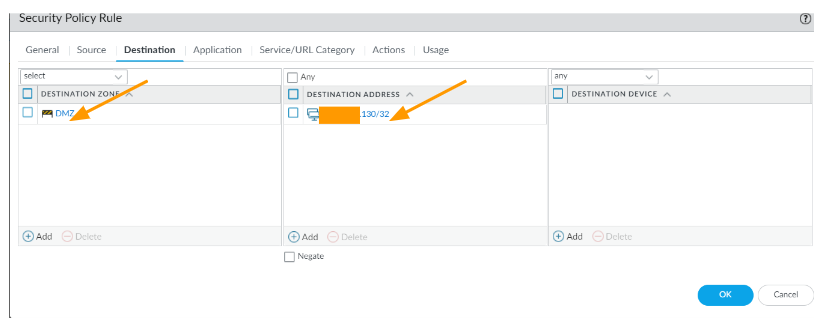

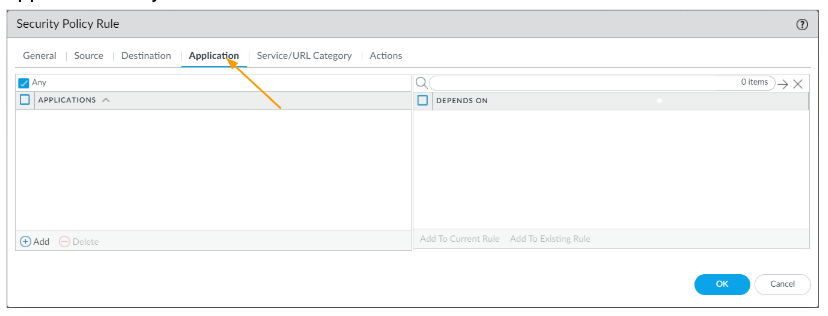
- Application: ssl
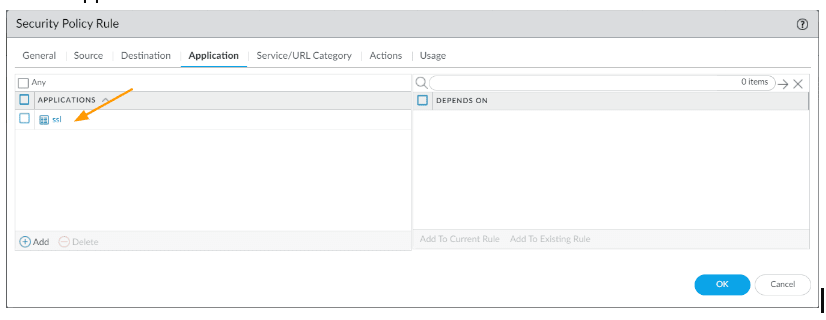
- Service/URL Category:
- Service: service-https – As we are allowing only https traffic (443), i have to add it in service.
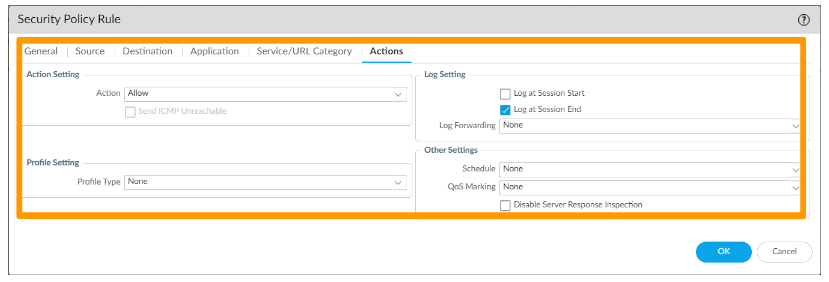
- Actions
- Action Settings : Allow
- Click on Ok
And commit the change.
You could even allow any application in the policy, but it is best to expose only the required services.
Tip: If you are in doubt as to what application to allow, you may just create a security policy with source IP as a different network (may be mobile hotspot) that you trust and test the connectivity, in the monitor logs, you should see the application that needs to be allowed.
Configure the Route.
So you open the door for the traffic to come in, however there is a problem.
Sometimes when you get a static IP address from the ISP, you might have the same subnet that you already have on the outside interface.
For eg: you may have 1.1.1.1/24 on the interface outside IP, and you have 1.1.1.130/24 for the DMZ server.
Since both are from same network, when someone tries to access 1.1.1.130, your ISP will send to your outside interface because you are owning that 1.1.1.0/24 subnet and if you have the 1.1.1.130 in different zone, the traffic will not leave the outside interface because firewall think that the destination server is in the outside zone somewhere.
So it is your responsibility to direct this traffic to the appropriate interface.
Goto Network – > Virtual routers -> Open your virtual router.
Click on Static routes.
Under IPv4, click on Add.
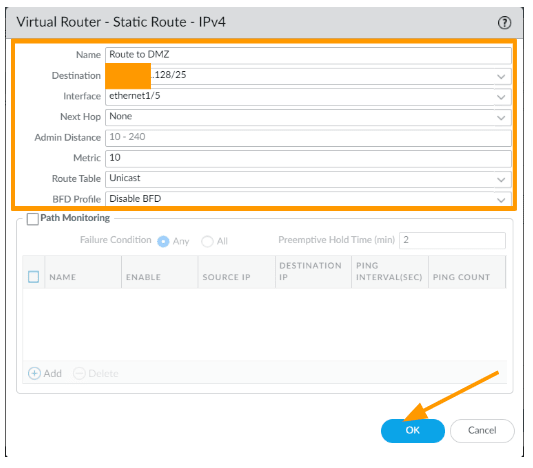
Name: Route to DMZ
Destination: x.x.x.128/25 – The IP x.x.x.130 is part of this subnet, and the CIDR will be different in your case, if it is a single ip you can add /32.
Interface: ethernet1/5
Next hop: None
Click on Ok and commit the change.

Create Static NAT (one to one nat).
At this point the traffic will come to the firewall and it will allow it, however from the firewall perspective, the IP address x.x.x.130 is not present to respond.
When you have a public IP directly configured on the server, it will respond to the https request, however we are using a private IP address on the DMZ server.
So we need to create a static nat in such a way that when anyone tries to access x.x.x.130 it should forward to our https web server private IP 10.100.1.10
In the palo alto firewall, goto policies -> NAT-> click on Add.
- General
- Name: Enter a user friendly name, for eg: DMZ_destination_NAT.
- Original Packet:
- Source Zone: Outside
- Destination Zone: DMZ
- Destination interface: ethernet1/5
- Service : https
- Source Address: any
- Destination: x.x.x.130
- Translated Packet
- Destination Address Translation:
- Translation type: Static IP.
- Translated Address : 10.100.1.10
- Destination Address Translation:
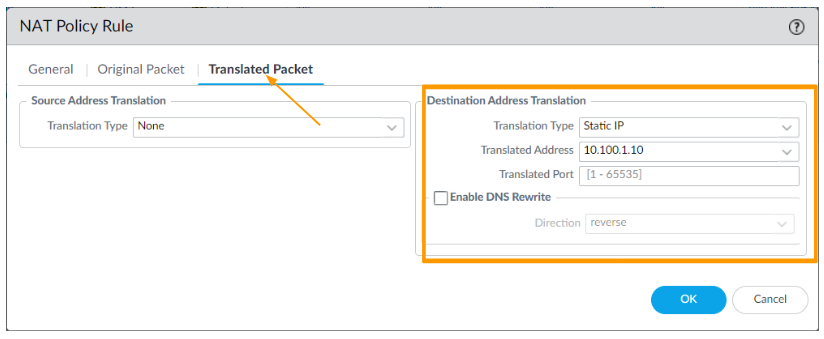
Click on Ok and commit the changes.
Test the DMZ traffic.
So now, when the traffic from the internet try to access x.x.x.130
- The traffic reaches the firewall, as you own the public subnet and is configured on the firewall.
- If the traffic is for an HTTPS service, the firewall allows it to pass from the outside to the DMZ.
- The firewall has a route that directs the traffic to the destination server within the DMZ.
- The public IP address is translated to the private IP address, 10.100.1.10.
- As a result, the user can successfully access the website.
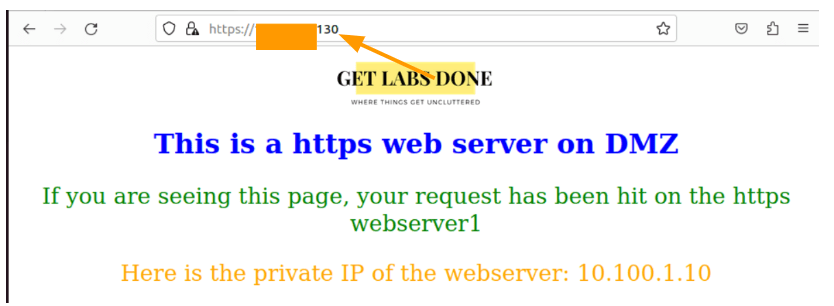
From the internet, you may try to access the web server that is in the DMZ.
If you are on the same network, the best way to test this is by connecting to mobile hotspot, as we allow all the users you would be able to access the website just fine.
I have connected my other machine to a different network and as you can see, I am able to access the website successfully using the public ip x.x.x.130.

You can check the logs in the monitor and you can see, it was sent right to the DMZ server, and on the NAT Dest IP, you can see the private IP address of DMZ server.


Configure the internet access for DMZ servers.
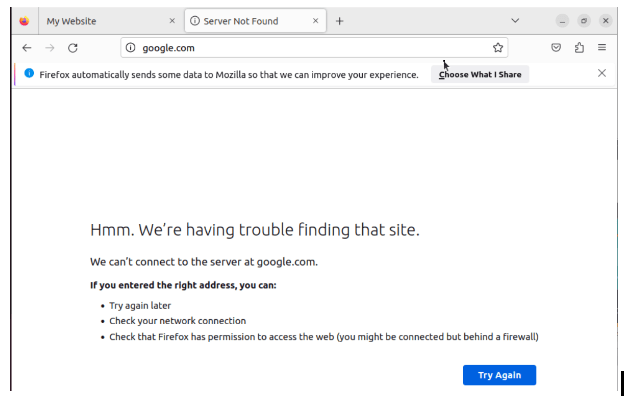
The users can access the website and everything is live, but if you want to update the server with the latest patch/packages or you need to just access the internet, will this work ?
No, as we have created only inbound security policies the DMZ server cannot access the internet. To access the internet, we need to also create outbound policies as well.
As you can see, I can’t access google

In Palolato firewall, goto policies->Security
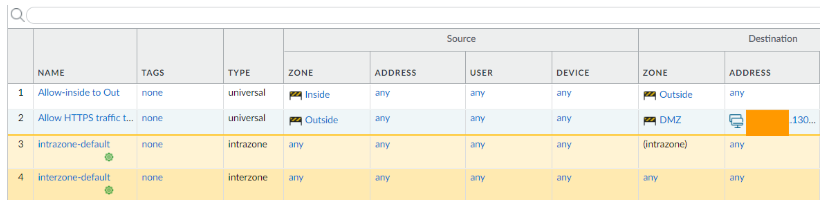
Right now, I have a policy that says, anyone from inside (LAN) try to go outside (internet), it should be allowed.
And DMZ policy to allow inbound traffic.

Click on Add.
In the new security rule.
- General
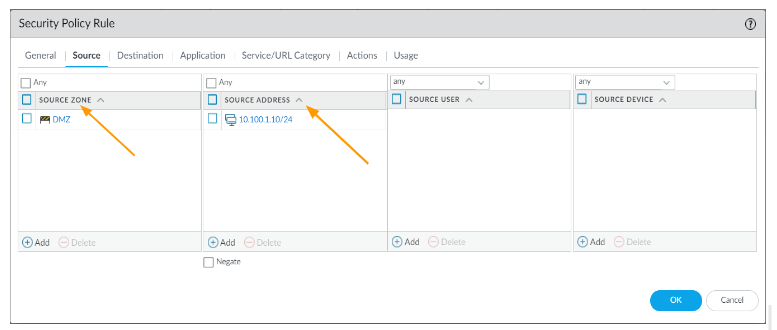
- Name: Allow internet access to DMZ hosts
- Source:
- Source Zone: DMZ
- Source Address: 10.100.1.0/24
- Destination:
- Destination Zone: outside.
- Destination Address: Any
- Application : any

- Service/URL category: Application-default
- Actions:
- Action Setting: Allow
- Log Settings: Log at session end.
- You might as well select any log forwarding device if you have it, for eg: panorama.
Since it is a lab, I am good to leave it to none and click on Ok.
You must also choose a security profile, which I am not using at the moment.

You can now try to access the internet and that should work just fine as well.
As you can see, the google dns ip 8.8.8.8 we are able to reach.

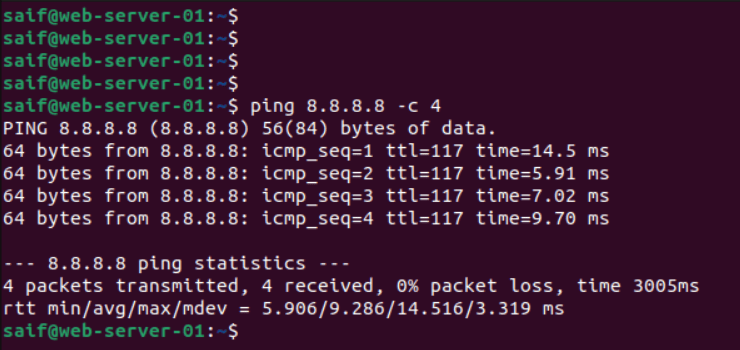
And in the monitor logs, we can see the traffic as well. And it is hitting the right policy.


Configure LAN access to DMZ.
Most of the time the DMZ is set up to expose the public facing servers, however at times your LAN side users also would want to access these servers.
We could configure the LAN users to use the public IP of the DMZ server and access the DMZ server.
If that’s the case, it will be interzone traffic and again, not only you need to allow the traffic, you are required to deal with destination nating as well.
As you can see, the traffic is not allowed, it is blocked by the default interzone policy.


Create a security rule to allow LAN users to access the DMZ server.
Goto Policy and click on Add.
- General:
- Name: Allow LAN users to DMZ.
- Source:
- Source Zone: Inside
- Destination:
- Destination Zone: DMZ
- Application: SSL
- Service/URL category: service-https
Action: Allow
Create a NAT policy.
Click on Add.
- Name: LAN to DMZ
- Original Packet:
- Source Zone: inside
- Destination Zone: DMZ
- Destination Address: XXX.XXX.X.130
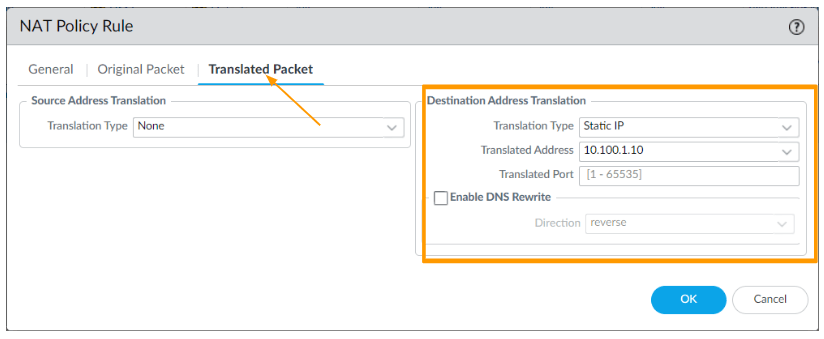
- Translated Packet:
- Translation Type: Static IP
- Translated Address: 10.100.1.10
Commit the change.
And you should now be able to access the DMZ website from the LAN side.

You could now see the traffic being allowed and it is translating the address to 10.100.1.10 and hitting the rule we just created.


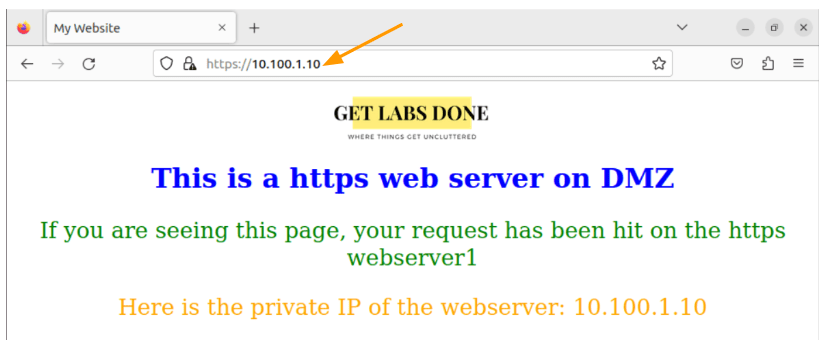
As we allowed the traffic from inside to DMZ, we should be able to access the DMZ server with its private IP address as well.
As you can see below.

Sujeesh
Monday 25th of December 2023
Good article. YOu have doe a wonderful job. I have a question , Are you sure about the destination NAT zones . As per my understanding both the source zone and destination zones are pre NAT zone(outside). Can you please clarify ?