
The Oracle VirtualBox is one of the popular hypervisor used by many. It is open-source and free; hence it is widely used by many users. It supports Windows, Mac, and Linux operating systems. So it doesn’t matter what operating system you are using; you can install the VirtualBox and spin up a VM’s on it.
I have personally used multiple operating systems in VirtualBox. Like any other hypervisors, one of the most important features in VirtualBox is taking the Snapshot of the VM’s.
What is a snapshot in Virtualbox?
A snapshot helps you capture the virtual machine’s current state to restore it later point when something goes wrong.
Let’s suppose you made some changes on the virtual machine, and it turns out the changes you made didn’t work the way you anticipated. And you need to roll back the changes you just made. What would you do if you are not using a VM snapshot?
You have to undo the changes step by step carefully, and that consumes more time.
However, if you have used the snapshot option, with just a click of a button, the VM will restore to its previous state before the changes you made.
There are no limitations on the number of snapshots you can take, and it’s mainly based on how much space you have on your hard disk.
If you have never taken a snapshot before, you have to do it, as you may not know when things can go wrong, and it will save a lot of frustration and time that you have to go through otherwise.
Where are VirtualBox snapshots stored?
When you take a snapshot, the VirtualBox will copy the entire VM settings and the hardware configurations. It is saved in a vmdk disk format on the VirtualBox VM’s folder and the respective VM’s subfolder.
By default, the VirtualBox will save its VM file in the VirtualBox VM’s folder located in the users home directory.
C:\Users\<username>\VirtualBox VMs\
Each VM will have its folders inside the VirtualBox VM folder. The snapshot folder is located under the VM directory.
I have an Ubuntu virtual machine, and its location is at C:\Users\saif\VirtualBox VMs\Ubuntu\
And the Snapshot of the folder located below.
C:\Users\saif\VirtualBox VMs\Ubuntu\snapshot.
Objective.
The Ubuntu and Linux mint virtual machines are running in the VirtualBox; we will take a snapshot of that VM’s using GUI and CLI. After the Snapshot is taken, make some changes to the VM, and we will try to restore the Snapshot and check how it looks.
How to take VirtualBox snapshot?
You can take the Snapshot of a VM while it is running or when it is stopped. Either way, the Snapshot will capture the current state of the VM (running or stopped). And when you restore it later, the VM that was running would show paused with its state shows saved.
We will take the Snapshot when the Ubuntu machine is running and Linux mint when it is stopped.
Taking a snapshot of a VM in GUI.
We will take a look how you can take a snapshot of a VM through the GUI.
Open the Snapshot list.
- Open the VirtualBox GUI.
You can see that I have Linux mint, which is stopped, and Ubuntu is running now.
- To see the Snapshot option, On the VM, click on the list icon next to it, and you will have an option called snapshots; click on that.
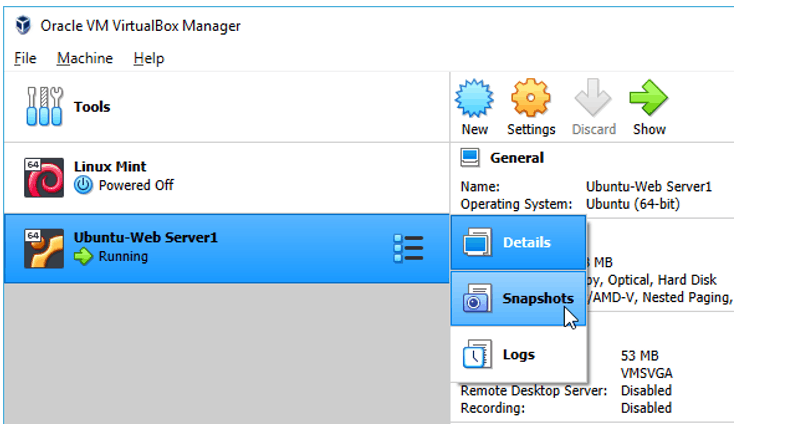

You will be directed to the snapshot management option in the VirtualBox.
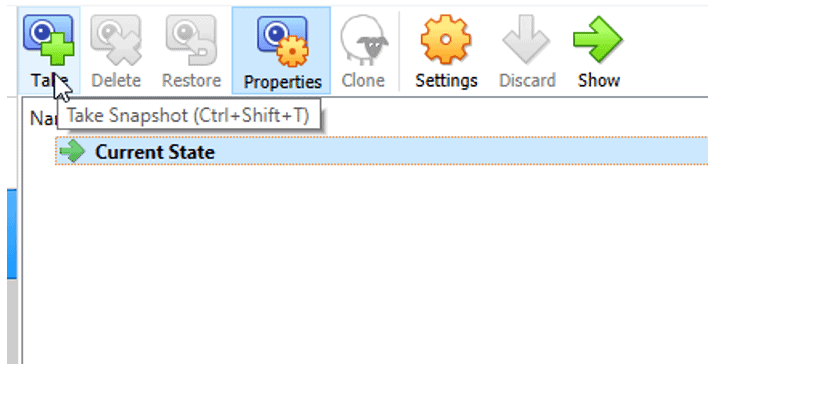
Take the Snapshot.
- Click on Take to take the Snapshot of the VM.
Alternatively, you can use the keyboard shortcut Ctrl+shift+T to take the Snapshot.

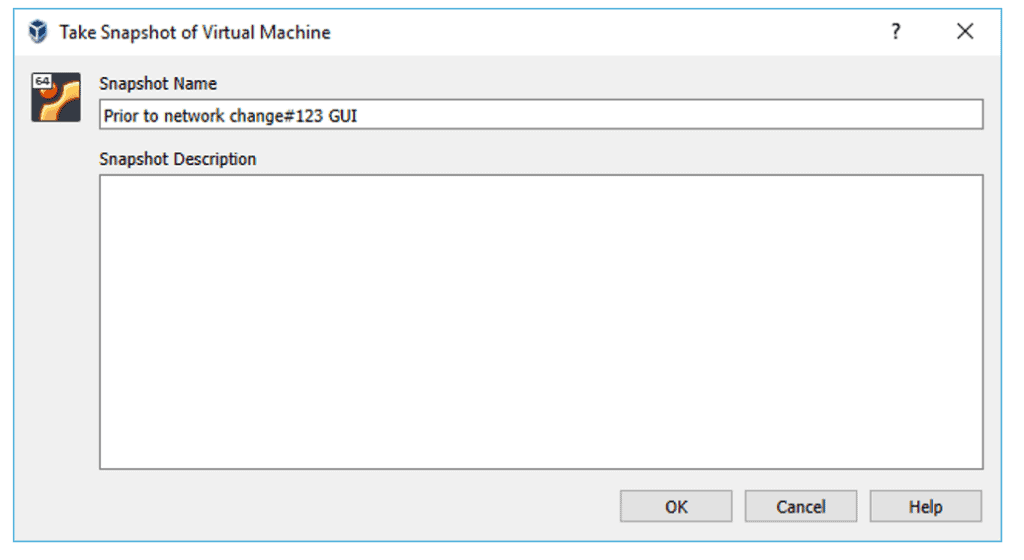
You will get a prompt for taking the Snapshot, and you can provide some name for the Snapshot.
Let’s say you are making some network changes to the VM; you may provide the name, For Example: Prior-to the network change.
For our tutorial, to identify the Snapshot taken from GUI, we can GUI at the end of the name and click on OK.

Similarly, do follow the above steps for the Linux mint as well. The only difference with the Linux mint is that the VM was stopped during the snapshot process.


Let’s also check out the same process using the CLI as well.
Taking a snapshot of a VM in CLI.
The VirtualBox CLI known as vboxmanage, is the command-line utility for the VirtualBox. You can learn more about the VirtualBox command line here. To perform the Snapshot in the VirtualBox, you do not need to click on multiple menu’s, and you can accomplish the same task with a single command.
Open the vboxmanage CLI in windows, and you will have to go to the installation location (C:\Program Files\Oracle\VirtualBox) of the VirtualBox and run cmd from there to get to the vboxmanage.
Before taking the Snapshot of a VM in VirtualBox CLI, check the list of Snapshot for the specific VM.
Check the list of VM’s in VirtualBox.
You can issue the command, vboxmanage list vms
C:\Program Files\Oracle\VirtualBox>vboxmanage list vms
"Linux Mint" {8637c1dd-9be0-49f4-9d07-9b12f0892941}
"Ubuntu-Web Server1" {105025b5-714c-42a8-81b9-b75b9f0adf63}
C:\Program Files\Oracle\VirtualBox>
Check the Snapshot for a particular VM.
To check the list of Snapshot for a VM, enter the command VBoxManage snapshot <uuid|vmname> list
The same snapshot taken in the GUI, you can see them in the CLI as well.
C:\Program Files\Oracle\VirtualBox>vboxmanage snapshot "Ubuntu-Web Server1" list
Name: Prior to network change#123 GUI (UUID: dffe50cc-fa17-4f99-a7ae-85ff0ae0da4c) *
C:\Program Files\Oracle\VirtualBox>vboxmanage snapshot "Linux Mint" list
Name: Prior to network change#123 GUI (UUID: 3085bafc-71ce-4cf9-8f0f-0631c2a51bc3) *
C:\Program Files\Oracle\VirtualBox>
Take the snapshot.
The command for taking the Snapshot in vboxmanage is below.
VBoxManage snapshot <uuid|vmname> take <snapshot-name> [--description=description] [--live] [--uniquename Number,Timestamp,Space,Force]
I have changed the command based on my setup, so the command will be as follows.
VBoxManage snapshot "Ubuntu-Web Server1" take prior_to_network_change#123_CLI --description=Taking_the_snapshot_for_future_use_in_CLI
C:\Program Files\Oracle\VirtualBox>VBoxManage snapshot "Ubuntu-Web Server1" take prior_to_network_change#123_CLI --description=Taking_the_snapshot_for_future_use_in_CLI
0%...10%...20%...30%...40%...50%...60%...70%...80%...90%...100%
Snapshot taken. UUID: c1b24f63-50f6-4889-b508-687f628f19c3
C:\Program Files\Oracle\VirtualBox>
I Ran the same command for the Linux mint as well.
C:\Program Files\Oracle\VirtualBox>VBoxManage snapshot "Linux Mint" take prior_to_network_change#123_CLI --description=Taking_the_snapshot_for_future_use_in_CLI
0%...10%...20%...30%...40%...50%...60%...70%...80%...90%...100%
Snapshot taken. UUID: 8938dfaf-1289-46c7-bb7a-99826dd56778
C:\Program Files\Oracle\VirtualBox>
When you take the Snapshot of the VM, based on the size of the VM, the network services will be paused during the snapshot process. To avoid that, you can add –live at the end of the command.


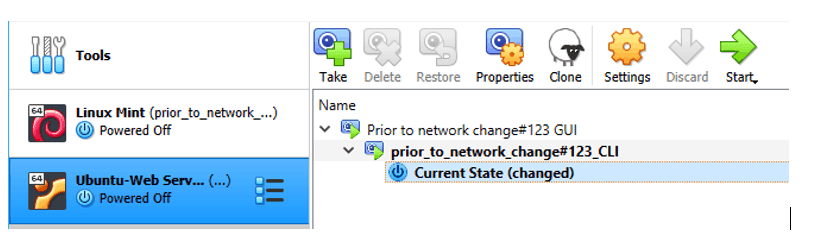
Check the list of VM snapshot in CLI.
You can see the Snapshot we have taken for both the GUI and the CLI.
C:\Program Files\Oracle\VirtualBox>vboxmanage snapshot "Ubuntu-Web Server1" list
      Name: Prior to network change#123 GUI (UUID: dffe50cc-fa17-4f99-a7ae-85ff0ae0da4c)
      Name: prior_to_network_change#123_CLI (UUID: c1b24f63-50f6-4889-b508-687f628f19c3) *
      Description:
Taking_the_snapshot_for_future_use_in_CLI
C:\Program Files\Oracle\VirtualBox>vboxmanage snapshot "Linux Mint" list
      Name: Prior to network change#123 GUI (UUID: 3085bafc-71ce-4cf9-8f0f-0631c2a51bc3)
      Name: prior_to_network_change#123_CLI (UUID: 8938dfaf-1289-46c7-bb7a-99826dd56778)
      Description:
Taking_the_snapshot_for_future_use_in_CLI
         Name: prior_to_network_change#123_CLI (UUID: 3e20f89a-5240-44d0-ada1-1ae88ab996f4) *
Description:
Taking_the_snapshot_for_future_use_in_CLI
C:\Program Files\Oracle\VirtualBox>
Make the changes.
Let’s go ahead and make some changes to the virtual machine, and when we restore it whatever the changes that we made will be disappeared.
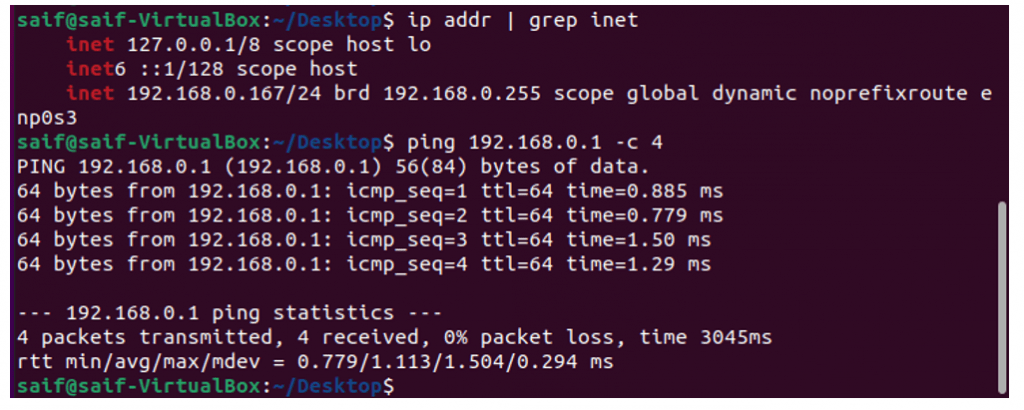
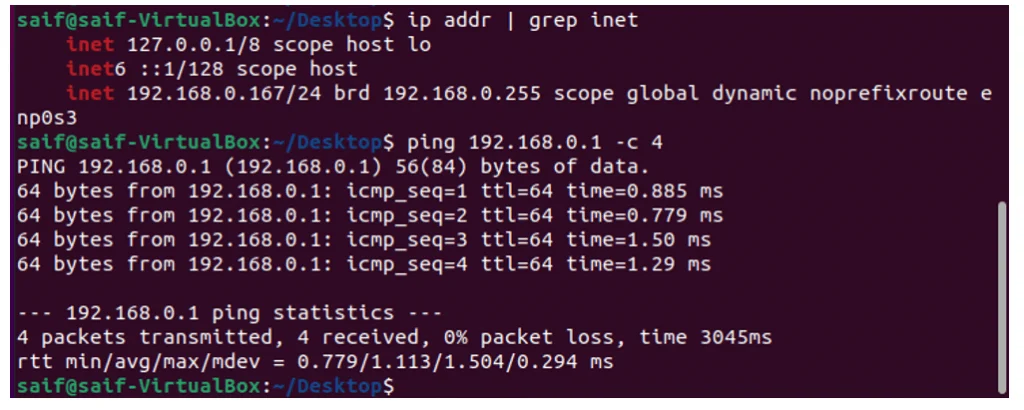
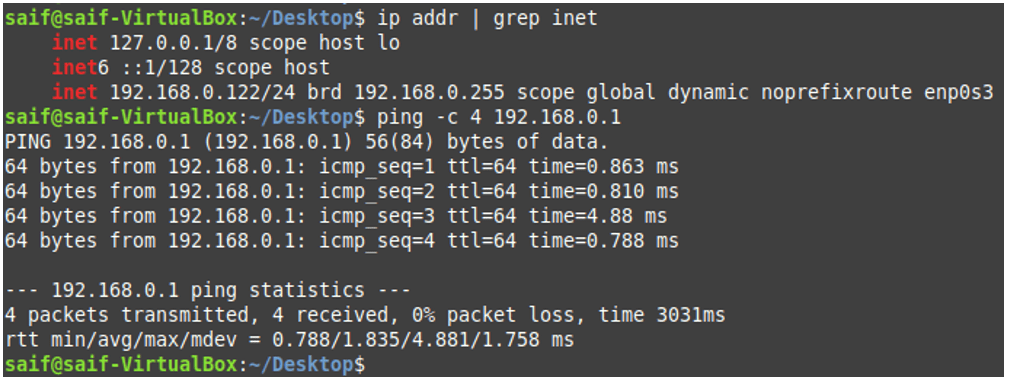
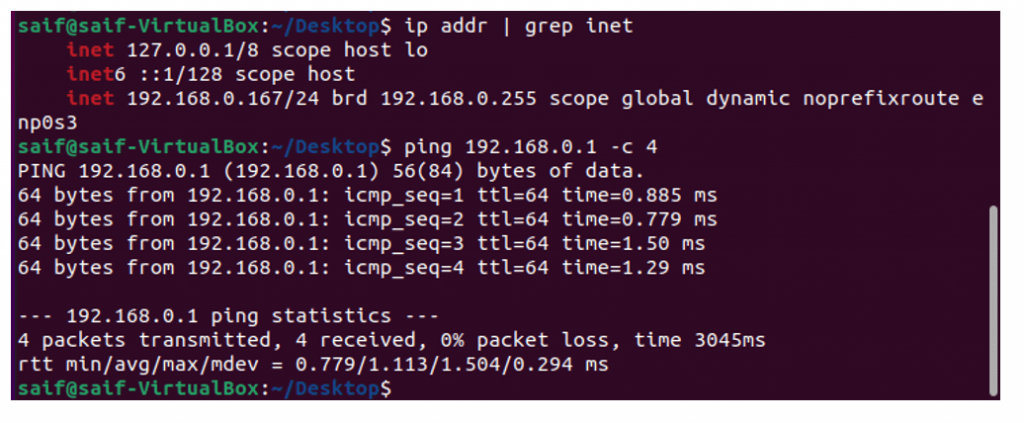
I did power on both the virtual machines, and currently, both the VM’s are connected to the bridge network. Because of which I got the IP address from the local network, and I can talk to the local network as well.

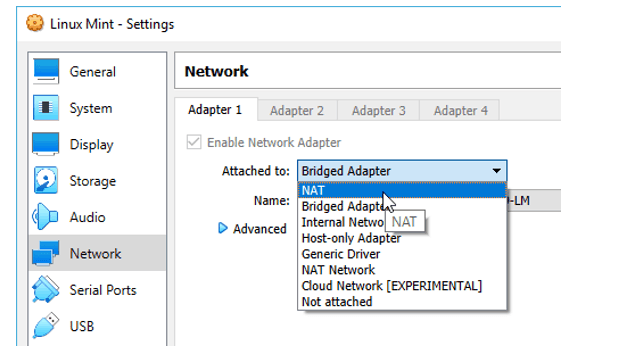
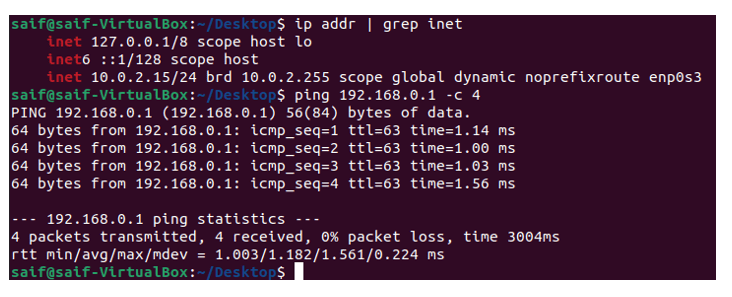
The only change that we are going to make is changing the VM network from Bridge to NAT. The process will move the VM out of the local network, and both get the IP address from the NAT.
The VirtualBox network settings are explained here.
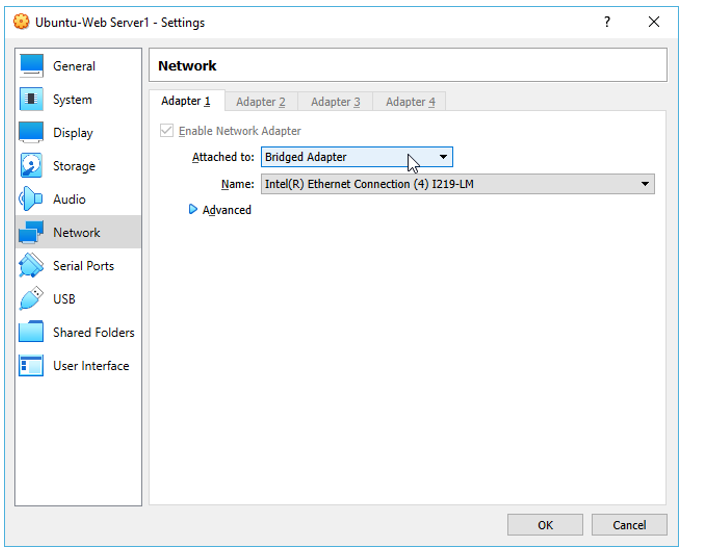
To change the network, right-click on the VM–> Settings–> Network.
Click on Adapter 1 and change it to NAT adapter.

Just turn off and turn back on the virtual adapter, and you must have a network configured on the NAT on the VirtualBox. I got the IP address 10.0.2.15 on both the VM’s and I can talk to the local network.
Note: In Virtualbox NAT, though you get the same IP address on both, they both are isolated from each other.


That’s it; we just made the changes; let’s imaging something stopped working after you made the changes, and you need to revert the changes quickly; how do we do that?
We can use the VirtualBox restore option to restore the VM.
During the restore, you can also take a snapshot of the current state of the VM as well, in case If you change your mind and restore to the NAT configuration again.
How to restore virtualbox snapshot?
Similar to how we have taken the Snapshot, the restore option can be performed using either GUI or CLI.
Right after we restore the VM, both the VM’s will go back to their original state.
Virtualbox Snapshot restore using GUI.
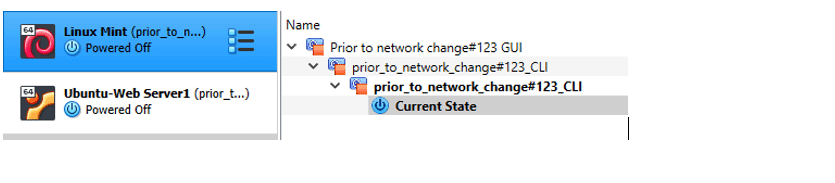
- Power off both the VM’s.
- Select the VM you want to restore it.
I have selected the Ubuntu machine; as you can see, I have the Snapshot that I created earlier.

You can notice the same Snapshot for the Linux mint as well, because we took the Snapshot for both at the same time.
Did you notice the icon on both the VM snapshot’s is different?
One of the VM is with the green play button and the other with the Red stop button.
The green play button indicates, the Snapshot was taken while the VM was running, and the stop button indicates it was taken when the VM was shut.
Note: When the VM is running, you will see the restore option is greyed out in the VirtualBox; hence, you must shut down the VM before proceeding with the restoration step.

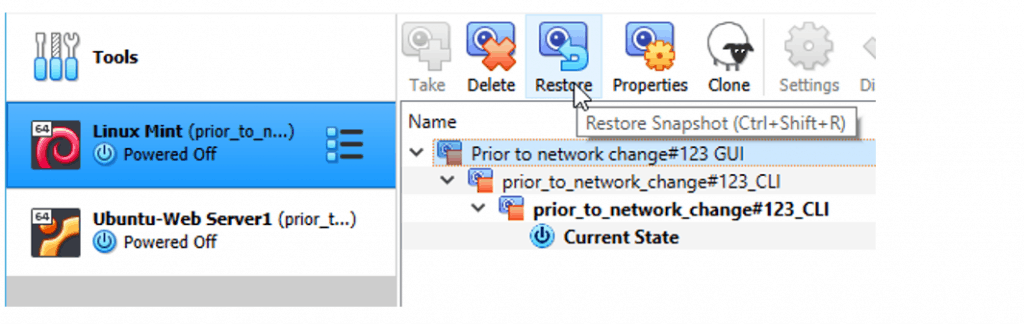
- On the Snapshot menu, select the Snapshot you want to restore to; in our case, I am choosing the Snapshot that I had taken in the GUI. And click on the Restore button to restore the VM from the Snapshot.

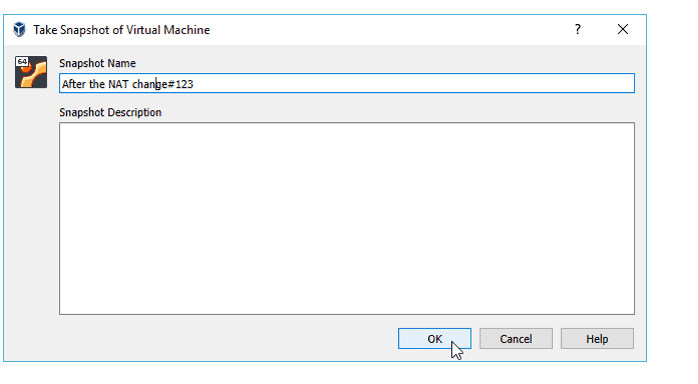
- When you click on that, a new window will pop up, and you also get an option to take a snapshot of the current state of the VM at this point.
I recommend selecting that option if you change your mind and roll back to the current version again.
If you do not prefer to take the Snapshot for the current state VM, you may uncheck the option.
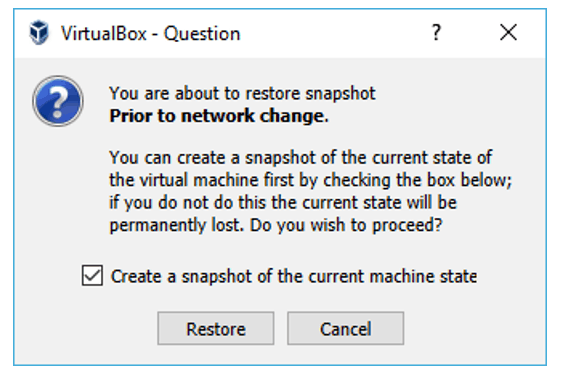

Because we checked the snapshot option, I have got another prompt to create a new Snapshot.
Provide some name and click on OK.

Virtualbox Snapshot restore using CLI.
Power off the VM, the command to restore the VM is VBoxManage snapshot <uuid|vmname> restore <snapshot-name>
The actual command would be.
VBoxManage snapshot "Ubuntu-Web Server1" restore prior_to_network_change#123
C:\Program Files\Oracle\VirtualBox>vboxmanage snapshot "Ubuntu-Web Server1" restore prior_to_network_change#123_CLI
Restoring snapshot 'prior_to_network_change#123_CLI' (c1b24f63-50f6-4889-b508-687f628f19c3)
0%...10%...20%...30%...40%...50%...60%...70%...80%...90%...100%
C:\Program Files\Oracle\VirtualBox>
Validate the Snapshot restore.
We have restored the Snapshot on both the VM’s now; let’s validate whether we roll back to the previous state or not.
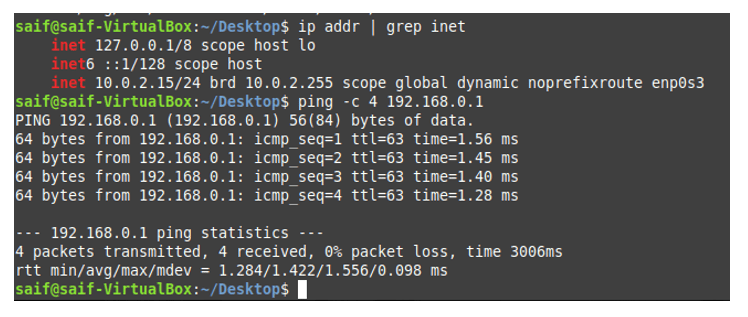
Before you proceed with powering on the VM, right-click on Settings–> Network.
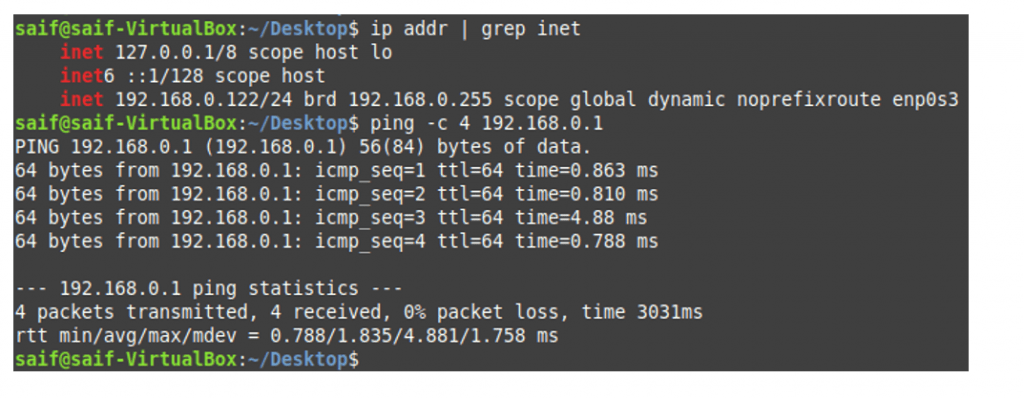
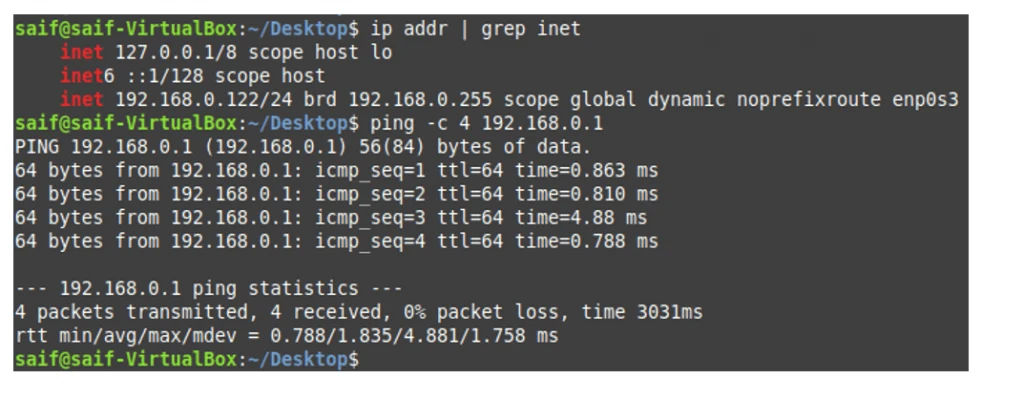
You will see the NAT interface changed to Bridge interface back on both the VM’s. Which means the restoration process was successful.

Power on the VM’s and check the IP configurations. As you can see, we are back to the bridged networking again with the same IP address.

How to delete virtualbox snapshots?
The deletion of VM snapshot in the virtualbox is very easy.
In GUI.
- Goto the VM snapshot list.
- Select the snapshot you want to delete.
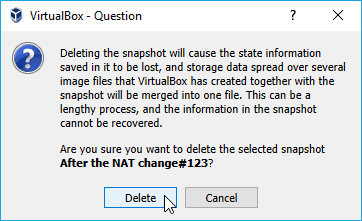
- And click on Delete.


You will get a prompt, click on Delete on that. The selected snapshot will get deleted.

In CLI.
- Check the list of snapshot you want to delete. with the command vboxmanage snapshot <vmanae> list
C:\Program Files\Oracle\VirtualBox>vboxmanage snapshot "Linux Mint" list
   Name: Prior to network change#123 GUI (UUID: 3085bafc-71ce-4cf9-8f0f-0631c2a51bc3)
      Name: prior_to_network_change#123_CLI (UUID: 8938dfaf-1289-46c7-bb7a-99826dd56778)
      Description:
Taking_the_snapshot_for_future_use_in_CLI
         Name: prior_to_network_change#123_CLI (UUID: 3e20f89a-5240-44d0-ada1-1ae88ab996f4) *
         Description:
Taking_the_snapshot_for_future_use_in_CLI
C:\Program Files\Oracle\VirtualBox>
- Issue the snapshot delete command. Which is vboxmanage snapshot <vmname> delete
C:\Program Files\Oracle\VirtualBox>vboxmanage snapshot "Linux Mint" delete prior_to_network_change#123_CLI
Deleting snapshot 'prior_to_network_change#123_CLI' (8938dfaf-1289-46c7-bb7a-99826dd56778)
0%...10%...20%...30%...40%...50%...60%...70%...80%...90%...100%
C:\Program Files\Oracle\VirtualBox>