
When it comes to MikroTik, you can pretty much run everything out of the box using the Quickset option. However, sometimes you may want to override the initial basic configuration manually. So, in this blog article, we will start configuring MikroTik from scratch.
You might be thinking where do I begin with the basic configurations, should I start with the bridge, or IP or firewall, and so on.
So in this blog, I am trying to setup mikrotik basic configuration step by step for anyone who wants to set it up manually in few mins.
I have reset the MikroTik router to its factory defaults, and we won’t be using the default MikroTik configuration. Instead, we will configure it from the beginning.
Prerequisites:
- MikroTik router.
- Winbox Utility.
- Windows machine.
Steps to Manualy configure MikroTik router – including the bridge.
1. Access the MikroTik GUI
To access the MikroTik router GUI, follow these steps:
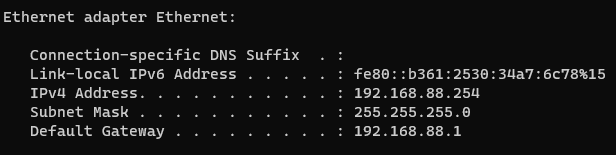
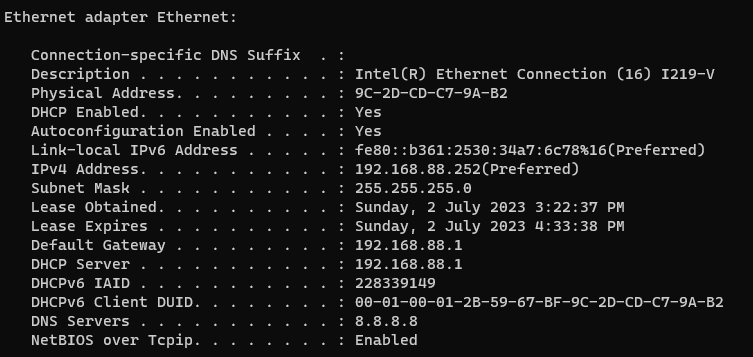
- After factory resetting the MikroTik router, the Port 1 will be configured as DHCP, and Port 2 will be configured with LAN, leasing out IP addresses in the 192.168.88.0/24 subnet through its DHCP service.
- Grab an Ethernet cable and connect one end to Port 2 of the MikroTik router and the other end to the PC you want to configure.
- As you can see, the IP address was assigned automatically.
There are multiple ways to access the MikroTik management console.
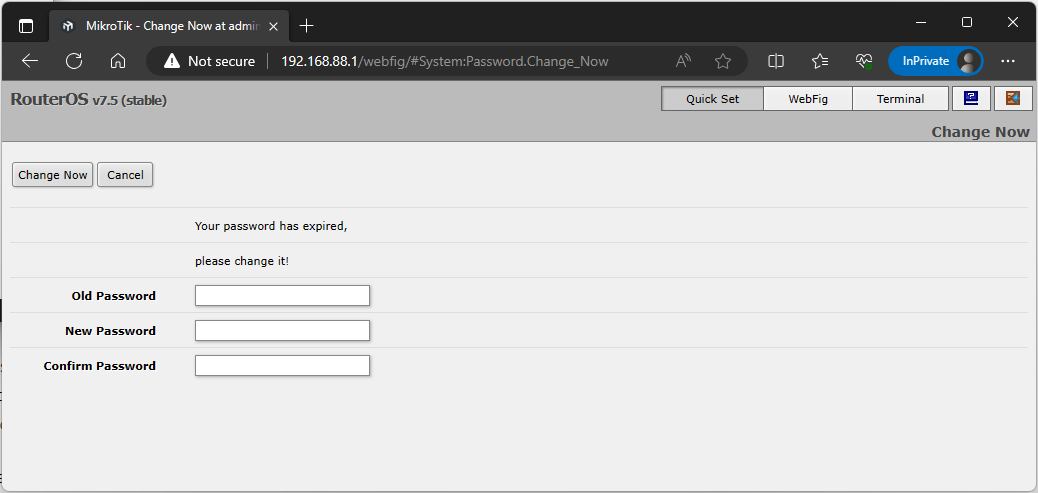
Web Browser: To access the web GUI, open a web browser and enter http://192.168.88.1. Please note that the service is HTTP, not HTTPS. To enable HTTPS, you’ll need to configure a certificate. However, for now, HTTP should suffice. If you have reset the router, it will prompt you to reset the credentials. The old password is blank, so you can enter and confirm a new password.
Once you’ve set the new password, click on WebFig to proceed with the manual configurations.
CLI (Command Line Interface): Similar to other network devices, you can access the MikroTik router CLI by establishing an SSH connection. You can use tools like PuTTY or the Command Prompt in Windows 11 to SSH into the device.

After establishing the SSH connection, the system will prompt you to change the password. Simply follow the instructions below:
- Enter the new password and press Enter.
- Repeat the new password and press Enter.
You will receive a confirmation message indicating that the password has been changed successfully.
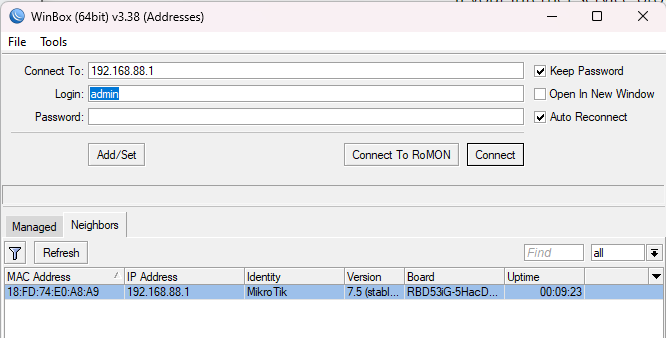
Using Winbox : This is my favorite way to access the MikroTik management console. Once you’re plugged in, simply open the Winbox utility and navigate to the “Neighbor” tab. There, you’ll find the MikroTik router. If you don’t see the router yet, you can click on “Refresh.”
You have two options to connect to the MikroTik: using the MAC address or the IP address.
To connect to the router using the MAC address, all you have to do is select the router from the list below, click on the MAC address, and then click on “Connect.”

If you prefer to connect using the IP address, just click on the IP address and then select “Connect,” as shown below.
Note: If you have already set the password for the router, make sure to enter it when prompted.
Here is my MikroTik management console.

2. Configure the WAN interface.
When setting up a MikroTik router, the first step is to configure the WAN interface. In my case, I will be using the first port for the internet connection.
To establish the connection, I opted for DHCP as my Internet Service Provider (ISP) already provides IP assignments through this service.
So, I connected the MikroTik router to the internet and patiently waited for the ISP to assign an IP address.
If you happen to use PPPoE instead, you can refer to this article for detailed instructions on configuring it.
Once I connected the internet link, I immediately received an IP address from my ISP. This IP address corresponds to the Ether1 port, while the bridge configuration assigns 192.168.88.1 to the port2 within the network.
Now, it’s time to dismantle the existing bridge and start the setup process from scratch.

3. Configure the MikroTik Bridge.
I’m using a MikroTik router with five ports and a WiFi interface, giving me a total of six ports. For this setup, we’ll keep the first port as it is and create another bridge. We’ll connect all the ports except for ether1 to the new bridge. Finally, we’ll remove the existing bridge and configure the LAN subnet as 10.1.1.0/24 for the new bridge.
To start, navigate to the left pane and click on “Bridge.”
You’ll notice that there is already a bridge configured.
To add a new bridge, simply click on the plus icon.
Now, let’s give the bridge a user-friendly name.
Click on “OK” to save the changes.

4. Add IP address for the bridge.
Before proceeding with any further configurations, it is important to add the IP address for the bridge.
However, please ensure that you do not move the ports to the new bridge at this stage. If you do so, you will be kicked out from the management GUI, which will prevent you from proceeding with the remaining configurations.
To add the IP address, follow the steps below:
- Navigate to IP -> Addresses in the management GUI.
- In the Address list, locate the plus icon and click on it to add a new address.
- Based on our previous discussion, we will assign the IP address 10.1.1.1/24 to the new bridge.
- In the “Address” field, enter the new subnet IP. In this case, it would be 10.1.1.1/24.
- In the “Interface” field, select the newly created bridge.
- Finally, click on “Ok” to save the changes.

Configure the DHCP service on the new bridge.
IP-> DHCP server
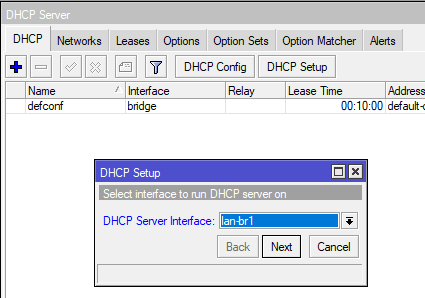
Open the DHCP server window and navigate to the DHCP tab.
Look for the DHCP setup option and click on it.
You will be prompted to select the interface on which you want to run the DHCP service. Choose the newly created bridge from the list.
Once you have selected the bridge, click on Next to proceed.
In the DHCP Address Space, it automatically picks up the range for you because we already allocated this subnet IP address in the Address list.
Click on Next.

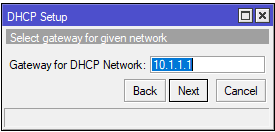
Configure the Default gateway, here you need to enter the ip address that you configured in the address list which is 10.1.1.1 and click on next.
In the DHCP Address to give out, I could have given the whole /24 subnet, instead I have restricted the IPs to 10.1.1.10 to 101.1.200.
So depending on your requirement, you may configure the IP pool. And click on next.

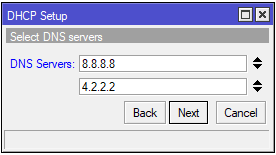
While configuring DNS settings, I proceeded by adding the Google Public DNS servers, namely 8.8.8.8 and 4.2.2.2. Afterward, I simply clicked on the “Next” button.
Please note that initially, there is only one field available for configuring DNS servers. However, you can expand the options by clicking on the downward arrow, allowing you to add multiple DNS servers.
Click on Next.
In the lease time, I am okay with the default lease time and click on next.

You will receive a message indicating that the DHCP has been configured successfully.
We have successfully configured the DHCP service on the newly created bridge interface.
Now, let’s move the bridge to the LAN.
5. Move the bridge to LAN.
We have completed all the pre-configuration steps. It’s time to move the newly created bridge to the LAN interface list.
Click on “Interfaces.”
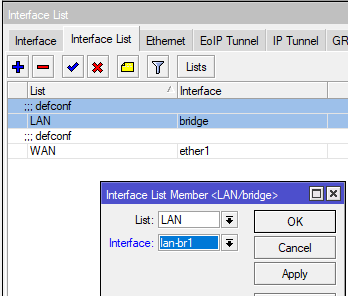
In the interfaces window, locate and click on the interface list.
Double-click on the LAN option. In the new window that appears, select the newly created bridge as the interface, and click “Ok.”
Please do not close the interface window yet, as we still need to move all the ports to the newly created bridge.
6. Move all the ports to the new bridge.
We have connected the PC to the MikroTik router using port2, so first let’s add the remaining ports to be part of the bridge and finally we will add the port2.
Remember, we should never touch the port1(ether1) which is connected to the internet.
Go back to the bridge on the left pane.
Click on the ports tab.
Click on Wlan2, a new window will now appear.
Choose the newly created bridge and click on OK.

Similarly add the remaining port except ether2.
As you can see, I have added all the ports to be part of the newly created bridge.

And we still have connectivity to the management GUI.
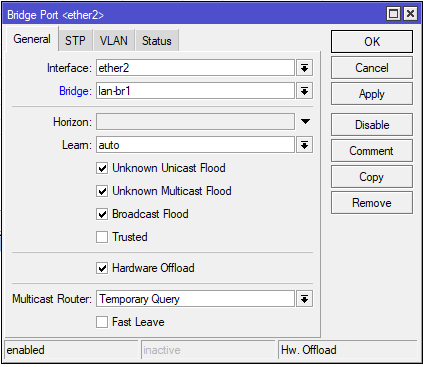
Finally lets move the ether2 as well to the newly created bridge.
Click on ether2, in the bridge choose lan-br1
When you click on ok, you will lose the connectivity in a few seconds.
You are now disconnected from the management GUI, how do you get back in?
From the network perspective, you are still connected to the old IP address which 192.168.88.0/24
Unplug and plug back in the port2 from your PC, and the MikroTik will start to assign a new IP address from the 10.1.1.0/24 or whatever the IP address you configured for the newly created bridge. Once you have it, you will be able to connect using the IP.
I now have a new Ip address now

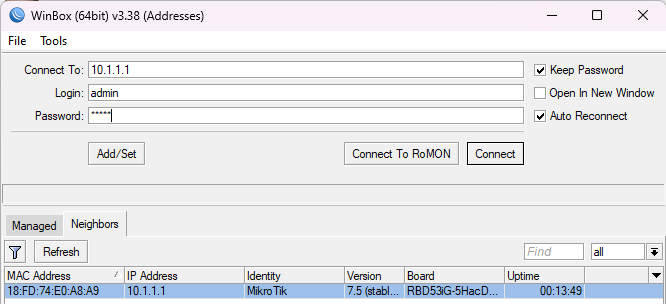
Open the winbox utility again, click on neighbours.
Open the Winbox utility once again and click on “Neighbors.”
In the neighbor list, you will find the router with a newly assigned IP address.
Click on the column labeled “IP address.” Notice that the “Connect to” option now displays 10.1.1.1. Enter the password that you have recently reset, and then click on “Connect.”
As you can observe, I am now successfully able to access the management console through the Winbox utility, which adds a personal touch to my experience.
Everything will work just fine from now on, and you are in the newly created subnet.