As a network engineer, most of the issues you may have to deal with are related to the performance of a network. There are multiple tools that we can use to troubleshoot performance issues. One among them is the iPerf, which can help you identify a given link bandwidth capacity.
You can have a server sitting on a remote location, be it Windows or Linux, and make your local machine act as an iPerf client.
Start sending the traffic by defining various parameters, and you would notice the traffic is sending back and forth between the iPerf client and the server. On both sides, it will tell you the exact throughput of the link; you are using to communicate with the remote location.
The most commonly used iPerf version is iPerf 2, and there is a recent release that is iPerf3 and the cool part about this tool because it is available on most operating systems.
We will be using iPerf3 to make the windows host the iPerf client and the Ubuntu Linux as the server. Regardless of the version and the operating systems, the iPerf commands will be the same.
How to install iPerf on a windows machine?
For a windows user, whether it is windows 10/11, or a server, you go to the iPerf site here. And in the download section, you can download the latest iperf windows release.
The downloaded file will be in a zip format, and you will have to extract them to your machine.
I would recommend you to either choose Desktop or C drive to keep them in a separate folder.
Right-click on the download file and click on Extract all.
In the destination, choose the location where you want to keep the iPerf files.
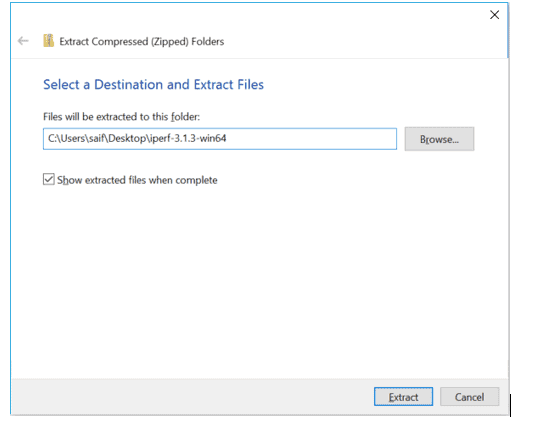
The iPerf files are extracted to my desktop folder in windows.

The iPerf software is not GUI based, and you will have to use the command utility to use the iPerf.
When you are in the iPerf folder, type the cmd and enter to open up the cmd in that specific location.

And while you are in the folder, you can type the dir command to list the same files in the iPerf folder.
C:\Users\saifudhe\Desktop\iPerf-3.1.3-win64>dir
 Volume in drive C is PC COE
 Volume Serial Number is 12CB-7D45
 Directory of C:\Users\saifudhe\Desktop\iPerf-3.1.3-win64
05/29/2021  08:25 PM    <DIR>          .
05/29/2021  08:25 PM    <DIR>          ..
04/21/2016  10:14 PM         3,539,372 cygwin1.dll
06/09/2016  10:30 AM           468,748 iPerf3.exe
               2 File(s)      4,008,120 bytes
               2 Dir(s)  28,996,456,448 bytes free
C:\Users\saifudhe\Desktop\iPerf-3.1.3-win64>
You now should be able to run iPerf commands on the windows machine from here.
How to install iPerf on Ubuntu?
The installation of iPerf on Ubuntu is pretty straightforward.
There are two packages available in Ubuntu; one is iPerf, version 2, and the other iPerf3 is version 3.
We will install version 3; enter the below commands to install the iPerf3 on the ubuntu machine.
sudo apt updatesudo apt install iPerf3 -y
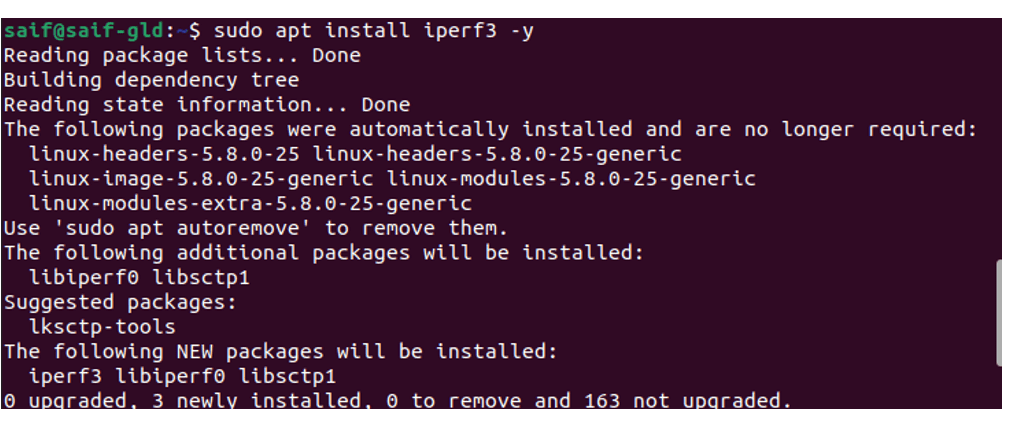
Check the bandwidth from your Windows machine to ubuntu.
There are numerous commands under the iPerf program, and one can get confused at any time.
You can type the command iPerf3 -h to get the commands supported by the iPerf3.
-h stands for help.
Enable iPerf3 server.
First, we need to note the IP address of our iPerf server, and we will use one of the Ubuntu machines for that.
Type ip addr in the terminal to get the ip address of the Ubuntu machine.
saif@saif-gld:~$ ip addr | grep inet
    inet 127.0.0.1/8 scope host lo
    inet6 ::1/128 scope host
    inet 192.168.0.193/24 brd 192.168.0.255 scope global dynamic noprefixroute enp0s3
saif@saif-gld:~$
My IP address of the machine is 192.168.0.193, and we have already installed iPerf3 on the ubuntu machine. To enable the iPerf3 as a server on Ubuntu, you can enter the command below.
iperf3 -s
-s stands for server.
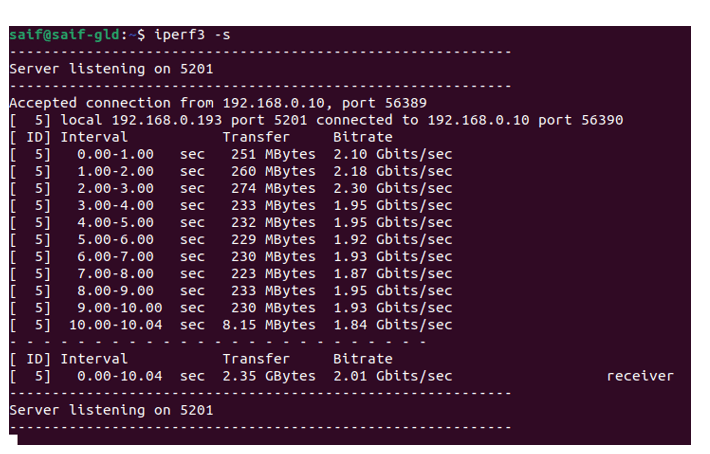
After you enter the command, you should see the server started to listen on port 5201

Initiate iPerf communication to the server.
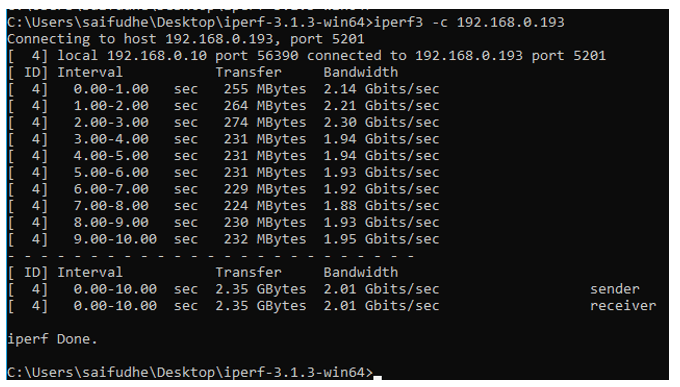
Now that we have the server running with iPerf, go to the windows machine and type the command iPerf3 -c <Server-IPaddress>
-c stands for the client; we already know the IP address of the server so that the command would be iperf3 -c 192.168.0.193
You should see the overall bandwidth from the windows machine to the ubuntu machine, which is 2Gbps.
You will also get the same output from the iPerf server as well.
Change the bits to bytes.
The output above showed the bits per seconds, and if you wanted to change it to bytes per second, you could do so by using the format option which -f.
-f, –format [kmgKMG] format to report: Kbits, Mbits, KBytes, Mbytes
To show the output for all the format, I can use the time to 2 seconds (-t 2) instead of the default 10 seconds.
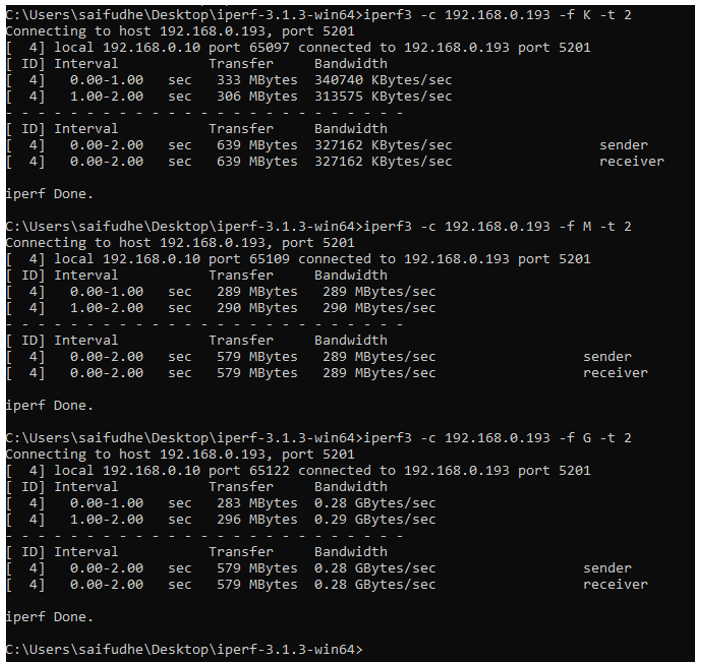
iPerf listens to different port numbers.
When you work on some network policies or advanced QoS policies, you might want to see how the packet behave before and after; the iPerf is very useful for that.
While enabling certain protocols, you need to make sure that the server is not using those specific services.
For example, if you try to Enable iPerf on the webserver that listens to Http / Https with port 80/443, you will get the error port is already in use.
iPerf3: error - unable to start listener for connections: Address already in useiperf3: exiting
You will have to shut the services if it is a lab and then try to run the iPerf, and it should work just fine.
You can enable the server to listen to the port number by typing -p and the port number.
Let’s see how we can enable the Http and Https traffic on the IPerf server, and we will test the same from the client machine.
To enable the Http service port on iPerf, you can use the -p and the port number.
iperf3 -s -p 80
While iPerf is listening on port 80, you can also open another terminal and listen to another protocol, for example, Https.
iperf3 -s -p 443
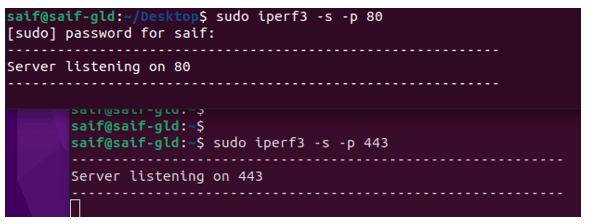
On the iPerf client, our windows machine, we can now talk to the iPerf server on port 80 and 443.
You have to enter the command as follows.
iPerf3 -c 192.168.0.193 -p 80 -t 2
iPerf3 -c 192.168.0.193 -p 443 -t 2
Below is the output for the Http service.
C:\Users\saifudhe\Desktop\iPerf-3.1.3-win64>iPerf3 -c 192.168.0.193 -p 80 -t 2
Connecting to host 192.168.0.193, port 80
[  4] local 192.168.0.10 port 56428 connected to 192.168.0.193 port 80
[ ID] Interval           Transfer     Bandwidth
[  4]   0.00-1.00   sec   330 MBytes  2.77 Gbits/sec
[  4]   1.00-2.00   sec   316 MBytes  2.65 Gbits/sec
- - - - - - - - - - - - - - - - - - - - - - - - -
[ ID] Interval           Transfer     Bandwidth
[  4]   0.00-2.00   sec   646 MBytes  2.71 Gbits/sec                  sender
[  4]   0.00-2.00   sec   646 MBytes  2.71 Gbits/sec                  receiver
iPerf Done.
Here is the https traffic generated using iperf.
C:\Users\saifudhe\Desktop\iPerf-3.1.3-win64>
This is how the https service looks like.
C:\Users\saifudhe\Desktop\iPerf-3.1.3-win64>iPerf3 -c 192.168.0.193 -p 443 -t 2
Connecting to host 192.168.0.193, port 443
[  4] local 192.168.0.10 port 51598 connected to 192.168.0.193 port 443
[ ID] Interval           Transfer     Bandwidth
[  4]   0.00-1.00   sec   304 MBytes  2.55 Gbits/sec
[  4]   1.00-2.00   sec   271 MBytes  2.27 Gbits/sec
- - - - - - - - - - - - - - - - - - - - - - - - -
[ ID] Interval           Transfer     Bandwidth
[  4]   0.00-2.00   sec   576 MBytes  2.41 Gbits/sec                  sender
[  4]   0.00-2.00   sec   576 MBytes  2.41 Gbits/sec                  receiver
iPerf Done.
C:\Users\saifudhe\Desktop\iPerf-3.1.3-win64>
Simulate multiple connections from the iPerf.
When you have certain services running on a server, and you want to test them. You can do multiple user sessions in iPerf by using the parallel option. What does it do? It creates a separate session based on how much you specify.
For example, if you want to see how the Https traffic bandwidth shared when 10, users try to access it at the same time, you can do that by using parallel (-P)
I am going to run 10, iPerf sessions parallel to the Https service on default port 443.
You can see the source machine initiated the traffic with a random port number.
C:\Users\saifudhe\Desktop\iPerf-3.1.3-win64>iPerf3 -c 192.168.0.193 -p 443 -t 2 -P 10
Connecting to host 192.168.0.193, port 443
[  4] local 192.168.0.10 port 57280 connected to 192.168.0.193 port 443
[  6] local 192.168.0.10 port 57281 connected to 192.168.0.193 port 443
[  8] local 192.168.0.10 port 57282 connected to 192.168.0.193 port 443
[ 10] local 192.168.0.10 port 57283 connected to 192.168.0.193 port 443
[ 12] local 192.168.0.10 port 57284 connected to 192.168.0.193 port 443
[ 14] local 192.168.0.10 port 57285 connected to 192.168.0.193 port 443
[ 16] local 192.168.0.10 port 57286 connected to 192.168.0.193 port 443
[ 18] local 192.168.0.10 port 57287 connected to 192.168.0.193 port 443
[ 20] local 192.168.0.10 port 57288 connected to 192.168.0.193 port 443
[ 22] local 192.168.0.10 port 57289 connected to 192.168.0.193 port 443
[ ID] Interval           Transfer     Bandwidth
[  4]   0.00-1.00   sec  20.0 MBytes   168 Mbits/sec
[  6]   0.00-1.00   sec  44.8 MBytes   375 Mbits/sec
[  8]   0.00-1.00   sec  39.1 MBytes   328 Mbits/sec
[ 10]   0.00-1.00   sec  13.1 MBytes   110 Mbits/sec
[ 12]   0.00-1.00   sec  12.6 MBytes   106 Mbits/sec
[ 14]   0.00-1.00   sec  21.1 MBytes   177 Mbits/sec
[ 16]   0.00-1.00   sec  10.8 MBytes  90.1 Mbits/sec
[ 18]   0.00-1.00   sec  3.25 MBytes  27.2 Mbits/sec
[ 20]   0.00-1.00   sec  38.8 MBytes   325 Mbits/sec
[ 22]   0.00-1.00   sec  20.6 MBytes   173 Mbits/sec
[SUM]   0.00-1.00   sec   224 MBytes  1.88 Gbits/sec
- - - - - - - - - - - - - - - - - - - - - - - - -
[  4]   1.00-2.00   sec  21.1 MBytes   177 Mbits/sec
[  6]   1.00-2.00   sec  4.62 MBytes  38.8 Mbits/sec
[  8]   1.00-2.00   sec  19.2 MBytes   162 Mbits/sec
[ 10]   1.00-2.00   sec  16.0 MBytes   134 Mbits/sec
[ 12]   1.00-2.00   sec  18.9 MBytes   158 Mbits/sec
[ 14]   1.00-2.00   sec  30.5 MBytes   256 Mbits/sec
[ 16]   1.00-2.00   sec  18.1 MBytes   152 Mbits/sec
[ 18]   1.00-2.00   sec  15.5 MBytes   130 Mbits/sec
[ 20]   1.00-2.00   sec  11.2 MBytes  94.4 Mbits/sec
[ 22]   1.00-2.00   sec  31.1 MBytes   261 Mbits/sec
[SUM]   1.00-2.00   sec   186 MBytes  1.56 Gbits/sec
- - - - - - - - - - - - - - - - - - - - - - - - -
[ ID] Interval           Transfer     Bandwidth
[  4]   0.00-2.00   sec  41.1 MBytes   172 Mbits/sec                  sender
[  4]   0.00-2.00   sec  40.9 MBytes   172 Mbits/sec                  receiver
[  6]   0.00-2.00   sec  49.4 MBytes   207 Mbits/sec                  sender
[  6]   0.00-2.00   sec  49.1 MBytes   206 Mbits/sec                  receiver
[  8]   0.00-2.00   sec  58.4 MBytes   245 Mbits/sec                  sender
[  8]   0.00-2.00   sec  58.2 MBytes   244 Mbits/sec                  receiver
[ 10]   0.00-2.00   sec  29.1 MBytes   122 Mbits/sec                  sender
[ 10]   0.00-2.00   sec  28.9 MBytes   121 Mbits/sec                  receiver
[ 12]   0.00-2.00   sec  31.5 MBytes   132 Mbits/sec                  sender
[ 12]   0.00-2.00   sec  31.3 MBytes   131 Mbits/sec                  receiver
[ 14]   0.00-2.00   sec  51.6 MBytes   217 Mbits/sec                  sender
[ 14]   0.00-2.00   sec  51.5 MBytes   216 Mbits/sec                  receiver
[ 16]   0.00-2.00   sec  28.9 MBytes   121 Mbits/sec                  sender
[ 16]   0.00-2.00   sec  28.8 MBytes   121 Mbits/sec                  receiver
[ 18]   0.00-2.00   sec  18.8 MBytes  78.6 Mbits/sec                  sender
[ 18]   0.00-2.00   sec  18.6 MBytes  78.2 Mbits/sec                  receiver
[ 20]   0.00-2.00   sec  50.0 MBytes   210 Mbits/sec                  sender
[ 20]   0.00-2.00   sec  49.8 MBytes   209 Mbits/sec                  receiver
[ 22]   0.00-2.00   sec  51.8 MBytes   217 Mbits/sec                  sender
[ 22]   0.00-2.00   sec  51.6 MBytes   216 Mbits/sec                  receiver
[SUM]   0.00-2.00   sec   410 MBytes  1.72 Gbits/sec                  sender
[SUM]   0.00-2.00   sec   409 MBytes  1.71 Gbits/sec                  receiver
iPerf Done.
C:\Users\saifudhe\Desktop\iPerf-3.1.3-win64>
Though I have added the timer as 2, the output was still long.