
Ubuntu is the alternate Linux operating system that I use in VirtualBox hypervisor on my windows 10 host machine. Because of which I can switch between the Ubuntu guest and windows host anytime I want. One important thing when you work with Linux VM in VirtualBox, how do I transfer files between the operating system and what is the simplest way.
In our last blog, I have covered how you can install Ubuntu operating system on VirtualBox. And In this one, I will show you how you can create a folder in windows and share them with Ubuntu vm in VirtualBox.
How do I create a shared folder between Windows and virtual machines?
There are different ways you can create a folder in a windows machine and share it with the virtual machines. The first option is to create a folder in the windows machine and share permission to the user, and from Ubuntu, you try to access the shared folder using the smb protocol via the host and guest networking. So your host machine must have reachability to the guest VM. I have covered this in more detail here.
The second and easiest way is to share the folder with the help of VirtualBox guest addition. In that, you create a folder and share the folder via VirtualBox settings. You should be able to see them in the guest operating system. We are going to do just that in the lab as a step-by-step guide.
Steps to configure Virtualbox shared folder.
- Install VirtualBox guest additions.
- Create a folder in windows.
- Connect the shared folder to the VirtualBox.
- Test the VirtualBox shared folder access.
1. Install VirtualBox guest additions.
You can think of VirtualBox guest additions as a VirtualBox driver for the guest machine. After the installation, you will observe the overall guest operating system performance is improved. The guest addition is an ISO file located in the VirtualBox installation location. And most of the operating systems out there are supported with guest additions.
You will end up with many performance issues if you don’t have VirtualBox guest additions are not installed on the Guest VM’s. For that reason, you must install VirtualBox guest additions right after you deploy the guest VM.
Follow the instruction below to install the guest additions on a ubuntu-desktop.
- Power on the VM.
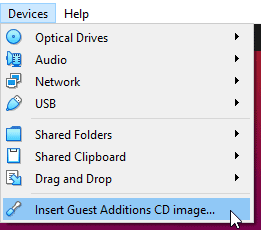
- In the VirtualBox Devices drop-down, click on Insert Guest Additions CD image..

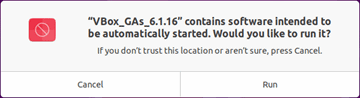
- You should see the CD drive was automatically mounted, and you would get a prompt that says Vbox_Gas_6.x.x contains software intended to be automatically started. Would you like to run it?
You can click on Run on that prompt.
- It will prompt you for authentication, enter the password for your ubuntu account
- You should see the guest additions have been installed on the terminal screen, and you may hit enter to exit out of the terminal.
- Let’s go ahead and reboot the VM now.
We have now successfully installed the virtual box guest addition on the ubuntu VM. To confirm the installation, you can run the command lsmod | grep vboxguest
saif@saif-gld:~$ lsmod | grep vboxguest
vboxguest              45056  5
saif@saif-gld:~$
2. Create a folder in windows.
We now have to create a folder in the windows machine that we can use between the guest VM and the windows host.
I created a folder called Ubuntu share on my windows machine in my C drive. You can create the folder anywhere you want.
3. Connect the shared folder to the VirtualBox.
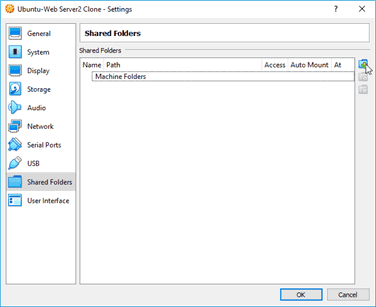
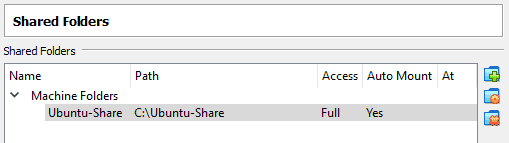
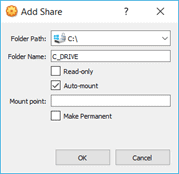
Shut down the Ubuntu VM, and right-click on it, and click on settings. You should get settings pop up in that choose Shared folders.
Click on the plus icon to add the shared folder that we created in our last step.

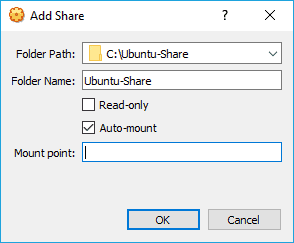
In the folder path, choose the shared folder that we have created.
You may provide a user-friendly name for the share.
You can decide whether this folder is read-only or read-write, I want this folder as read-write hence I unchecked the option Read-only.
Check the option Automount, which will automatically mount the share to the guest when the system reboots.
Mount point: You can choose the location for the mount point. I recommend leaving this blank so the guest will pick up the best path for mounting the folder.
Click on Ok and Ok on the VirtualBox settings.

At any time, if you changed your mind and wanted to adjust the existing shared folder, you can come back to the shared folder option in VirtualBox and click on the gear icon to edit the settings.

4. Test the VirtualBox shared folder access.
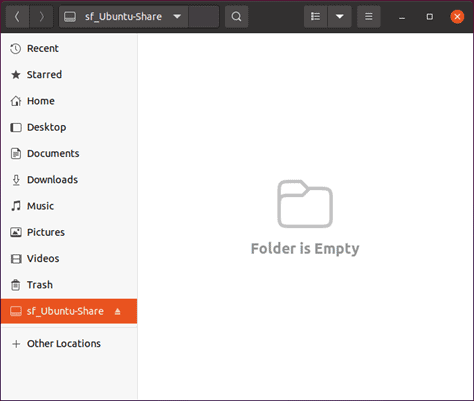
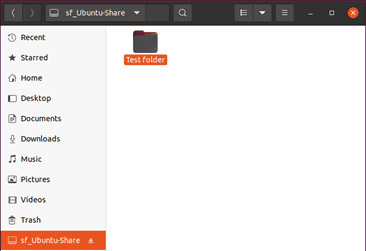
You may go ahead and start the VM now. Once the VM has been started, you should be able to see the shared folder under files. As you can see, the folder is empty at the moment. Let’s go ahead and create a folder in it now.

I created a test folder in the Ubuntu share folder.

You may now go back to the windows folder and make sure you can see the folder in the windows share.
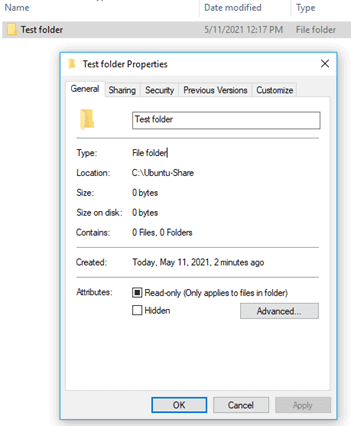
As you can see, the folder has been shown. You can now start sharing files back and forth from windows to Ubuntu and vice versa.
Can I share entire hard disk drive to Guest VM in VirtualBox?
If you wanted to share the entire hard disk drive, maybe the whole C drive instead of a specific shared folder with a Guest Virtual machine, Ubuntu in our case, which is also possible. All we have to do is instead of attaching the newly created folder. You can connect the entire C drive itself, and it should work fine.
As you can see below, I have attached the C drive instead of a specific folder.

And C drive showed up in the Ubuntu file manager app.

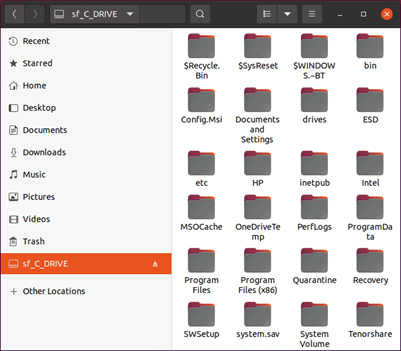
The conclusion is, you can not only share just a folder with the guest VM. You can even share the entire hard disk with it, giving the guest virtual machine access to the whole hard disk. And one thing to keep in mind is that you must always install the VirtualBox guest additions before proceeding with any of the above steps.