

If you have a Linux machine (Ubuntu, Centos, Redhat) running in your environment and you would want to configure them as an NTP server it is pretty easy.
In our last blog, we took a look at what is NTP and how to configure the public and private NTP servers using network routers. In this blog, we are going to configure the Linux machines as the NTP server.
By default, most of the Linux boxes are pointing to some open NTP servers once it has the NTP utility installed. You can use the same one, however, we are going to use google time servers for this lab.
When I say google time server which means, I would install and configure the NTP services on the linux box and during the configuration I would point the NTP to the google time servers.
As the google time servers are used mainly in the google cloud, it is very stable and just like google public DNS servers the NTP also can be used by anyone on the internet.
What is iburst in NTP?
when you add iburst in the NTP configuration the NTP synchronization would become faster. In iburst mode, the 10 NTP requests are sent within a minute instead of waiting for a minute. It is actually a good practice to keep the iburst in the NTP configuration.
I already have two Linux operating systems installed in my network, first one is the Centos and the second one is the Ubuntu machine. We are going to use the CentOS as our primary NTP server and the Ubuntu as the secondary NTP server.
After the configuration, you can point all the clients to Centos as well as the Ubuntu as the NTP servers.
Please note that the steps followed in the Centos are the same for the Redhat server as well.
Prerequisite for this NTP configuration
You just need a Centos / Redhat / Ubuntu Linux distribution installed with internet access. Since we are going to be installing two NTP servers, you may need two operating systems.
NTP Configuration in Linux step by step.
1. Install the NTP package.
2. Modifying the NTP configuration.
3. NTP Configuration Verification.
4. Restart the NTP services.
5. Allow NTP port on the firewall.
6. Linux NTP status verification
7. Configure NTP clients.
8. NTP client verification
1. Install the NTP package.
The first step in the process is to install the NTP service installation in Linux. Most of the Linux distributions would not have NTP preinstalled by default. To install the NTP package and its dependencies on the Linux machine you can run the command below.
- Ntp installation on Centos and Rhel
yum -y install ntp
- NTP installation on Ubuntu
apt install -y ntp
apt install -y ntpstat
2. Modifying the NTP configuration.
Once the NTP package installed you can go to the NTP config file and add the public NTP server.
The NTP configuration files are located at /etc/ntp.conf on Centos, Rhel, and Ubuntu. To edit the file enter the command below.
vi /etc/ntp.conf
You could also use a nano editor if you are comfortable with it.
nano /etc/ntp.conf
In this lab, I am using google NTP server. You could also go to pool.ntp.org and find out the NTP servers near to your location and use them as well.
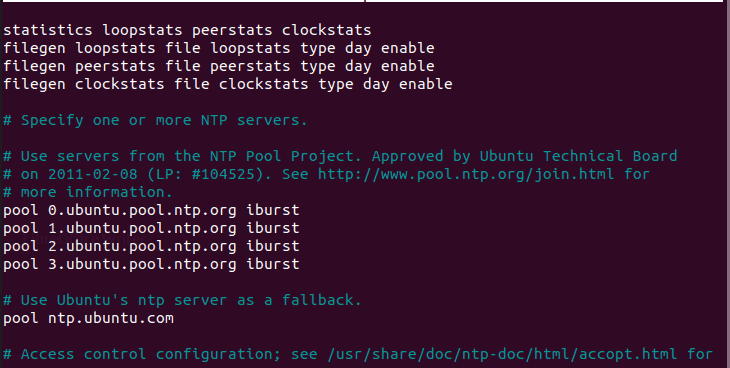
As you can see by default the Linux NTP config will have centos public NTP server pool from pool.ntp.org preconfigured in CentOS machine.
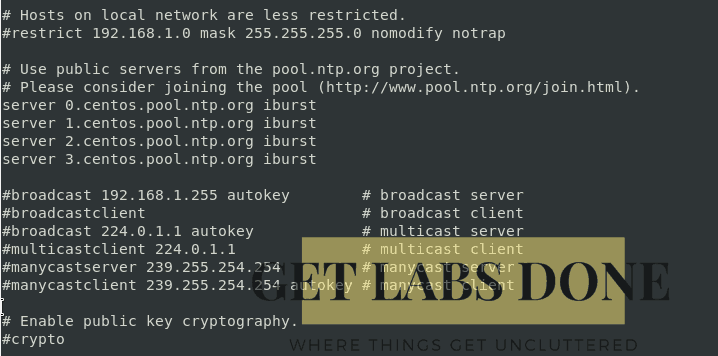

so does on the Ubuntu NTP configuration.

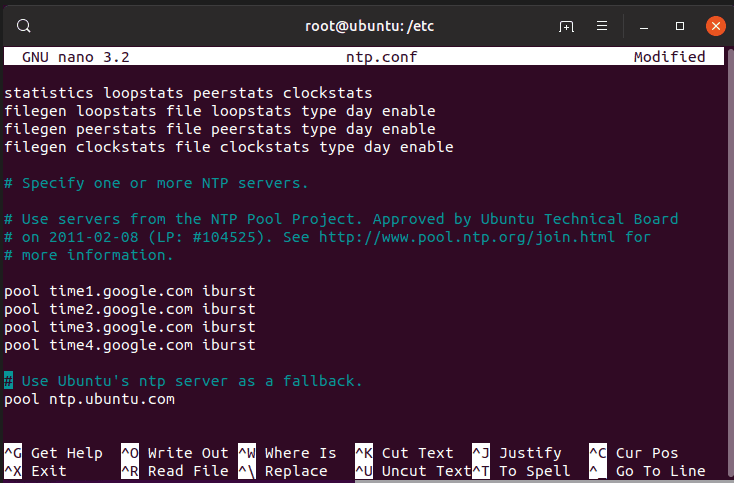
change the values to our google NTP time servers below.
time1.google.comtime2.google.comtime3.google.comtime4.google.com
3. NTP Configuration Verification.
I have now removed the existing configuration and pointed both the Linux box to the google NTP server, let’s verify the same.
Centos and Redhat NTP server verification.
As you can see below is the new configuration. And I have added all four NTP servers to the configuration.


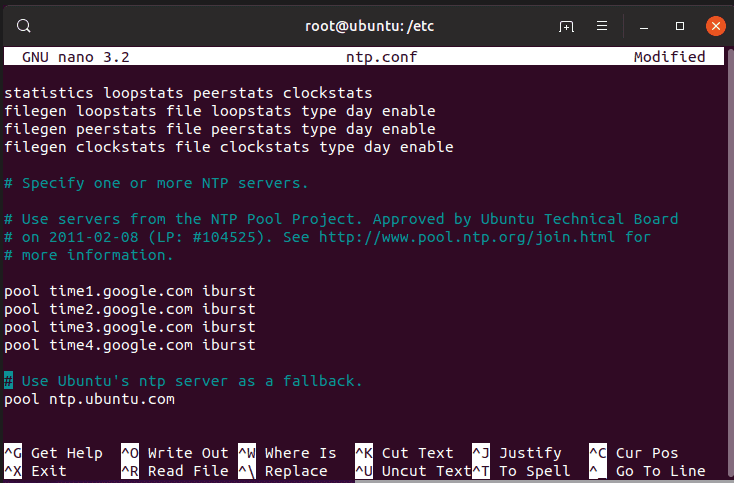
NTP configuration from the Ubuntu machine.
4. Restart the NTP services.
After you modify the file, you may go ahead and restart the NTP service just like how you would restart any other Linux services.
service ntpd restart
It is important that you add the NTP service to the Linux start up programs, so at any point if you had to reboot the machine the program would start automatically during the boot.
And add the NTP service to start during the system boot.
chkconfig ntpd on
5. Allow NTP port on the firewall.
Finally, you will have to allow port 123 in the centos firewall service for the NTP service to talk to the outside world.
You can allow the NTP port by typing the below command.
CentOS
[root@saif@gld ~]# firewall-cmd --add-service=ntp --permanent
success
[root@saif@gld ~]#
- Restart the firewall service in Centos to take this effect.
[root@saif@gld ~]#
[root@saif@gld ~]# service firewalld restart
Redirecting to /bin/systemctl
Ubuntu
sudo ufw allow ntp
6. Linux NTP status verification
After you finished the configuration, you may go ahead and check the NTP status on both the servers, as you can see both are synced with the google NTP servers.
It is common that NTP would take some time to sync with the remote servers, so just give it sometime.
If you still see the NTP status as not synced you may go ahead and restart the service one more time. Also, make sure you have internet access and able to reach the google time servers.
As you can see on both the Centos and Ubuntu the NTP service has been synced and I got the stratum value of 2. So basically google time servers has the stratum value of 1, and if you connect more clients to the NTP servers its stratum value would be higher than the NTP servers. The lesser the stratum the more NTP authority. If you want to learn more about the NTP protocol you can check out the article here.
Centos
[root@saif@gld ~]# ntpstat
synchronised to NTP server (216.239.35.0) at stratum 2
   time correct to within 49 ms
   polling server every 64 s
Ubuntu
root@ubuntu:/etc# ntpstat
synchronised to NTP server (216.239.35.4) at stratum 2
   time correct to within 26 ms
   polling server every 64 s
[root@saif@gld ~]# clock
Sun 21 Jul 2019 12:02:46 AM IST  -0.645947 seconds
We can also check NTP server synchronization status on all the servers
Centos
[root@saif@gld ~]# ntpq-p
remote           refid      st t when poll reach   delay   offset  jitter==============================================================================+time1.google.co .GOOG.           1 u   38   64  377   90.771   -3.560  12.827*time2.google.co .GOOG.           1 u   38   64  377   40.405   -6.920  21.720+time3.google.co .GOOG.           1 u   35   64  377   85.982   -8.006  20.105+time4.google.co .GOOG.           1 u   34   64  377   89.000   -9.192  10.081[root@saif@gld ~]#
Ubuntu
In ubuntu, you can also see some backup NTP server as well which I didn’t modify in ntp.conf
root@ubuntu:/# ntpq -p
     remote           refid      st t when poll reach   delay   offset  jitter
==============================================================================
 time1.google.co .POOL.          16 p    -   64    0    0.000    0.000   0.000
 time2.google.co .POOL.          16 p    -   64    0    0.000    0.000   0.000
 time3.google.co .POOL.          16 p    -   64    0    0.000    0.000   0.000
 time4.google.co .POOL.          16 p    -   64    0    0.000    0.000   0.000
 ntp.ubuntu.com  .POOL.          16 p    -   64    0    0.000    0.000   0.000
+time1.google.co .GOOG.           1 u   27   64   77   89.655    1.639   0.906
+time2.google.co .GOOG.           1 u   31   64   77   43.757   -1.704   0.975
*time3.google.co .GOOG.           1 u   29   64   77   92.284    0.247   1.231
+time4.google.co .GOOG.           1 u   27   64   77   88.076    0.552   2.482
-pugot.canonical 17.253.34.125    2 u   37   64   77  133.805   -4.524   0.547
-chilipepper.can 17.253.108.125   2 u   34   64   77  136.376   -3.614   1.116
-golem.canonical 131.188.3.220    2 u   37   64   77  136.002   -3.193   0.751
+alphyn.canonica 145.238.203.14   2 u   35   64   77  226.162    0.073   2.878
root@ubuntu:/#
If I comment on the ubuntu backup server in /etc/ntp.conf file and restart the NTP server, you can see only google NTP servers are synced, similar to how we have seen for the Centos.


root@ubuntu:/# service ntp restart
root@ubuntu:/# ntpq -p
     remote           refid      st t when poll reach   delay   offset  jitter
==============================================================================
 time1.google.co .POOL.          16 p    -   64    0    0.000    0.000   0.000
 time2.google.co .POOL.          16 p    -   64    0    0.000    0.000   0.000
 time3.google.co .POOL.          16 p    -   64    0    0.000    0.000   0.000
 time4.google.co .POOL.          16 p    -   64    0    0.000    0.000   0.000
 time1.google.co .GOOG.           1 u    1   64    1   95.693   -2.491   0.000
 time2.google.co .GOOG.           1 u    1   64    1   44.392   -2.687   0.000
root@ubuntu:/#
7. Configure NTP clients.
We got our NTP server configured on both CentOS and Ubuntu, now let’s put them to the test.
We are going to point one of the clients to our NTP servers. I am using Centos as the NTP client for this example.
Just like you pointed NTP servers to google time servers, you need to point your NTP client to the NTP servers that we have setup. When the client gets connected to the NTP server, it will have the stratum value of 3.
To point the Linux NTP client to the NTP server, you can follow the steps below.
- In terminal type
vi /etc/ntp.conf - Enter the IP address of both NTP servers.
server 192.168.137.10 iburstserver 192.168.137.20 iburst
- Restart the NTP service
service ntpd restart
8. NTP client verification
Similar to how we performed the NTP verification on the server, you can follow the same approach.
Type ntpstat to see if the NTP is synced.
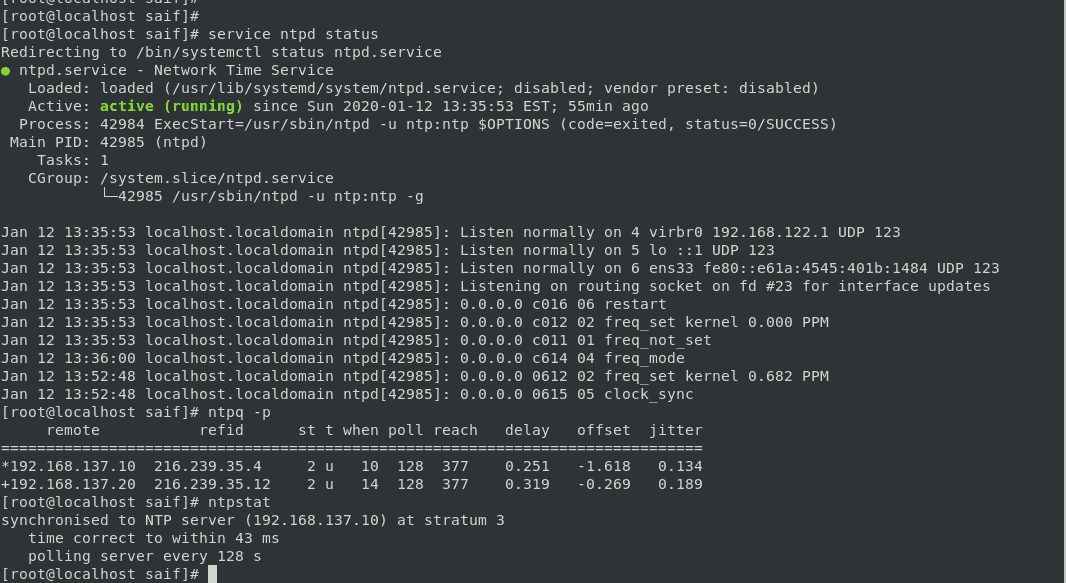
[root@localhost saif]# ntpstat
synchronised to NTP server (192.168.137.10) at stratum 3
   time correct to within 99 ms
   polling server every 64 s
[root@localhost saif]#
- You may type
ntpq -pto verify which server is in use
You can see both servers are used, however, the primary server 192.168.137.10 is selected for the NTP synchronization as the ‘*’ suggests.
[root@localhost saif]# ntpq -p
     remote           refid      st t when poll reach   delay   offset  jitter
==============================================================================
*192.168.137.10  216.239.35.4     2 u   51   64   17    0.376   -2.116   0.710
+192.168.137.20  216.239.35.4     2 u   47   64   17    0.227    1.374   0.833
[root@localhost saif]#
How to configure windows 10 as NTP client?
Well, configuring the Linux as the NTP client is not so common as many of the network client hosts are windows. So, it is better to sync the windows machine to the NTP server and see if it’s working.
So, I have a windows 10 machine in my lab and I am going to point the windows host to the linux NTP servers that we just setup.
To configure the windows 10 as the client you just have to follow only three steps.
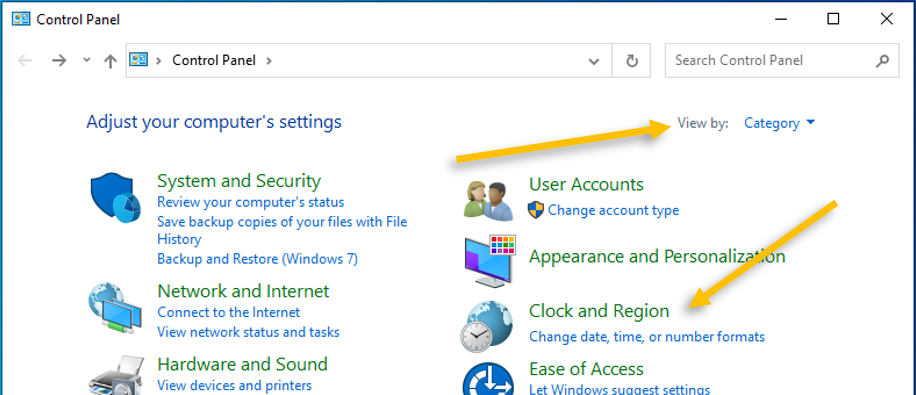
- Open the Date and time in control panel settings.
- Add the internet time servers (NTP servers) to the list.
- Click on Update now.
Go to windows 10 control panel, change the view by category and click on Clock and regions. Click on set the time and date. And click on internet time.
You now will have to click on change settings.

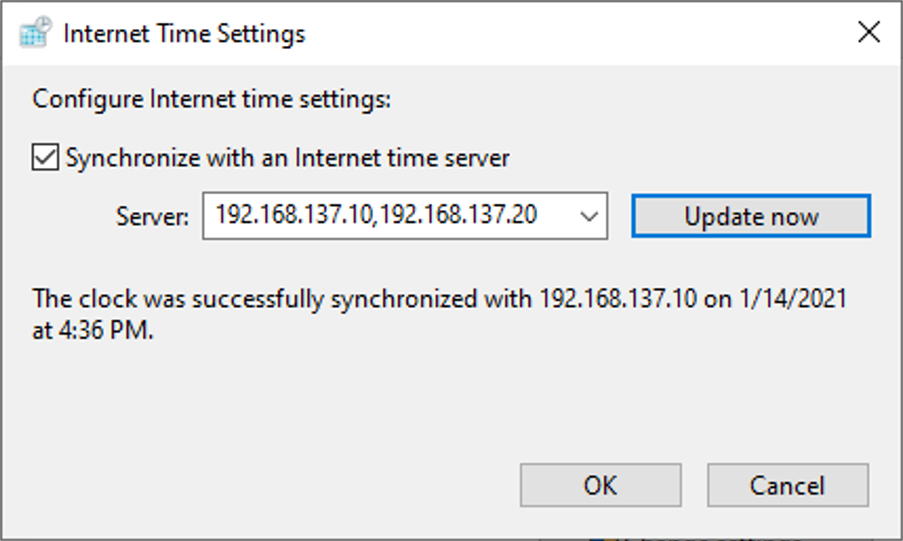
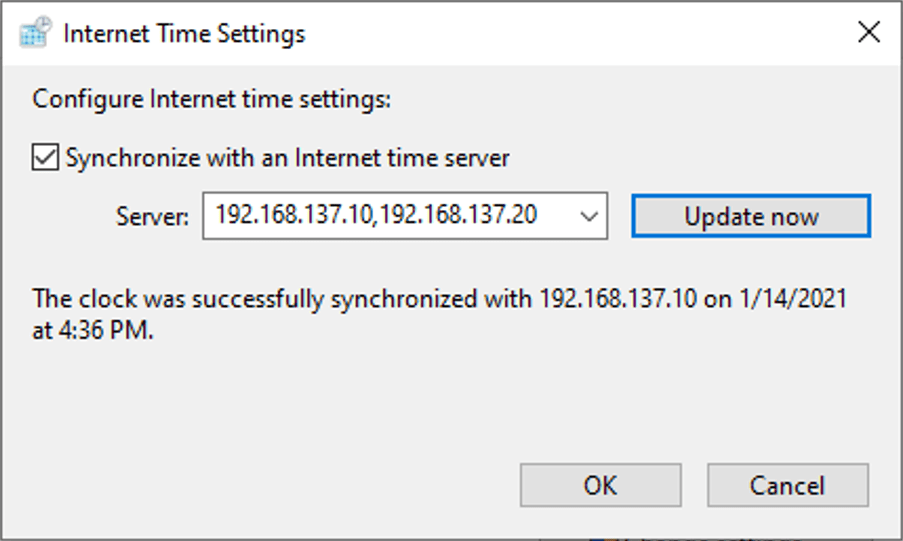
Check the box that says Synchronize with an internet time server.
In the server field provide our primary and secondary server Ip addresses and click on Update now.
After few seconds you should be able to see a message that says The clock was successfully synchronized.
We have successfully configured the 2 NTP servers and verified the NTP service by connecting the NTP clients as well.