
In my previous blog, we have covered plenty of articles related to the pfsense firewall, which is a great firewall if you want to use it for your home purpose. However, suppose you’re going to use it for commercial use. In that case, you cannot use custom hardware with pfsense in it. As per the netgate terms of service, the company that develops and manages the pfsense firewall says you should not use the community editions of the pfsense firewall for commercial use. You should use pfsense plus instead, which is only available on netgate hardwares and on the cloud.
When it comes to fortigate Firewalls, it is not open-source. It is a commercial firewall that is only available for purchase. Though they have a free permanent license with less security, but you cannot do anything much on that. For example, in the case of IPsec, it doesn’t support all the IPSec parameters on the fortigate free trial.
however, you can still get full license if you have fortigate support and by reaching out to the rep.
I am running pfsense on my home network, and in this blog, I will build an IPsec tunnel from a fortigate firewall to a pfsense firewall.

We have a FortiGate firewall with a LAN network of 10.100.2.0/24 at Head quarters and we will be using a linux machine with the IP 10.100.2.62, and pfsense got 10.200.2.0/24 network at branch1 with windows11 machine with the IP 10.200.2.10.
Both linux and windows 11 can go out to the internet, but they cannot communicate with each other. we are going to fix that in this lab.
With that, let’s go ahead and build an IPsec tunnel from a fortigate firewall to a pfsense firewall.
In case if you prefer to follow video guide, below is the video instructions.
IPsec configuration on FortiGate.
The IPsec Tunnel consists of two phases, phase one and phase two. Phase one is connectivity between the Internet side, and phase two takes care of the data traffic.
Fortigate Phase1 configuration.
Let’s go ahead and configure phase one of the IPsec.
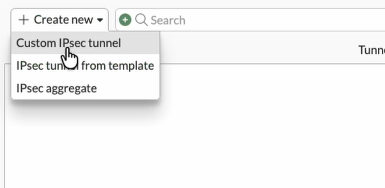
Log into the Fortigate Firewall, under VPN->VPN Tunnels.
Click on Custom IPsec tunnel.
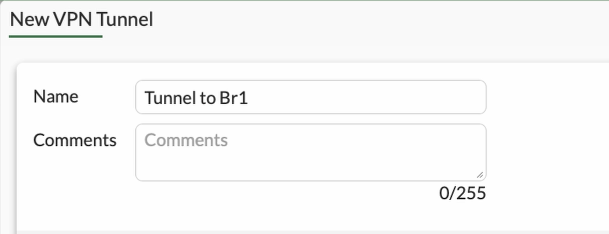
Name : Enter a name for the tunnel.
Comments : To identify the tunnel, will be useful if you have multiple IPsec tunnels.
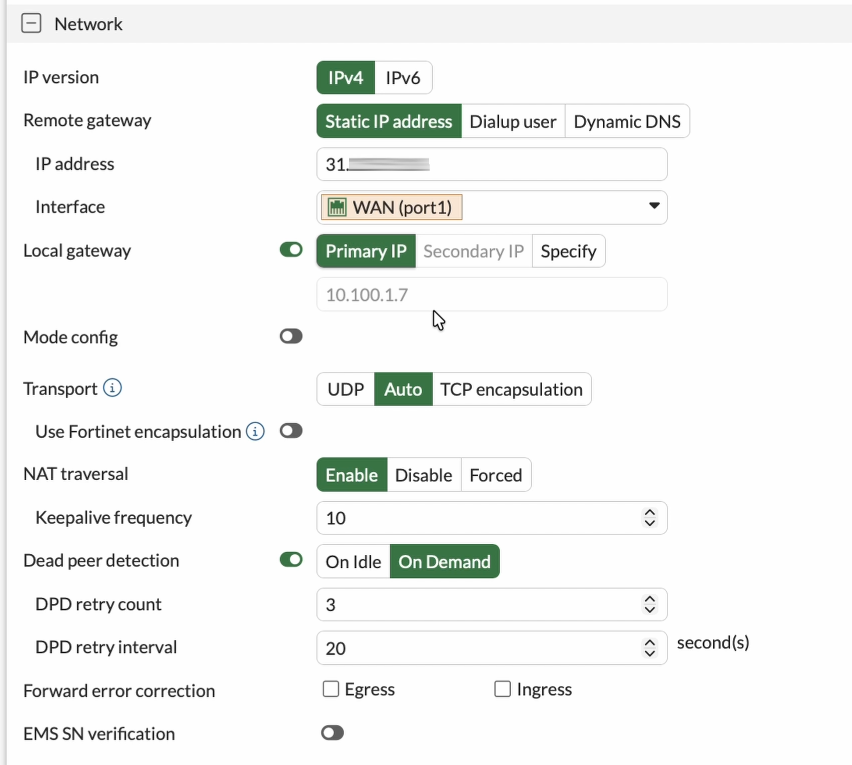
Network
IP version: IPv4
Remote Gateway: Static IP address., If you have dynamic dns, you can select the dynamic dns and put the dynamic dns fqdn instead.
IP address: Enter the Public IP address of the Pfsense firewall.
Interface: Choose the WAN interface connected to the internet side of the fortigate Firewall, in my case it is port1.
Local gateway: Choose Primary IP. It would automatically pick up the public IP address configured on port1. In my case, the Firewall is behind the NAT gateway. Hence I have a private IP address instead. I also allowed port 4500 to reach the fortigate WAN interface on my NAT device.
NAT Traversal : I choose Nat Traversal enabled since the fortigate is behind the NAT.
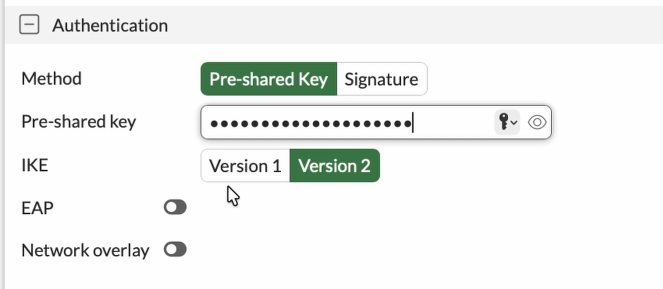
Configure the Authentication.
You can create an IPsec tunnel with a preshared key or a certificate. The very common method is to use the preshared key; hence choose a preshared key and enter the pre-shared key.
You need to ensure the pre-shared key matches on the Fortigate and pfsense sides.

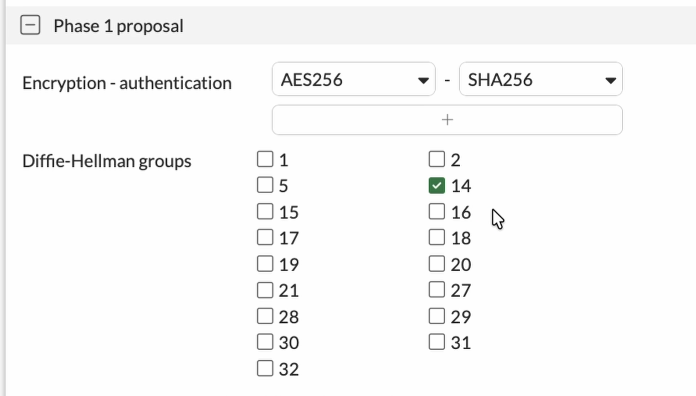
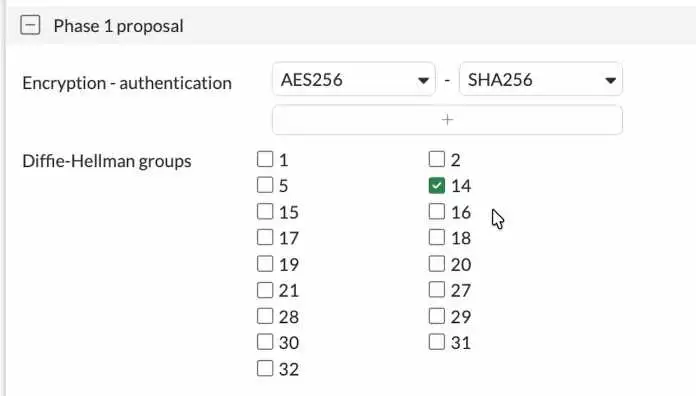
Configure the Phase1 proposal.
You will see multiple phase 1 proposal are selected. However, you don’t need to choose all of them.
We will specify the phase one proposal in the encryption and authentication and the Diffie Hellman group. The same will be configured on the other side. I’ve seen many people use sha1 as the authentication, but that’s not recommended. So instead, we choose SHA256.
Encryption : AES256
Authentication: SHA256
Diffie-Hellman Group: 14.
That’s a secure Phase1 configuration.
Fortigate phase2 configuration.
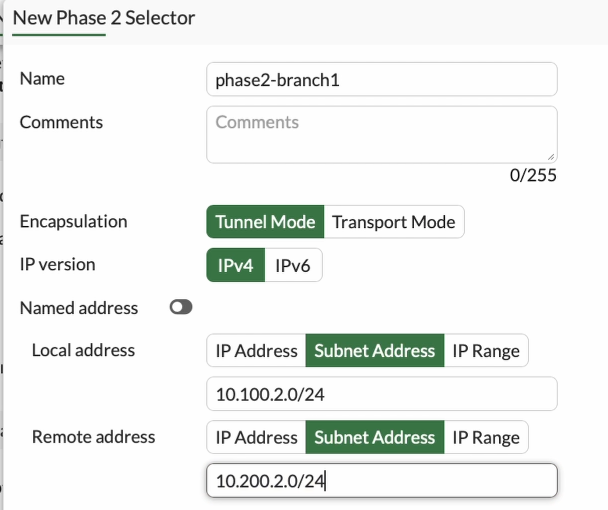
You need to configure the interesting traffic here, so you need to choose your Local network subnet and you also need to choose the remote LAN as well. It will ensure that only traffic matches these subnets will be allowed through the IPsec tunnel.
Create new under Phase2 Selectors.
Name: Enter a name for the phase2.
Choose the Local subnet and remote subnet.

Click on Advanced.
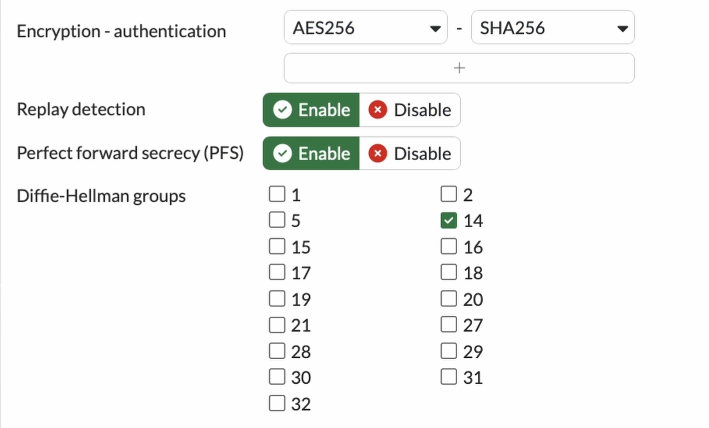
Configure the phase2 proposal.
Like we made the phase one proposal, you also have to configure the phase 2 proposal.
Encryption : AES128
Authentication: Sha256.
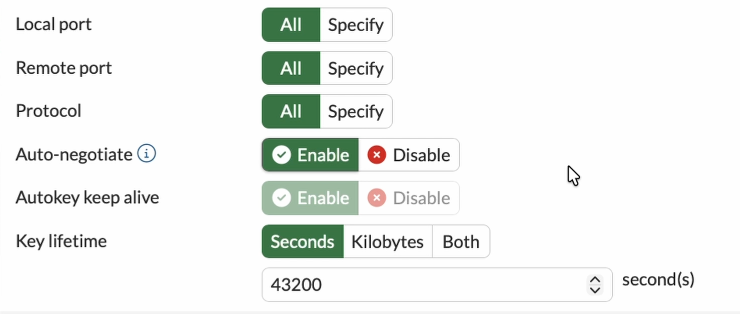
Check the following options.
Enable replay detection.
Enable perfect forward secrecy.
Diffie Hellman Group: 14.
To keep the tunnel active even when there is no traffic, you may enable the option that says Auto-negotiate and Autokey keep alive enabled. And click on OK.
Key lifetime: leave default
We just completed the Fortigate side of the IPsec tunnel.
We need to tell the FortiGate LAN users to take the ipsec path to get to the pfsense branch1 lan side, you we need to update the static route and security policy here, lets look at both of them.
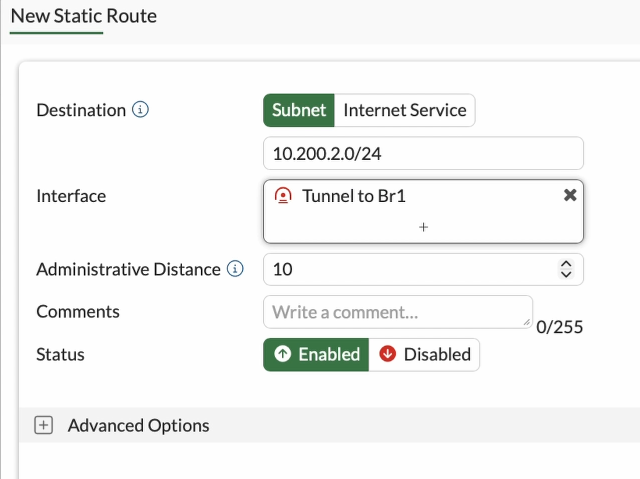
Configure the static route.
We allowed the traffic through the IPSec tunnel. But we need to tell the Firewall if you want to send traffic to the 10.200.2.0/24 network, it has to go via the IPSec tunnel. The way we tell Firewall is by configuring a static route.
Goto Network-> Static route-> Create New.
Destination : Subnet.
Enter the 10.200.2.0/24 network.
Interface: Chose the tunnel interface, which is Tunnel to Br1
Status: Enabled.
Click on Ok.
The static route will be added to the Firewall.

Let’s go ahead and configure the security policy to allow the traffic
Configure the Security Policy on fortigate.
We configured the IPSec tunnel on both sides. However, in Fortigate, you must configure the security policy to allow the traffic.
Configure the policy to allow traffic from LAN to Ipsec.
Goto Policy & Objects-> Firewall Policy -> Click Create new
Name : Enter the name for the policy
Action : Accept.
Incoming Interface : Choose the LAN side of the fortigate Firewall.
Outgoing Interface : Choose the ipsec tunnel interface that we just created.
Source : I already have address object for 10.100.2.0/24 network as port2 address so I have chosen that.
Destination : create new branch1 subnet and call it here.
service: All.
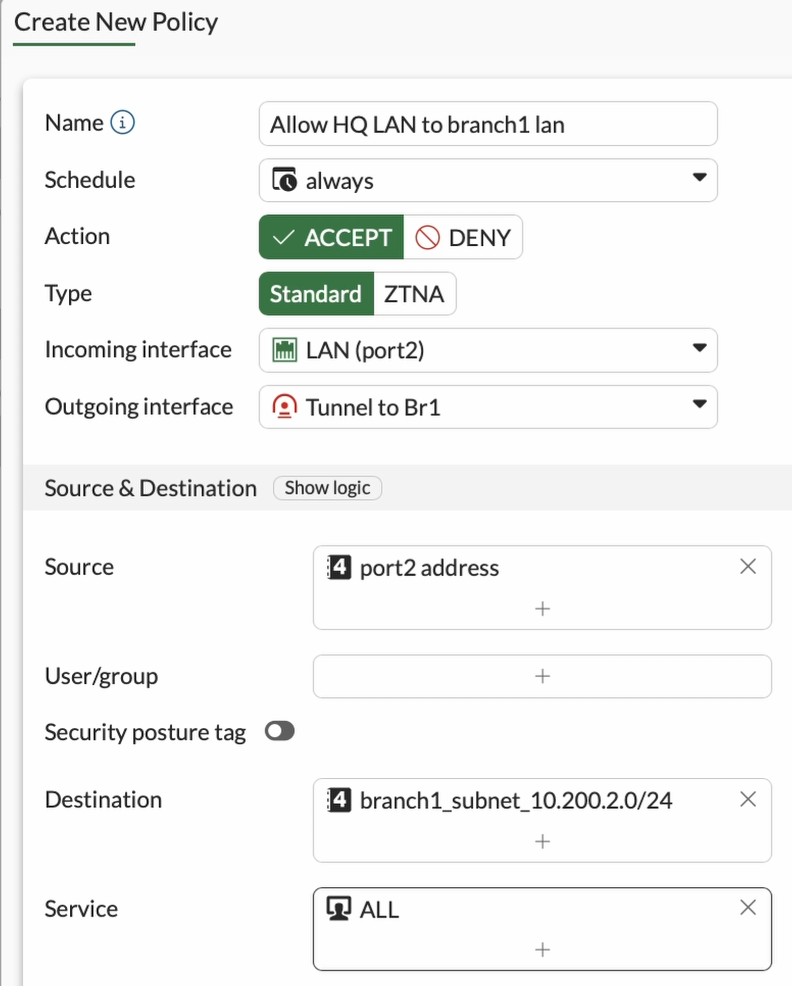

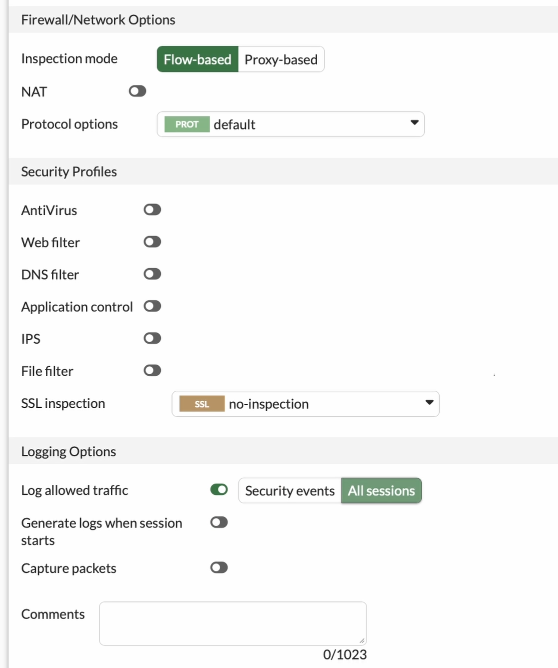
NAT : Uncheck.
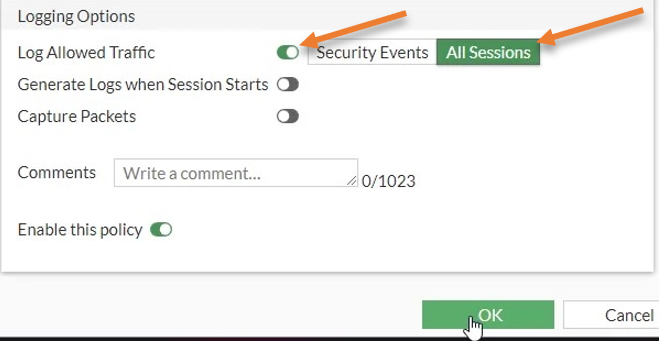
To see all the traffic traversing across the IPSec tunnel, you must log all the sessions. Check the option log allowed traffic and choose all sessions.
Click on Ok.
Configure policy for the traffic coming from the IPsec to the LAN.
We configured the policy from LAN traffic that is going across the IPSec tunnel. Now we need to do just the opposite: the traffic coming from the IPSec tunnel to the LAN side has to be allowed as well.
Note: if you need the traffic to be allowed only towards the branch 1 side, then you don’t have to create more policies, but I am allowing from both the sides.
Click on create new on the firewall policy.
Name Allow branch1 lan to HQ lan
Incoming interface: Choose the IPsec tunnel interface.
Outgoing interface: Chose the LAN side of the Firewall.
Source: Branch1 address object
Destination: FortiGate LAN address object.
Service: All.
Action: Accept.
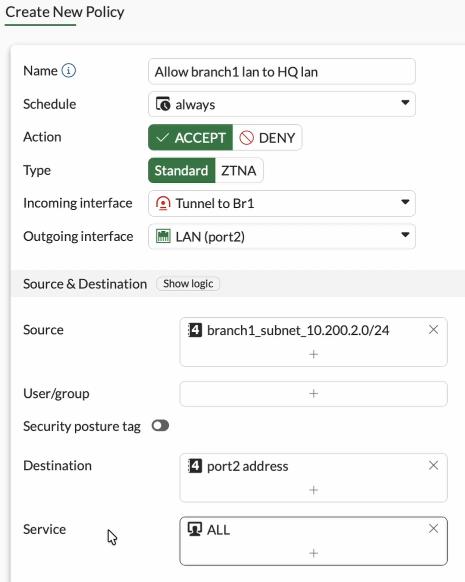
Uncheck the Nat option.
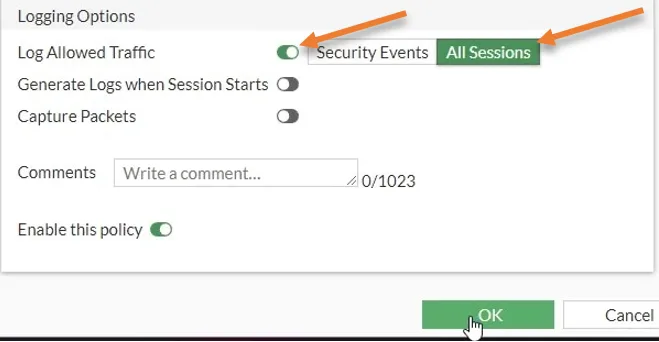
to see the traffic, Check the Log allowed traffic option to All sessions and click on Ok.
Pfsense Phase 1 configuration.
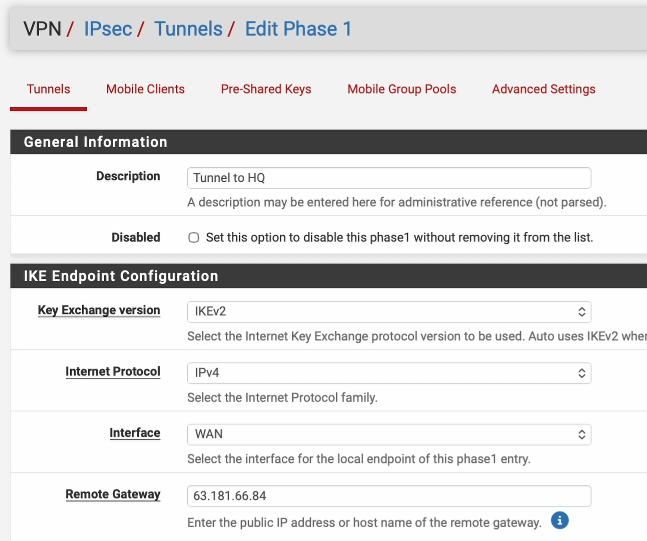
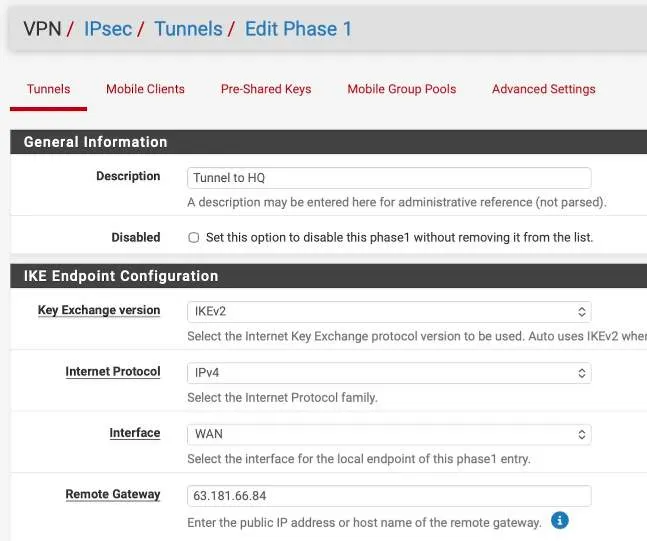
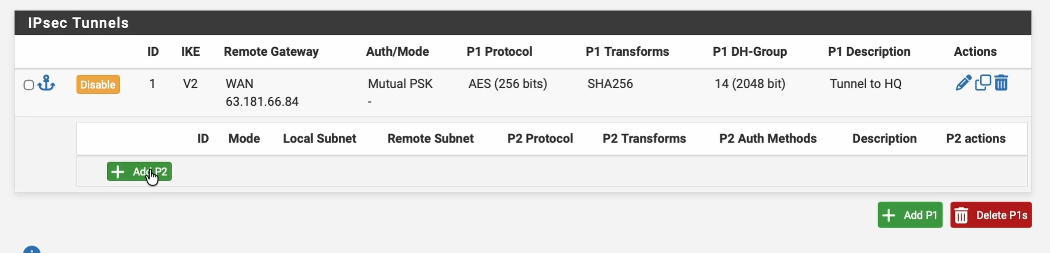
Login to the Pfsense->VPN->IPsec-> Click on Add phase1.
Description: Tunnel to HQ
Choose the Key Exchange version as IKEv2.
Interface : WAN.
Remote Gateway : Enter the public IP address of the fortigate Firewall.
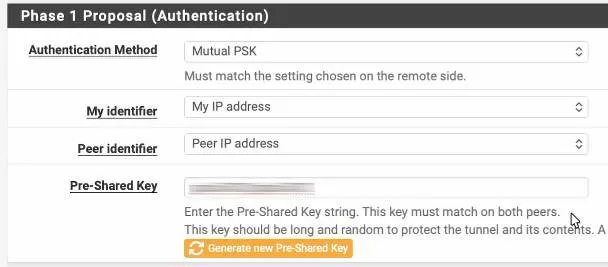
Phase1 proposal – Authentication.
Authentication Method : Mutual PSK and paste the pre-shared key that you copied from FortiGate.

Encryption Algorithm.
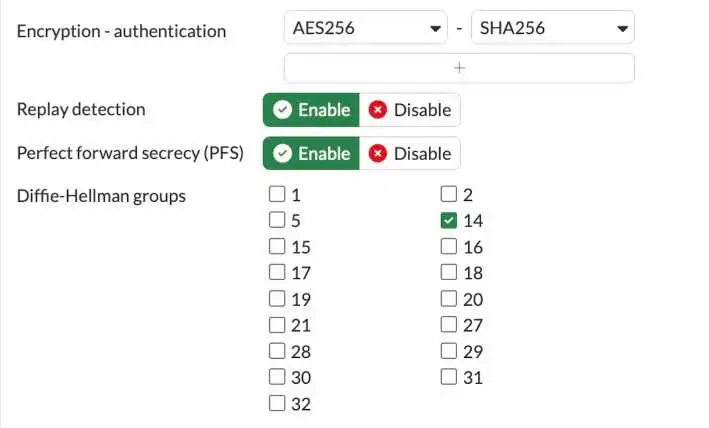
We are matching the remote side, which is AES256, Sha256 and dh group 14.


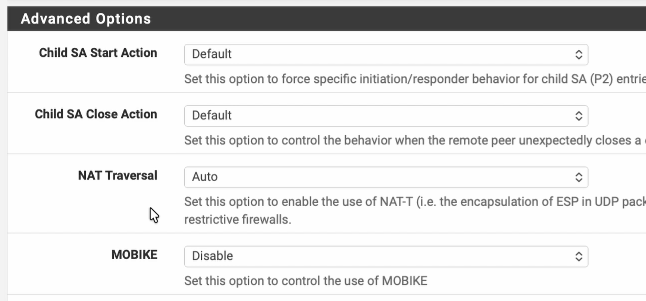
In advanced option, choose Auto in NAT traversal and click on save.

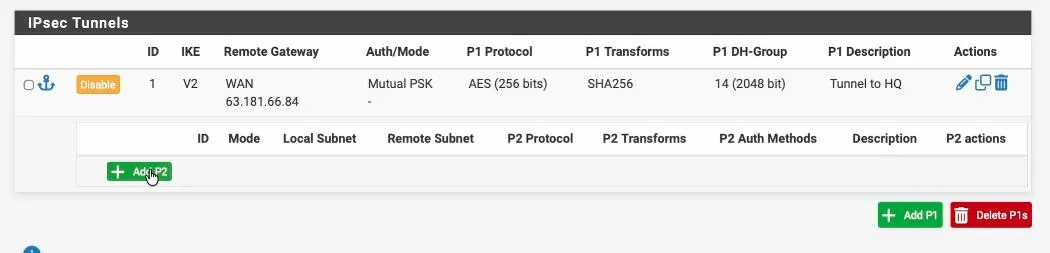
Pfsense Phase2 configuration.
We just completed phase 1 of the IPsec configurations. Let’s go ahead and do phase 2 of the configuration.
To add phase two, expand phase2 and click on add P2.
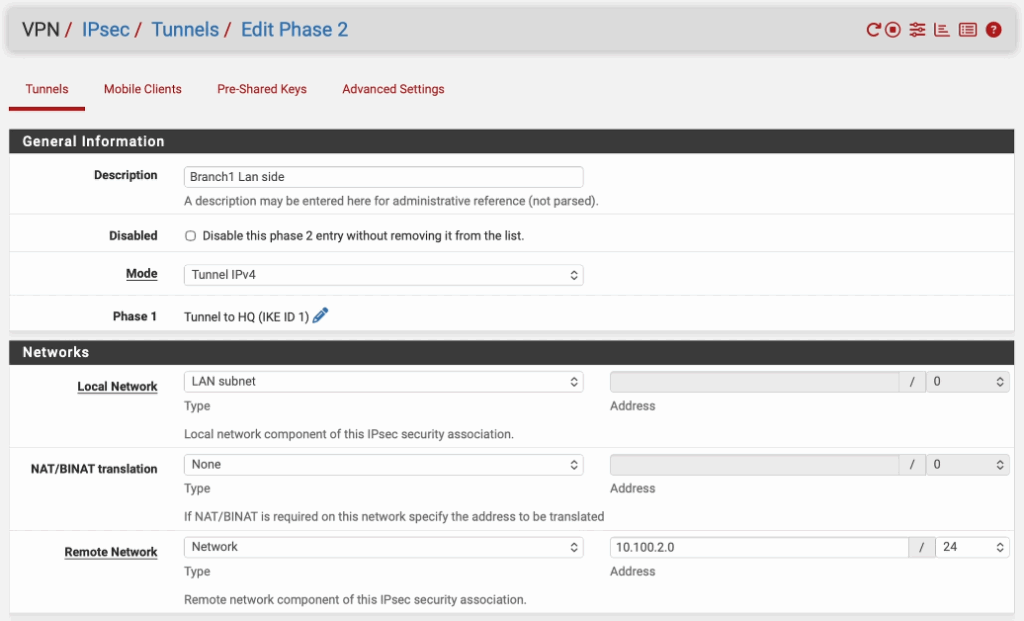
Like we configured the interesting traffic on the Fortigate, you’ll have to do the same thing on the PFsense side.
Description: Enter a user friendly name.
Mode: tunnel IPv4.
Local Network: you can choose a LAN Address.
Remote Network: you need to specify the remote Network here. In this case, it’s 10.100.2.0/24.
Phase 2 Proposal.
In the phase 2 proposal, choose the protocol as ESP.
Encryption Algorithms : AES 256.
Hash Algorithms : Sha256
PFS Key group : 14 (2048bit)
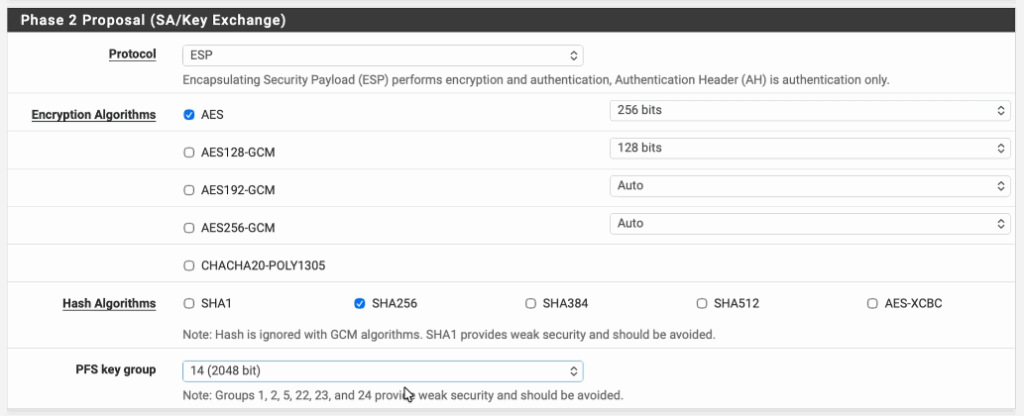
Click on Save.
Configure security policy in pfSense.
In pfsense there is no routing that you have to define, however you need to allow the traffic using policies.
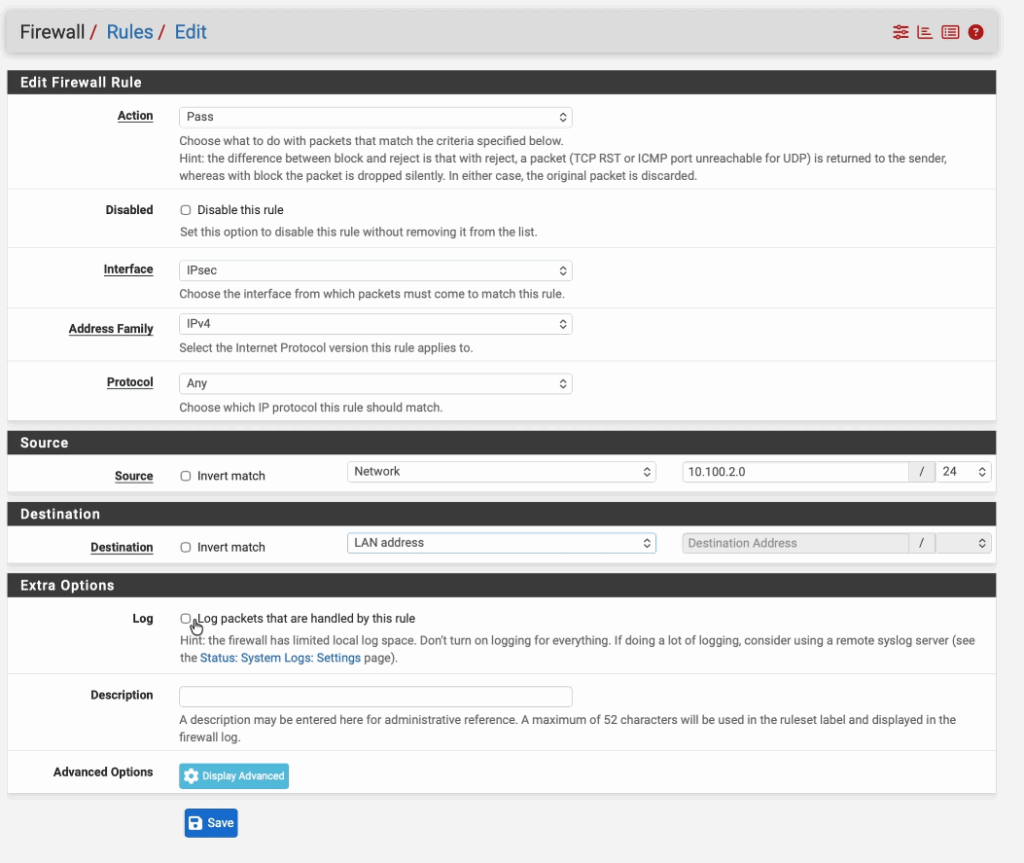
Create a Inbound policy from fortigate to pfsense.
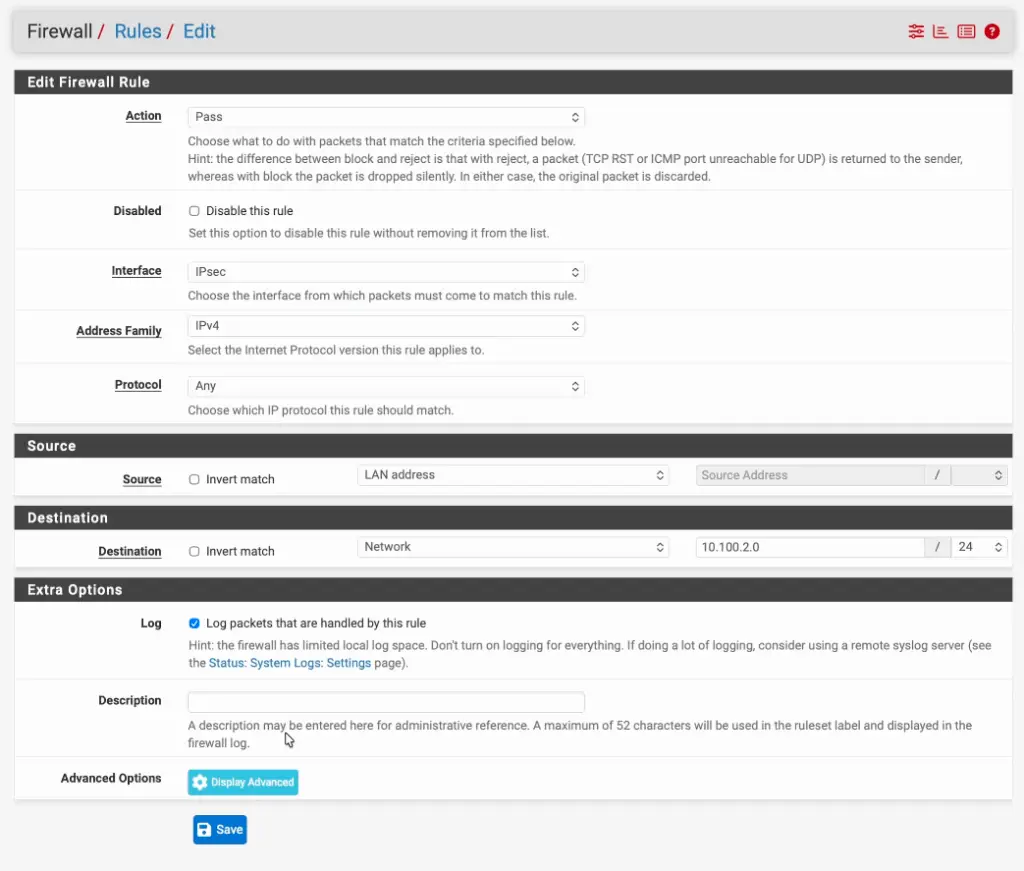
Click on Firewall -> Rules
Click on the IPsec tab and click on Add to create new policy.
Action: Pass
Interface: IPsec
Address Family: IPv4
Protocol: Any
Source: Network and enter the FortiGate LAN network.
Destination: Lan Address.
Check the option that says Log packets that are handled by this rule and click on Save.

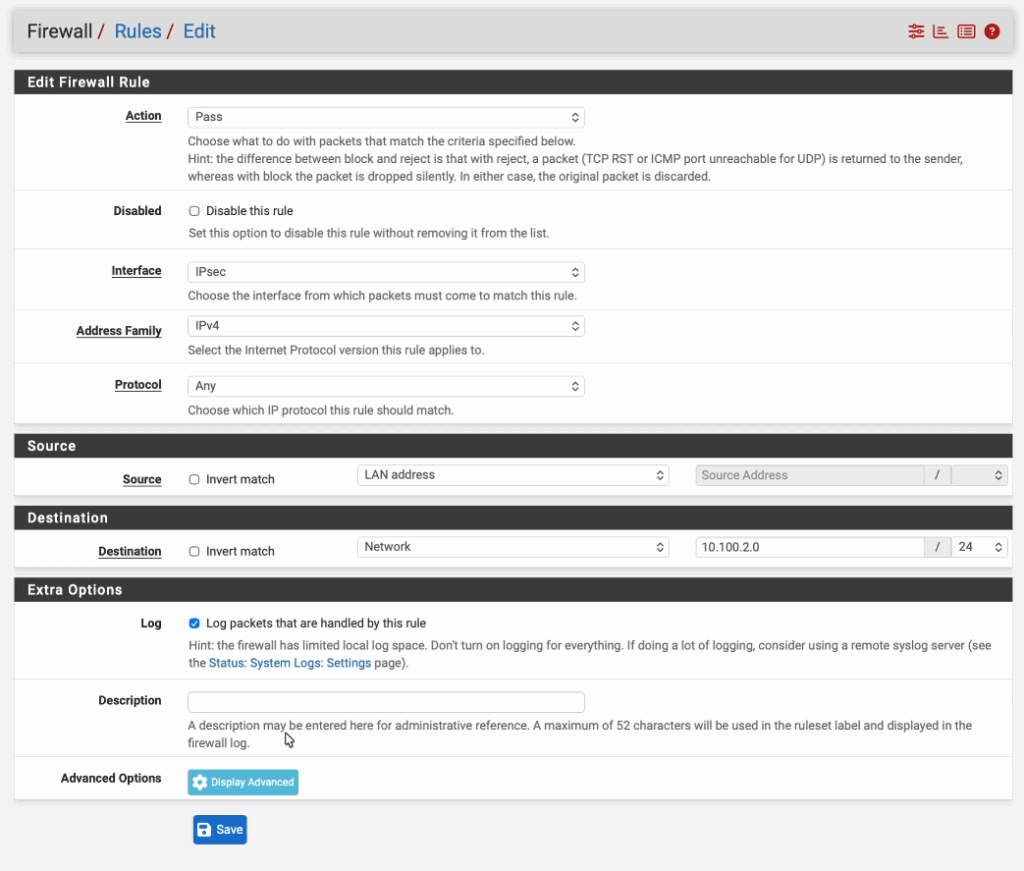
Create a outbound policy to fortigate from Pfsense.
Click on Add again, this time the policy is right opposite.
Action: Pass
Interface: IPsec
Address Family: IPv4
Protocol: Any
Source: Lan Address.
Destination: Network and enter the FortiGate LAN network.
Check the option that says Log packets that are handled by this rule and click on Save.
Check the tunnel status on both the pfsense and fortigate.
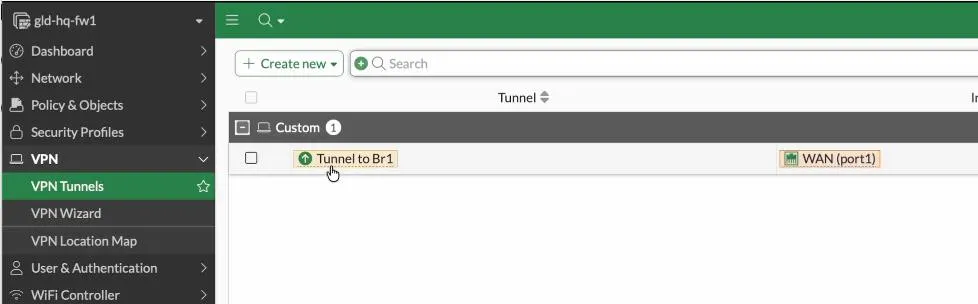
That’s it, you have configured IPSec tunnel on the Fortigate to Pfsense, to see the tunnel status, you can got to VPN -> VPN tunnels.
You can see the tunnel status is up.

But to see the phase1 and phase2 status separately, you can use the fortigate wedget to manage both.
Goto Dashboard, status.
You can add the IPsec widget into the dashboard, and it will show you the vpn widget with the IPsec Status. click on that.
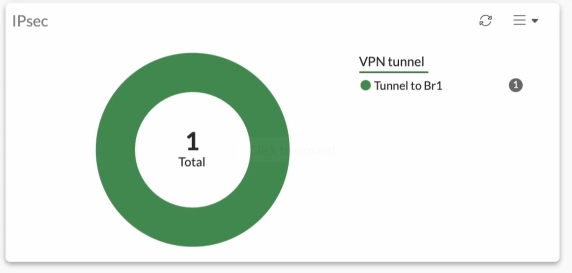

It will show you the phase1 and phase2 tunnel status separately as shown below.


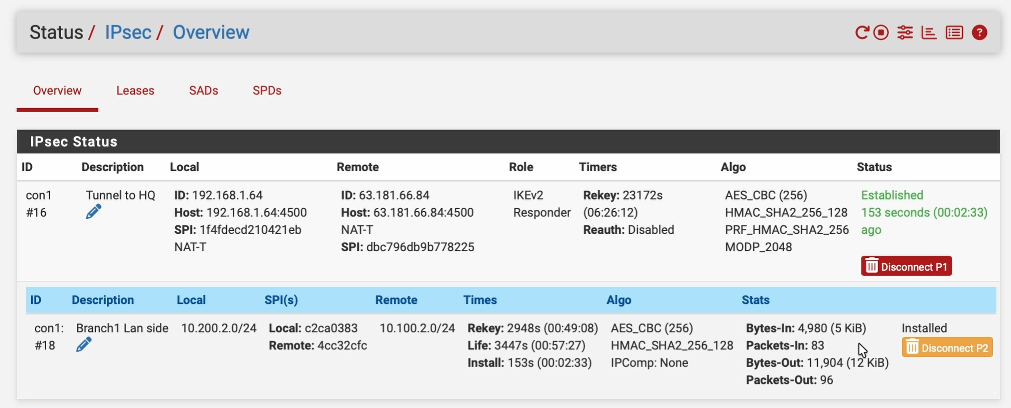
Similarly, to see the status on Pfsense, you can click on status-> IPSec, and you’ll be able to see the status of your IPsec tunnel. As you can see, it is an established state, on both phase one and phase two of the tunnel.

Test the IPsec communication.
To test traffic, you can initiate traffic from either side towards the remote, and if you have configured everything correctly, you will see the traffic is going across the tunnel.
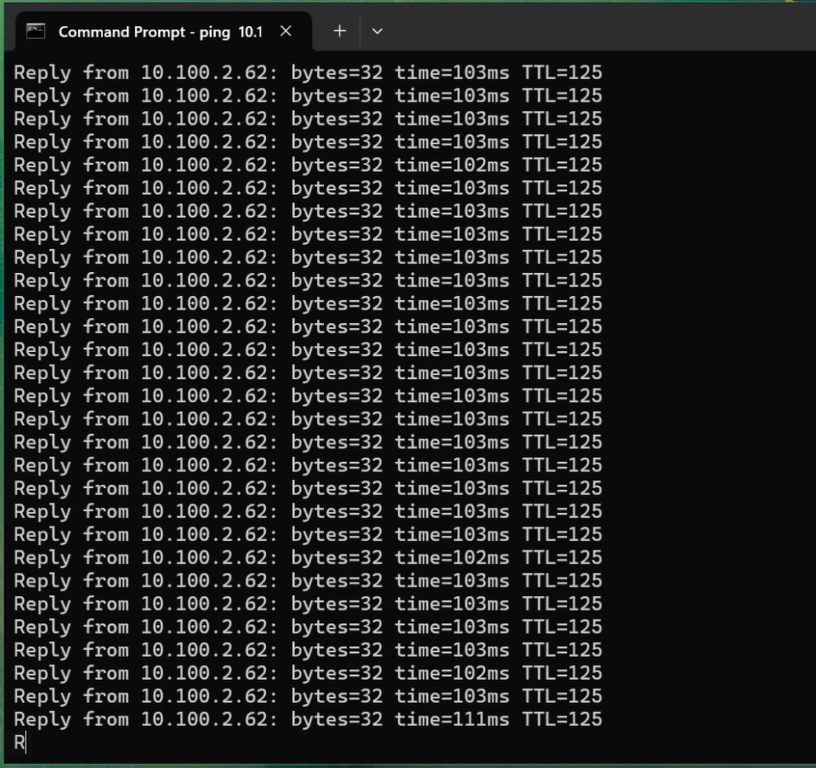
The tunnel has been working fine. As you can see, I was able to ping from a fortigate Local linux client, 10.100.2.62 to the remote side IP address 10.200.2.5, which is the PFsense LAN side IP address.
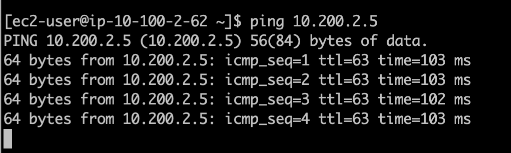
You can also see the windows 11 machine to the linux machine also working fine.
Check the logs on fortigate.
You can also observe the same traffic inside the Firewall. I have initiated some more traffic, and if I go to log and reports->Forward logs: We should be able to see all the logs going through the IPsec tunnel because we have the log forwarding enabled for all sessions.


Check the IPsec logs on Pfsense.
You may generate some more traffic. And if you go back to the PFSense firewall-> System logs-> Firewall
As you can see, the traffic between the pfsense and the fortigate Firewall.


We have successfully configured the IPsec tunnel between fortigate and pfsense firewall. We also confirmed the traffic is going through the tunnel and each host on the LAN side can communicate over the tunnel. This kind of setup will be helpful when you have a fortigate firewall in one of the sites and pfsense on the other side.
Lim
Sunday 27th of April 2025
What version of pfsense and fortigate is that ?
Saifudheen Sidheeq
Sunday 7th of December 2025
I recently updated the article, so the fortigate is in 7.6.3 and pfsense plus 2.8.0