I like the port warding feature on a router. It is the best way to allow external users to access some specific services inside your network.
The most commonly used port forwarding example would be the web services. That’s the reason you can read this web page now. This website, or any website for that matter, is hosted on a hosting provider server. Their edge firewall/router connected to the internet gets the external request, and it would port forwarding to ports 80 and 443 to the internal hosting server.
If you got a router at home connected to the internet and you wonder, can I do the port forwarding on my router? If yes, How do I do that?
In this blog, we will configure the port forwarding on a consumer router at home. That way, you can enable specific internal access to the outside.
The first step in the process is to identify what services you are willing to allow to outside. It could be http or HTTPS service, or you wanted to allow somebody to access the RDP access on your inside machine, or something else. So once you finalize the port you are going to allow, it is just a piece of cake; however, you have to be careful when playing with port forwarding.
Suppose you don’t know what you are doing. In that case, you may put your network at risk, so before you proceed further, you must understand what external and internal networks are and the network ports used by the applications.
Why port forwarding is required?
If I sum up the external network, it is the internet, also known as a public network. It is a vast network connected with millions of devices, including your network router at home.
For the network communication, we use an IP address, right?, on the internet, we use something called public IP address, which means each network equipment connected to the internet will have a unique public IP address. You can check out your public IP here.
So what is an internal network? The internal network is what you have inside your home or office. In an internal network, we use something called private IP addresses.
For the internal network, which is the private IP, we use Network address translation to talk to the external network, the public. The private IP will get translated to the public IP of your router.
All network devices connected to the internet will have the connection from outside blocked by default. The connection from inside to outside is allowed, however connection from outside to inside is blocked by default.
And port forwarding allows us to unlock specific ports to the internet, for example, http (80) or https (443).
1. Get the port forwaring prerequisites ready.
So before we proceed further, you need to know
- your public IP.
- The port that you wanted to forward. In my case, I am going to use HTTP-port80, HTTPS-port443 RDP port number 3389.
- And source Public IP that you are going to allow, you might as well use any source IP which is not a good practice for certain applications. For example,
When you want to allow port forwarding to the RDP machine, you need to enable a specific source external IP. So if you are unsure about the source IP and allow any, anyone on the internet will be able to access the RDP to your inside host, unless it is the webserver you want to allow for everyone. Even for web servers, you shouldn’t allow them to be inside your network. We will have a specific network called DMZ. That will be for another discussion.
In this blog, I will allow http and HTTPS and RDP traffic from outside to a specific source IP, and after it is completed, the source user should be able to access the http and HTTPS services on my inside web server and can access the RDP server from outside. Alright, let’s get started.
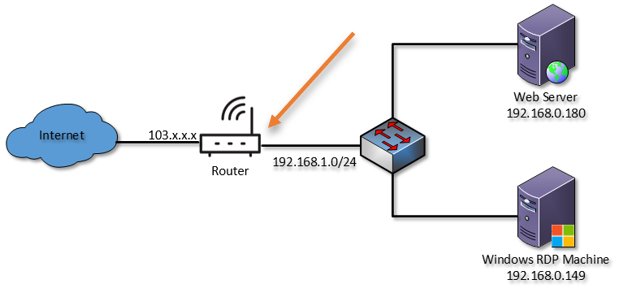
Below is the topology that we are going to use. My router is the regular Dlink wifi router connected to the internet service provider, and I have a web server on my LAN side and the RDP machine.
By default, this router also acts as a basic firewall by blocking external access. Just because I am using a DLINK router, this doesn’t mean the steps mentioned here will not work for yours, for example, TPLINK, Net gear.
Most of the home internet connections will be as follows: the internet connection to the consumer router and that router act as a wireless access point. All the clients will connect to the router wirelessly on the LAN. We will configure the port forwarding on the router in the middle.

2. Verify the services locally.
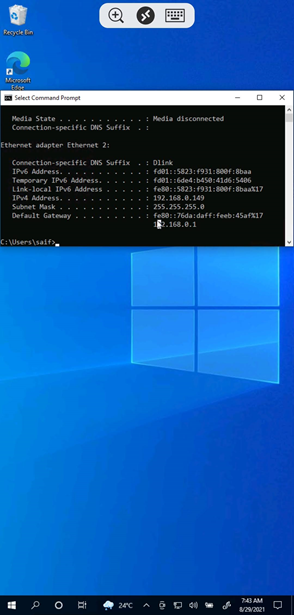
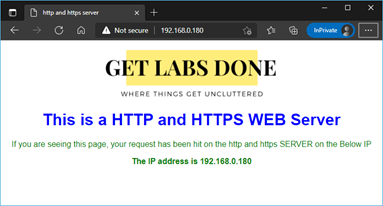
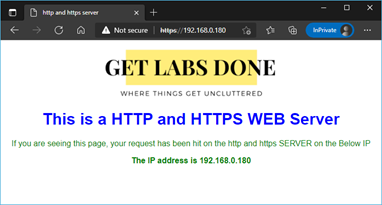
For the http and HTTPS service, I am using a ubuntu web server on my local area network 192.168.0.180.
As you can see, I can access the same server using http and HTTPS traffic.

The RDP machine is also working fine as well inside my local area network.
3. Identify the source IP.
As I mentioned earlier, it is better to allow the specific IP address to your internal services. You could ask your source user to check your IP here to find out their public address.
You may note that the source IP would be dynamic for most consumer internets, meaning the IP gets changed at times. If it is static, you should be good to go. However, if the source user is using dynamic IP, which most of the internet connections are, you need to make sure you allow the access for a certain period and remove it when not required. Because the same IP could get assigned to some other users on the internet. This means you cannot trust the dynamic IP address either.
In my case, I will allow my phone internet as the source IP. It starts with 106.x.x.x. I know this is not a static IP address, and it will get changed after some time, and I am using this only for this test. After that, I will be removing it.
4. Validate the access from outside.
Before you allow the access, you may try to test and verify that you cannot access the internal resource from outside.
As I mentioned earlier, only public IP addresses can communicate on the internet, so if you want to access something on the Destination, you should use the public IP address instead of the server’s private IP address. As you can see, my public IP address starts with 103.x.x.x, and to access the web services, you can go to your mobile browser and try to access the webpage http://103.x.x.x or https://103.x.x.x.x
To test the RDP access, I can use my phone with the data network on and use the RDP application in it, and when I tried it, as you can see, it didn’t work.
5. Configure the port forwarding on my router.
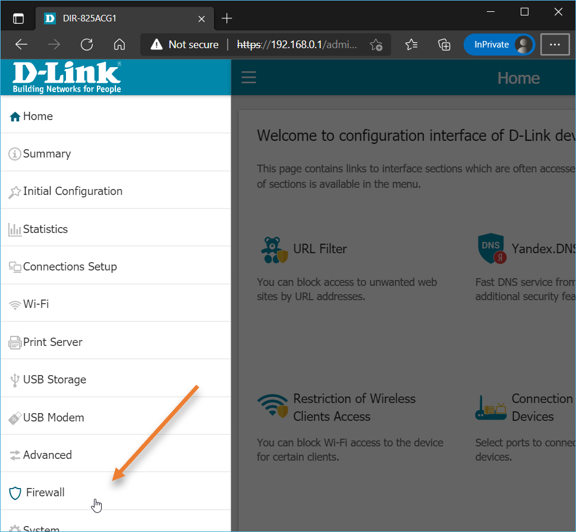
Access the router’s admin page by using its IP address. It most likely is 192.168.0.1 or 192.168.1.1. You may check the back of your router and verify how you can access the admin access from your network. It should have the default creds as well. You should access the admin console with the information on the back of your router unless you changed the default configuration.
See the example from my router.
I am using a DLink router, and I typed my local IP, and I logged in now.
Click on Firewall. That’s where you manage the port forwarding on the link router.

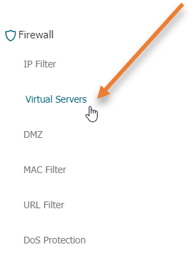
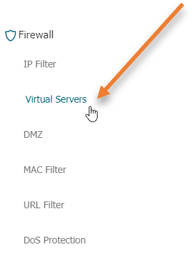
And click on Virtual Servers.
Click on the plus icon to add a new virtual server.
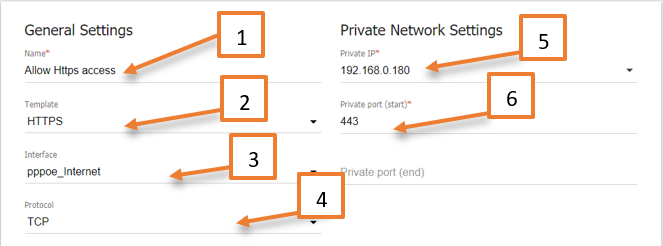
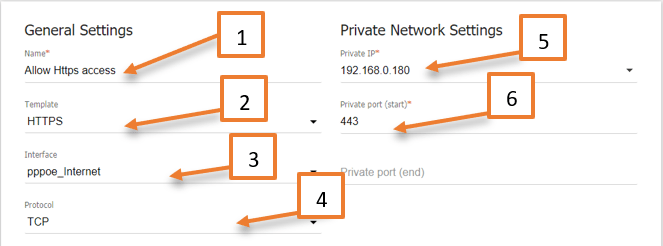
General Settings.
- Provide a user-friendly name.
- Click on the template drop-down list and choose HTTPS.
- Interface: Choose the WAN interface.
- Protocol: As the HTTPS is a TCP protocol, choose that.
- Private Network settings:
- Private IP: Provide the internal webserver IP address here.
- Private Port: When you choose the template HTTPS, the default port number 443 will be selected here, if not, enter that here.
Note: For some reason, you are using an alternate port for HTTPS traffic. You may enter them here, for example 8443, in my case, I am okay with the default configuration.
Public Network settings.
At the bottom of the same screen, you should see the public network configuration.
In the remote IP, you can add the source IP that you trust. If you want to allow all, you may enter 0.0.0.0/0, but I recommend adding the specific source subnet or IP.
In my case I am adding my phones public IP, that starts with 106.x.x.x, also the port number which 443 for https.

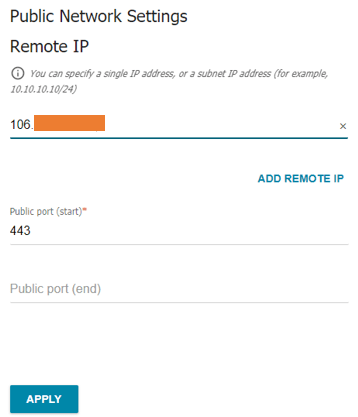
And apply the configuration.
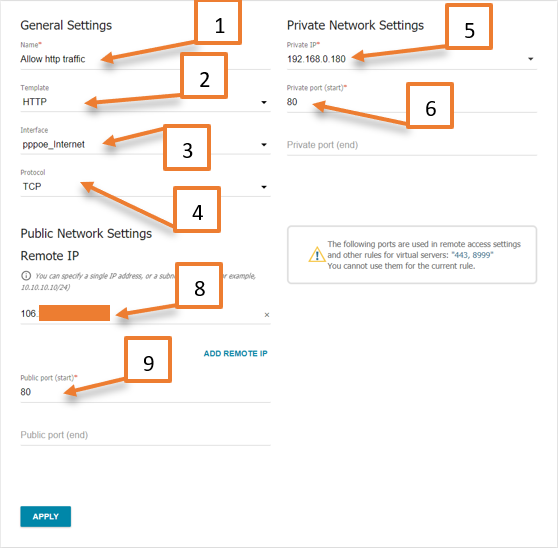
The same way I configured the policy for http traffic as well.
- Provide a user-friendly name.
- Click on the template drop-down list and choose HTTP.
- Interface: Choose the WAN interface.
- Protocol: As HTTP also is a TCP protocol, choose that.
- Private Network settings:
- Private IP: Provide the internal webserver IP address here.
- Private Port: When you choose the template HTTP, the default port number 80 will be selected here, if not, enter that here.
- Remote Public IP – Here, you need to choose the source public IP that you are going to use to connect to the webserver, if you want allow ‘all’ use 0.0.0.0/0.
- Public Destination will be the same as private, which is 80.

6. Test the webserver access from outside.
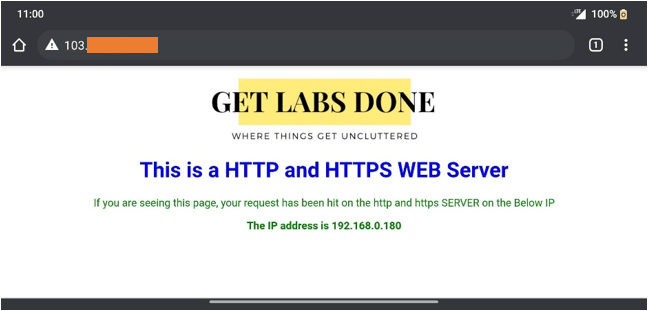
We have successfully allowed HTTP and HTTPS access to outside. Let’s try to access from the outside host.
Since I have allowed my phone public IP address, I should now access my internal web page from outside.
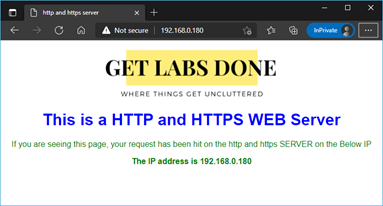
I tried to access my public IP using http and HTTPS traffic from my phone, and as you can see, I can access it just fine.

7. Configure the RDP port forwarding in router.
Follow the same steps for the RDP connection as well.
General Settings.
- Provide a user-friendly name.
- Click on the template drop-down list and choose RDP.
- Interface: Choose the WAN interface. In my network, it is PPPOE. It might be different for you.
- Protocol: As the RDP is a TCP protocol, choose that.
- Private IP: Provide the internal webserver IP address here. Which is 192.168.0.149 in my case.
- Private Port: When choosing the template RDP, the default port number 3389 will be selected here. If not, enter that here.
- Add the Remote Public source IP.
- Destination port from remote is 3389.


8. Test the RDP access from outside.
On my android phone. I am now going to access the RDP machine from the outside.
Just open the client and add the server. In the server IP field, enter the public IP of your router.
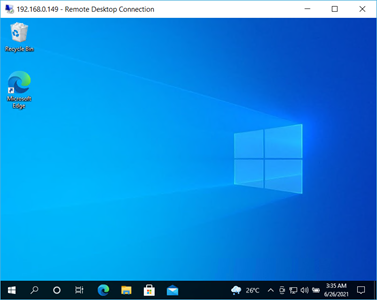
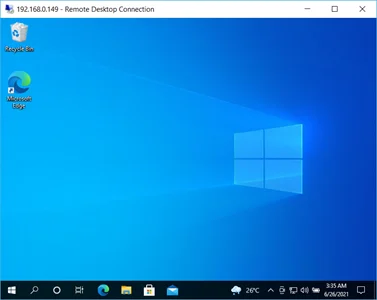
And try to connect. If you have configured everything correctly, you will get credentials prompt to enter. Once you logged in, you should be able to see the desktop of the RDP screen as below.