
We have installed multiple firewalls in gns3, and one of the firewalls you will have issues installing in gns3 is the Cisco ASA firewalls. Though there is documentation out there that explains how to install ASA in gns3, the result would be that you will end up with a reboot loop, and things may not work the way you expect them to be and waste so much time during the process.
Can I install ASA on GNS3?
You can install the ASA on GNS3, and I have tried multiple versions in it, and the version that I found to be compatible and stable with the GNS3 is ASA 9.8.3. It works great if you follow the instructions here.
In blog post, we will install cisco ASA on gns3, configure the inside and outside interface, connect the outside interface to the internet, and connect a host on the internal network.
Read also,
How To Install Pfsense Firewall On GNS3?
How to Install Palo Alto in GNS3?
How To Install Checkpoint Firewall In Gns3?
How to integrate VM with gns3? – VMware Workstation, VirtualBox, Qemu KVM.
Prerequisites.
- Before you proceed with the lab, You need to have Cisco ASA 9.8.3 qcow2 image.
- Gns3 is installed and up and running.
Note: For better performance, I am using gns3 as a remote server. If you are using gns3 with a VMware workstation or Virtualbox running the GNS3VM in it, you will not get better performance, so keep that in mind. You may follow the article here if you want to know how I have set up my GNS3.
1. Add the ASA to the Gns3.
Click on the Browse security devices option, and click on New template.
A new template wizard window will now open.
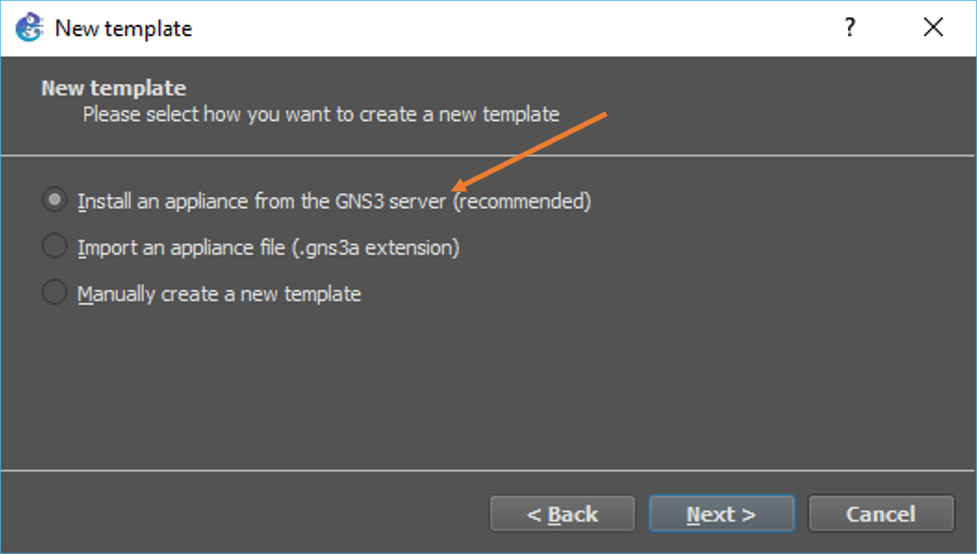
Choose Install and appliance from the GNS3 server and click on Next.

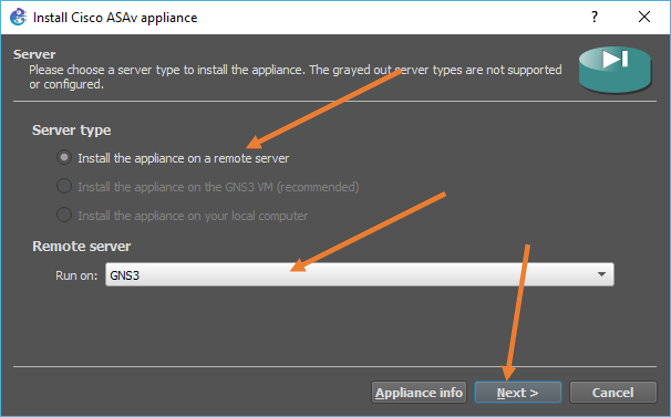
In the server type, choose to install the appliance on a remote server. You should see your remote server name under the remote server drop-down, mine is auto-selected, and its name is gns3 click on Next.
Note: If you use GNS3VM with other hypervisors such as VMware workstation, Virtualbox, or HyperV, you may choose the second option that says install the appliance on the GNS3 VM and click on Next.

Choose the qemu settings as default and click on Next.
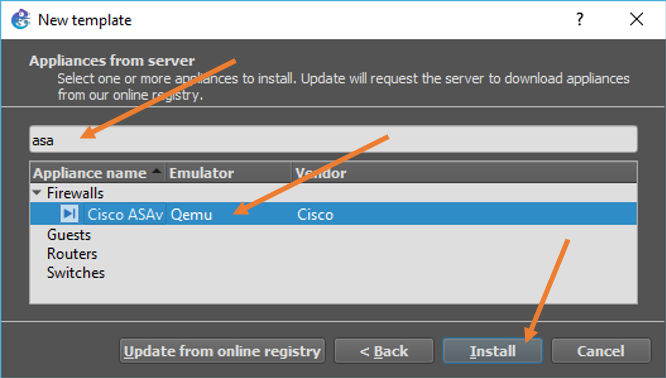
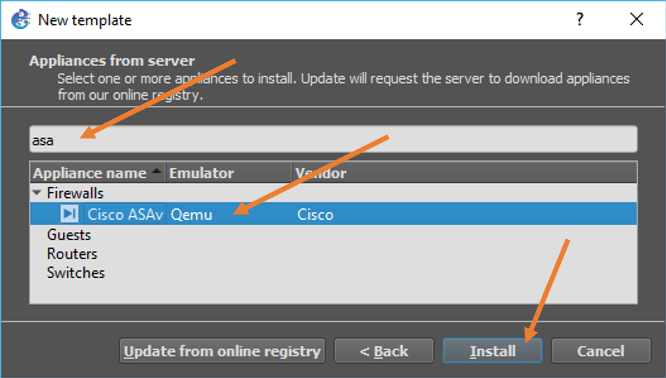
You will see the list of devices supported by the GNS3 here, type ASA, choose Cisco ASAv from the list, and click on Install.
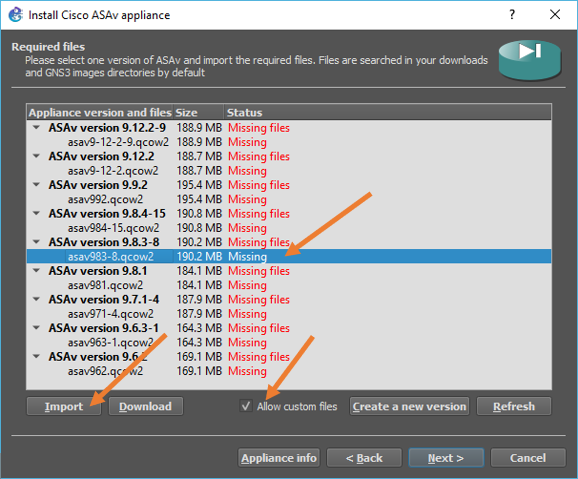
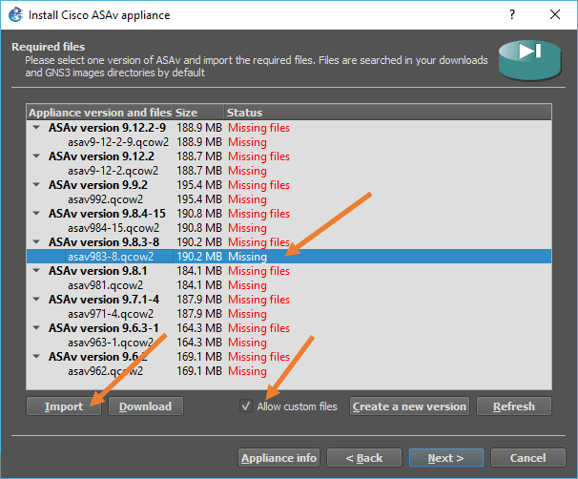
Next, you will see the list of ASA firewall versions supported by the GNS3 software, but we don’t see version 9.8.3, but we see 9.8.3-8 in the list, so check the option that says Allow custom version.
And click on the import button to import the file to the gns3.
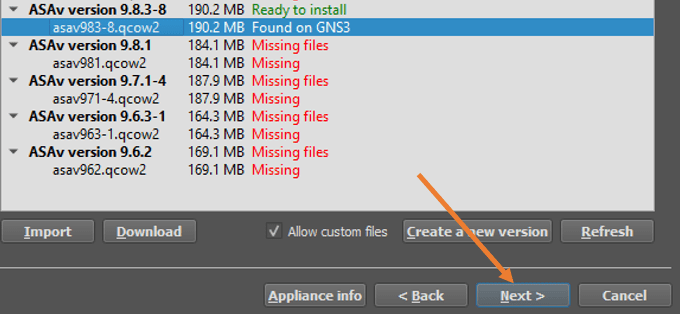
After you have uploaded the file to the gns3 server, you will see the message that says ready to install.
Choose the version and click on Next.

You will get the prompt that says would you like to install cisco ASAv version 9.8.3-8, click on Yes on that.
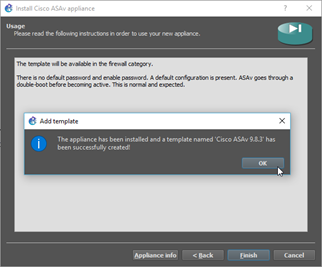
On the final screen, click on Finish, and you will get a confirmation message that says it is installed successfully, click on OK on that.
You will see the Cisco ASA has been added under the security devices.

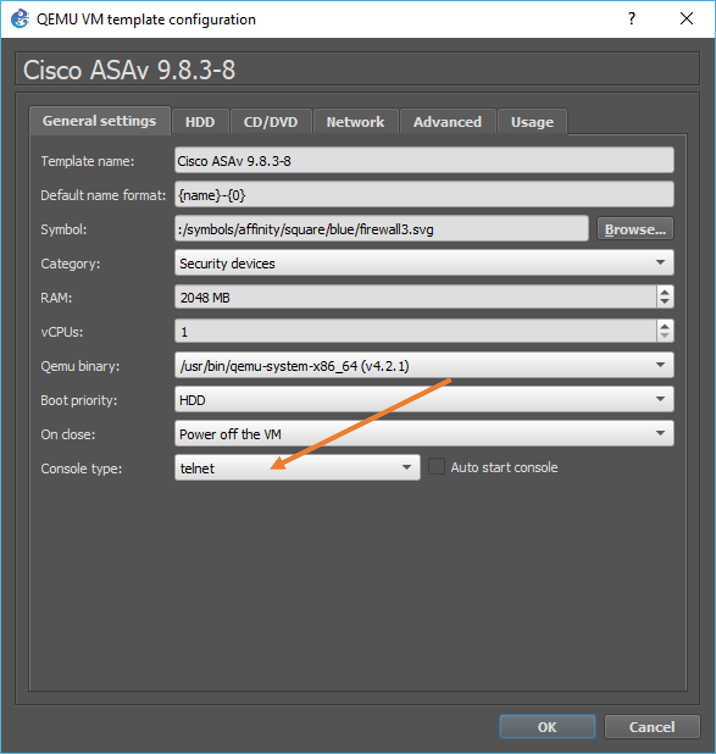
2. Change the console type to telnet.
If you use the default console for ASA, which is VNC in gns3, you will get an error message and will not let you log in to the device.
Lina to use serial port /dev/ttyS0 for console IO
To avoid that, you need to change the console from VNC to telnet.
Goto the ASA under security devices, Right-click on the ASA that you just installed, and click on configure the template.
Under General settings, Change the console type from VNC to telnet and click on OK.

3. Create a basic network with inside and outside interfaces.
Create a new project, drag and drop ASA to the topology, and power it on.
Configure the inside interface.
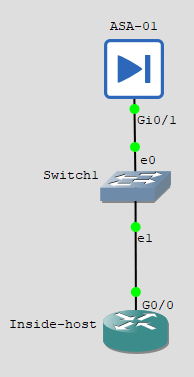
We are going to use gig0/1 for the inside access, for the inside interface g0/1,
- configure the interface as inside.
- IP address 10.1.1.1/24, will act as the default gateway for the internal users.
- Make sure to unshut the interface.
ciscoasa# configure terminal
ciscoasa(config)# interface gigabitEthernet 0/1
ciscoasa(config-if)# nameif inside
INFO: Security level for "inside" set to 100 by default.
ciscoasa(config-if)# ip address 10.1.1.1 255.255.255.0
ciscoasa(config-if)# no shutdown
Connect the end-user machine to the inside network.
I am using a router with IP routing disabled for the inside host and pointed the default gateway to the inside interface IP, which is 10.1.1.1/24.
Connect a layer 2 switch to the inside interface that can connect to all internal users. On the switch connect the new router as inside host.
Note : It doesn’t really need to be a router you can use it as an end-user machine. You could use any other end-user machine such as windows or Ubuntu machine as well. For the sake of simplicity, I am using the router instead.

To make the router act as the end user host, add the below configurations.
inside-host(config)# no ip routing
inside-host(config)# interface gigabitEthernet 0/0
inside-host(config-if)# no shutdown
inside-host(config-if)# ip add 10.1.1.10 255.255.255.0
inside-host(config-if)#exit
inside-host(config)# ip default-gateway 10.1.1.1
inside-host(config)#exit
inside-host#wr
Building configuration...
[OK]
You just configured the inside interface, and you should now be able to ping the default gateway from your internal host.
inside-host#ping 10.1.1.1
Type escape sequence to abort.
Sending 5, 100-byte ICMP Echos to 10.1.1.1, timeout is 2 seconds:
!!!!!
Success rate is 100 percent (5/5), round-trip min/avg/max = 7/207/1009 ms
inside-host#
Awesome!
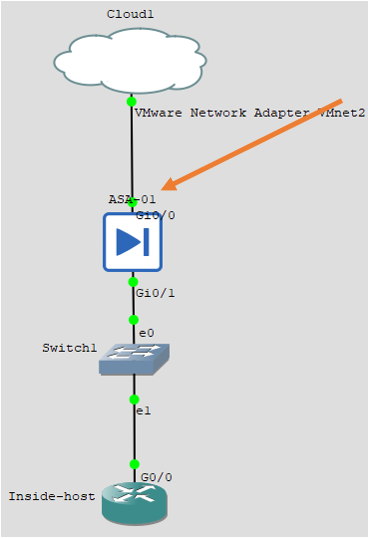
Connect the outside interface to the internet.
Let’s now connect the outside interface of the firewall, which we are going to use g0/0.
Connect a cloud with internet access to the outside interface of the firewall.
If you are not sure about how to configure the cloud to share internet access, check out the article here for help.

Configure the outside IP address.
As we are sharing the internet access to the cloud, it will now act as DHCP server, so we can configure the outside interface to receive the IP address via DHCP.
- Configure the interface as outside.
- Set the IP address as DHCP and add setroute. This setroute command will make sure the default route gets added along with the IP address.
- Unshut the interface.
ciscoasa(config)# interface gigabitEthernet 0/0
ciscoasa(config-if)# nameif outside
INFO: Security level for "outside" set to 0 by default.
ciscoasa(config-if)# ip address dhcp setroute
ciscoasa(config-if)# no shutdown
ciscoasa(config-if)# exit
ciscoasa(config)# exit
ciscoasa# wr
Building configuration...

[OK]
ciscoasa#
Check the outside interface status.
To verify the configuration that we just made on the outside interface of the firewall, type the command show interface gigabitEthernet 0/0
As you can see I got an IP address 192.168.137.222 from the cloud.
ciscoasa# show interface gigabitEthernet 0/0
Interface GigabitEthernet0/0 "outside", is up, line protocol is up
  Hardware is i82540EM rev03, BW 1000 Mbps, DLY 10 usec
        Auto-Duplex(Full-duplex), Auto-Speed(1000 Mbps)
        Input flow control is unsupported, output flow control is off
        MAC address 0c89.aa02.e101, MTU 1500
        IP address 192.168.137.222, subnet mask 255.255.255.0
        868 packets input, 105449 bytes, 0 no buffer
        Received 139 broadcasts, 0 runts, 0 giants
        0 input errors, 0 CRC, 0 frame, 0 overrun, 0 ignored, 0 abort
        0 pause input, 0 resume input
        63 L2 decode drops
        20 packets output, 7560 bytes, 0 underruns
        0 pause output, 0 resume output
        0 output errors, 0 collisions, 2 interface resets
        0 late collisions, 0 deferred
        0 input reset drops, 0 output reset drops
        input queue (blocks free curr/low): hardware (481/461)
        output queue (blocks free curr/low): hardware (511/509)
  Traffic Statistics for "outside":
        80 packets input, 7399 bytes
        7 packets output, 2388 bytes
        76 packets dropped
      1 minute input rate 0 pkts/sec,  5 bytes/sec
      1 minute output rate 0 pkts/sec,  9 bytes/sec
      1 minute drop rate, 0 pkts/sec
      5 minute input rate 0 pkts/sec,  19 bytes/sec
      5 minute output rate 0 pkts/sec,  0 bytes/sec
      5 minute drop rate, 0 pkts/sec
Check the routes, and you should see a default route towards the internet.
ciscoasa# show route

Codes: L - local, C - connected, S - static, R - RIP, M - mobile, B - BGP
       D - EIGRP, EX - EIGRP external, O - OSPF, IA - OSPF inter area
       N1 - OSPF NSSA external type 1, N2 - OSPF NSSA external type 2
       E1 - OSPF external type 1, E2 - OSPF external type 2, V - VPN
       i - IS-IS, su - IS-IS summary, L1 - IS-IS level-1, L2 - IS-IS level-2
       ia - IS-IS inter area, * - candidate default, U - per-user static route
       o - ODR, P - periodic downloaded static route, + - replicated route
Gateway of last resort is 192.168.137.1 to network 0.0.0.0

S*       0.0.0.0 0.0.0.0 [1/0] via 192.168.137.1, outside
C        10.1.1.0 255.255.255.0 is directly connected, inside
L        10.1.1.1 255.255.255.255 is directly connected, inside
C        192.168.137.0 255.255.255.0 is directly connected, outside
L        192.168.137.222 255.255.255.255 is directly connected, outside

ciscoasa#
You should now be able to ping the public IP address from your ASA firewall now.
ciscoasa# ping 8.8.8.8
Type escape sequence to abort.
Sending 5, 100-byte ICMP Echos to 8.8.8.8, timeout is 2 seconds:
!!!!!
Success rate is 100 percent (5/5), round-trip min/avg/max = 20/28/40 ms
ciscoasa#
That’s it. We have successfully configured the ASA on the GNS3, and you can further build labs with it.