We have created multiple VLAN interfaces in Ubuntu using netplan. And we are going to see how we can configure routing via VLAN interfaces using netplan.
And all the VLAN interfaces are working fine and able to ping the default gateways in our previous VLAN tagging configurations.
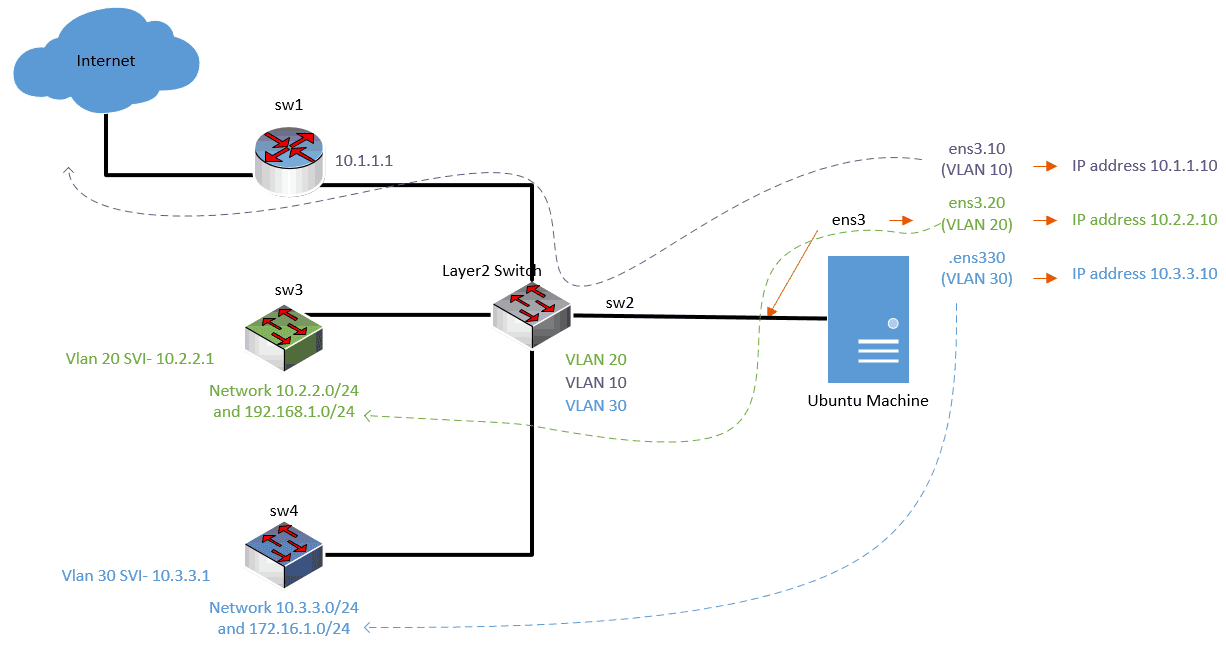
Below is the topology that we are going to use.
- The Ubuntu host is on the right side, with 3 VLAN interfaces configured, Vlan 10(ens3.10), 20 (ens3.20) and 30(ens3.30)
- Each VLAN represented with different color, purple for VLAN 10, Green for VLAN 20 and Blue for VLAN 30.
And we have to configure the following.
- You should be able to see there is internet access through VLAN10 via 10.1.1.1.
- To reach 192.168.1.0 you should use VLAN 20.
- Finally for the network 172.16.1.0 to reach you should go via VLAN 30.
Let’s check IP routing to see how the routing table looks like.

As you can see in the screenshot above, the Ubuntu host only knows about its local network, it also thinks that it can reach the internet using all of its links, which is not true.
Note: The default route represents the internet access, which is three right now.
If you are wondering how this default route is being added to the routing table. That’s because we have added a default gateway for all the VLAN interfaces configuration in netplan.
- Having a default route on a single interface network is not a big deal but here it is a problem as we have multiple interfaces and only VLAN 10 provide the internet access. Hence default route should be pointing to only the VLAN 10, not to other interfaces.
- And if you try to ping 8.8.8.8, which is the internet IP. You get the response but there is some packet loss due to this.

I can somehow reach the internet, but what about the other networks?
Will I be able to reach them as well?
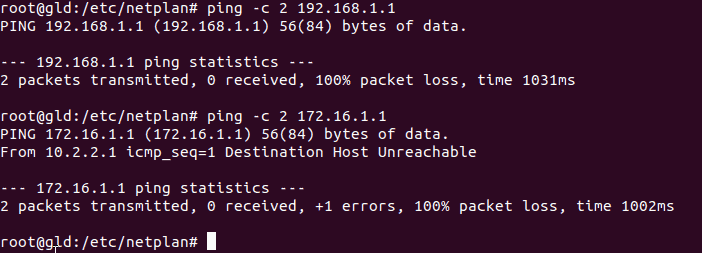
Neither there are routes for 192.168.1.0/24 via VLAN 20, nor 172.16.1.0/24 via VLAN 30.
As a result, you won’t get a response from those IPs.
So let’s configure a static route where there are multiple gateways in netplan.
1. Set the Gateway for the internet in netplan.
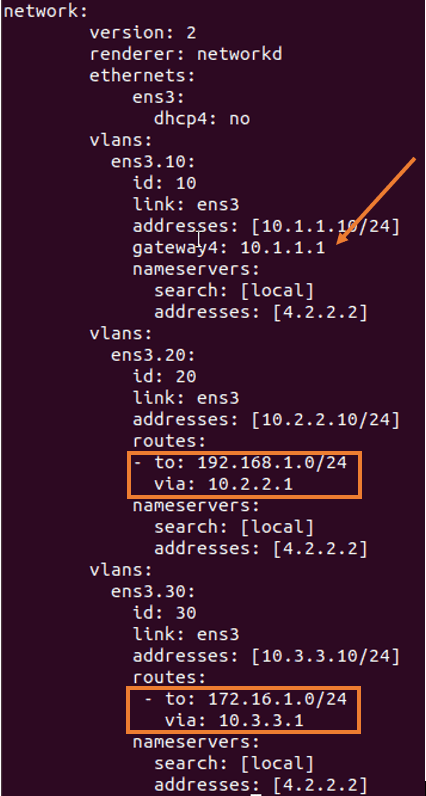
In the netplan configuration keep the default gateway for VLAN 10 interface as it is.
As you already know the internet access is provided via VLAN 10, check the diagram again.
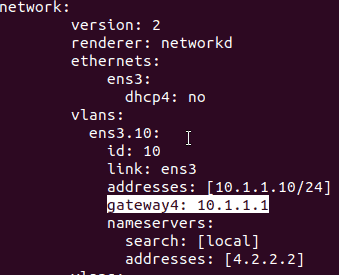
2. Remove the default gateway for other networks.
Because VLAN 20 and 30 do not provide internet access, let’s go ahead and remove the default gateway for the VLAN interface 20 and 30.
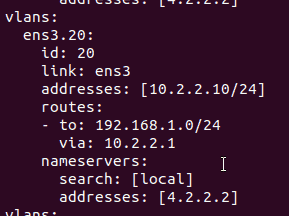
We also need to add static routes for the network 192.168.1.0/24 and 172.16.1.0/24 hence add them to the VLAN 20 and 30 configuration.
- VLAN 20
- You can see a static route added for 192.168.1.0 via 10.2.2.1. 10.2.2.1 is the VLAN 20 default gateway.
- VLAN 30
- Simliarly, static route added for 172.16.1.0/24 via 10.3.3.1. 10.3.3.1 is the VLAN 30 default gateway.
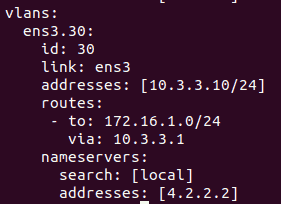
- The final configuration would look like below.
- We have the default route using the default gateway for internet.
- Specific static routes for each network.
3. Apply the configuration sudo netplan apply
4. verify the configuration.
- To verify the configuration, first lets go ahead and check the ip routing table.

Well, do you see the difference now as compared to the last routing table?
we now only have a default route pointing to the VLAN 10 interface. which is good!
Apart from the local subnet, we do have remote subnet 192.168.1.0/24 and 172.16.1.0/24 in the routing table via VLAN 20 and 30 respectively as well.
Let’s do the ping and verify the connectivity.
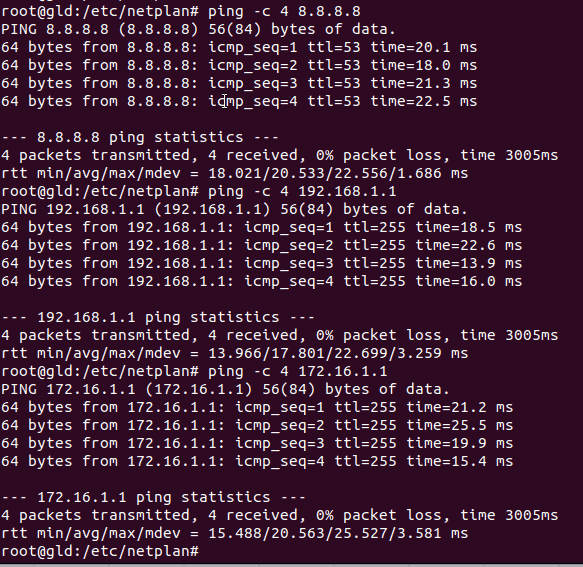
As you can see we are able to reach the internet IP 8.8.8.8 with no packet loss.
And we were not able to ping the remote subnet before but all the networks we are able to reach as well and our routing configuration using netplan is working successfully.
Conclusion
Configuring the route in netplan is pretty easy, we have taken a look at the route configuration using VLAN interfaces, and configuring the routing over physical interface also is similar. Instead of pointing the route under the VLAN interfaces in netplan, you have to specify under the physical interface.