Recently when VMware announced that it is making VMware workstation pro for free for personal use, I was very excited to try it out.
I went to the VMware page to download the same, and it turns out that none of the vmware download links were not working.
The reason why it was not working was because most of the download links now moved to vmware parent company broadcom and in order for you to download the sofwware, you would need to have broadcom account.
So in this blog article, we will see how you can download and install VMware workstation pro for your personal use.
If you prefer to watch video, here is the step by step instruction video.
Step 1. Register at Broadcom customer portal.
Most of the users who are trying to download VMware from broadcom they wont have an account to download the software.
So head over to the broadcom page here.
And on the top right click on Products.
And on the left side, click on VMware products.

In the search field search for workstation and hit enter.
Choose workstation pro from the list.

Click on Download now under VMware workstation pro for PC.

You will get a broadcom login page, if you have credentials, you may login here.
If you don’t have creds, you may click on the login drop down on the top right corner and click on register.

It is a basic registration process, complete that.
Once you have the login account, you may start over the step1, and get back into the login page.
And login with your credentials.
Under My downloads, scroll down, you will see VMWare workstation Pro.

Click on that.
Unable to see the VMware worksation download option.
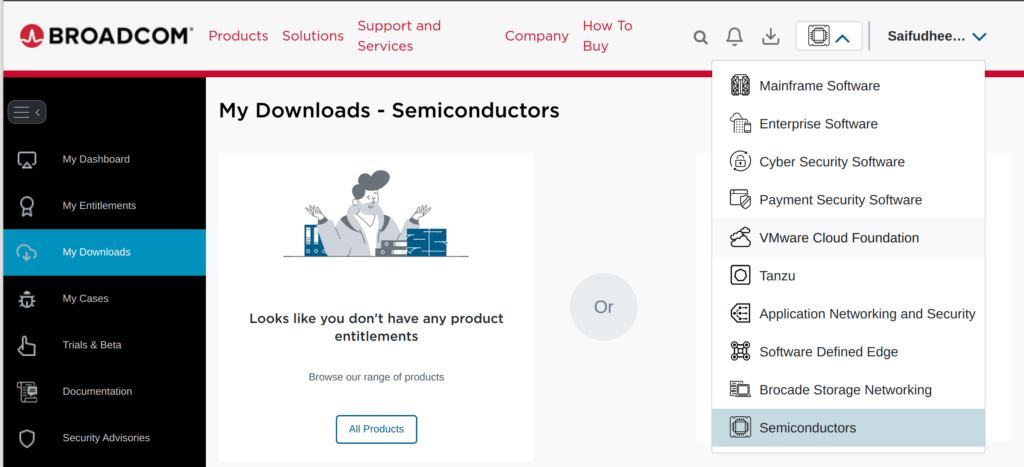
In case, if you are not seeing the VMware workstation pro download option under my downloads, you most likely selected some other options in customer portal.
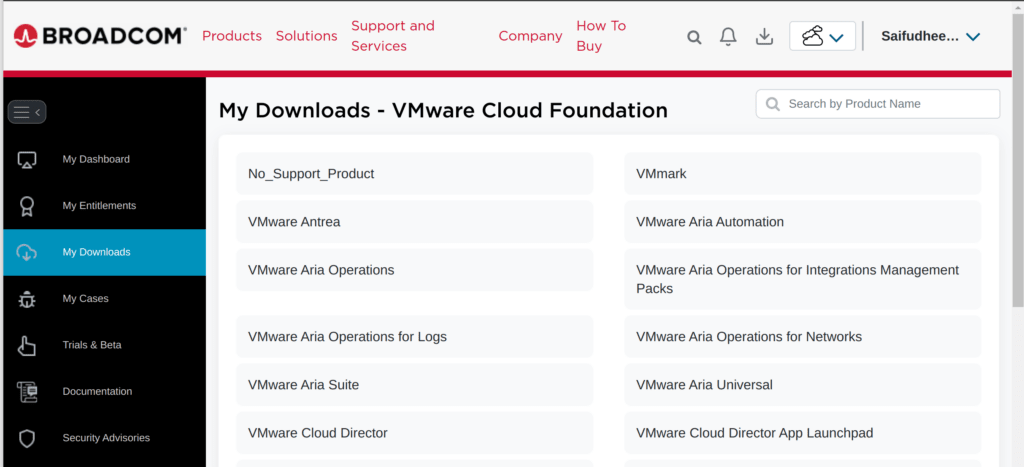
In the same my download page, top right corner. Click on the drop down, from there choose VMware foundation.

After the selection you can now see the VMware download option now showed up.

so, back in the download page, choose VMware workstation pro.
You will see Vmware workstation pro 17.0 for personal use(windows) and VMware workstation pro 17.0 for windows.
Click on the personal one.

Choose the latest version of the software, at the time of this writing it is 17.5.2, click on that.

Step 2. Complete the screening process.
And when I try to click on the download icon, it says Screening required.
Unfortunately, when I registered, I didn’t give address details, so we need to fill that in.
Click on the download button to proceed with screening.

You will get a message prior to downloading this file, additional verification is required, proceed?
Click on yes here.

It would take you to the Trade Compliance verification.
As you can see In my profile, the address field is blank, fill them in along with zip/pin code and click on submit.

Step 3. Download the software.
You are taken back to the same download page again, here choose Vmware workstation pro.

Choose the personal version for windows, like we did before.
And select the latest version.
You can now see, https download option click on that.

And the download will now begin.

Step 4. Install the Vmware workstation pro software in windows.
Lets now try to install the VMware workstation personal version in my windows machine.
Initiate the installation and complete it.

Once installed, open the Vmware workstation pro.
In license prompt, chose, Use VMware workstation 17 for personal use and click on continue.

You will get a message that shows successful message with Thank you, click on FInish here.
And thats it, we have now successfully installed VMware workstation pro in windows11 that is for free for personal use.
You can now go ahead and create VMs.
