
Two important aspects of networking are documentation and consistency in following standards.
Once you have both in place, it will help you in the long run when it comes to managing, troubleshooting, configuring, planning, and expanding your network.
There are many network documentation tools available, but one popular open-source software among network engineers is NetBox. It allows engineers to manage IP addresses, device inventory, sites, cables, racks, and ISP information and many more.
Is NetBox network monitoring tool?
There is a common misconception that NetBox is a monitoring solution, but that’s not the case. It’s actually an open-source network documentation software that allows you to manage and document your entire network infrastructure.
Many users first start using NetBox for its IP address management (IPAM) functionality, but as they become more familiar with the software, they slowly starts to explore other features.
I first learned about NetBox when I was searching for IPAM (IP management) software for a client that had a limited budget. The only two options were to either stick with traditional Excel sheets or use an open-source software.
I spun up the NetBox software and was blown away by the amount of features that it provides for free. I now manage the IP address for an entire organisation, device inventory, cables, racks, ISP information, and more using NetBox.
One issue with adding details to NetBox is that it is a manual process and takes time to integrate everything into NetBox and use it as a source of truth.
However, I have found a way to automate the entire process using an Ansible playbook, which I will cover in a separate article. Before automating something, it is important to understand how to do it manually.
With any software, there is a learning curve with respect to understanding how each item in NetBox is laid out. For example, when you try to add a site, you will see other options such as tenant, region, site group, and more.
So it is not that difficult to understand NetBox, just give it some time and you will be familiar with the tool in no time.
How to add sites in Netbox Step by step?
In this blog post, we will cover a step-by-step method on how to add sites to NetBox manually. Before we begin, it is important to deploy the NetBox application in your setup so that you can follow along.
Instead of adding sites directly, we will take a different approach, so by the time we add the sites, you will have everything.
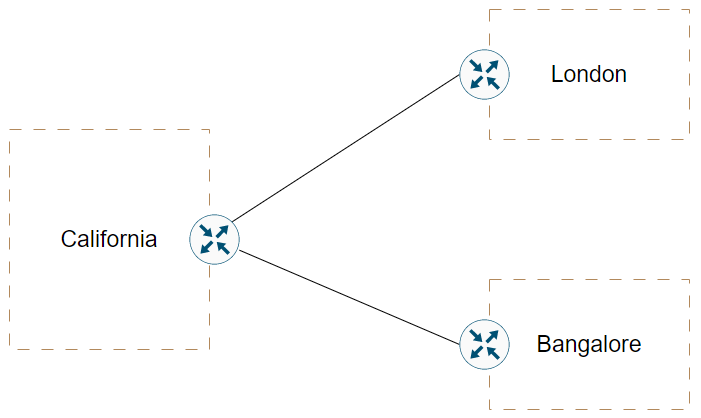
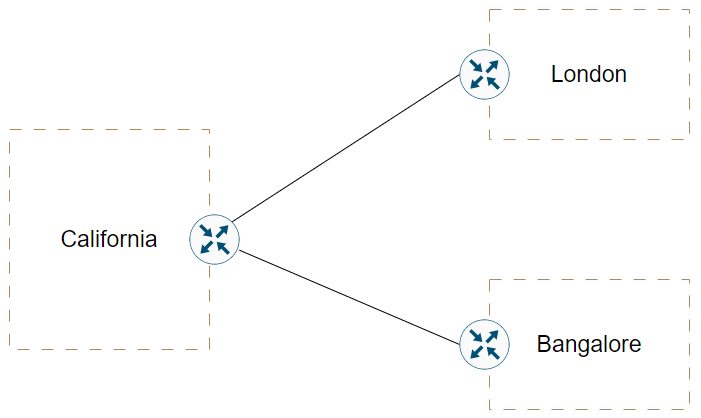
We are managing an enterprise network called ABC Company as shown below. Where we have Hub location California, and 2 spoke branch sites, one in London and other in Bangalore.
Let’s see how we can add these to the netbox.
1. Add the tenant group.
For most enterprise networks, it is mostly a single tenant. However, if you are in a service provider network, you will have multiple customers.
So you can segment the network into different customers as tenants. and seperate group of tenants into tenant group.
So lets create the tenant group.
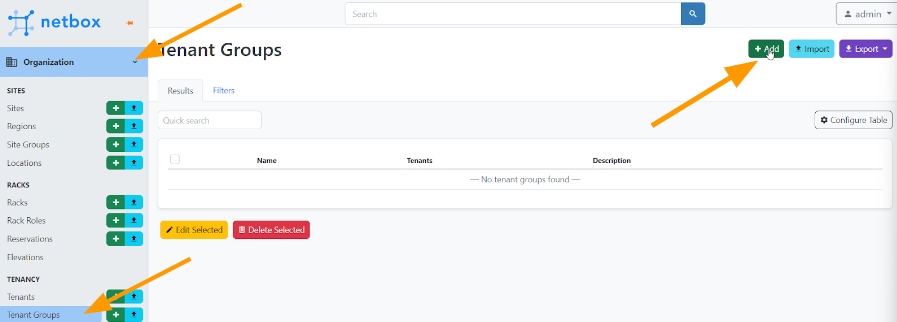
In netbox->organisation->Tenants Groups
Click on Add on the top corner.

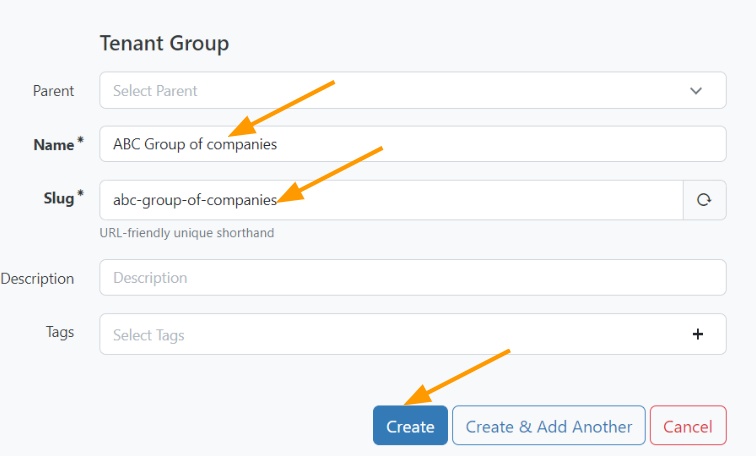
In the tenant group creation.
Name: Add the name as ABC Group of companies.
Slug: it will populate automatically when you click on it.
You might as well give some description for the tenant and click on Create.

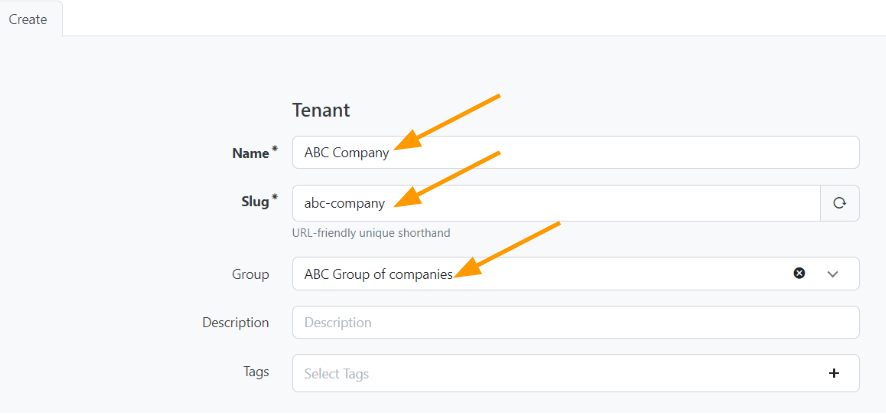
2. Add the tenant.
While yo you are in the tenant group, you can click on Add Tenant to add brand new tenant, or you can click on the left menu under organization and click on Tenant and add.
In the name : Add the name of the company, in our case it is ABC company.
Group: As we have created the tenant group already, it is available in the drop down menu, so choose the tenant group that you created.
And click on create.

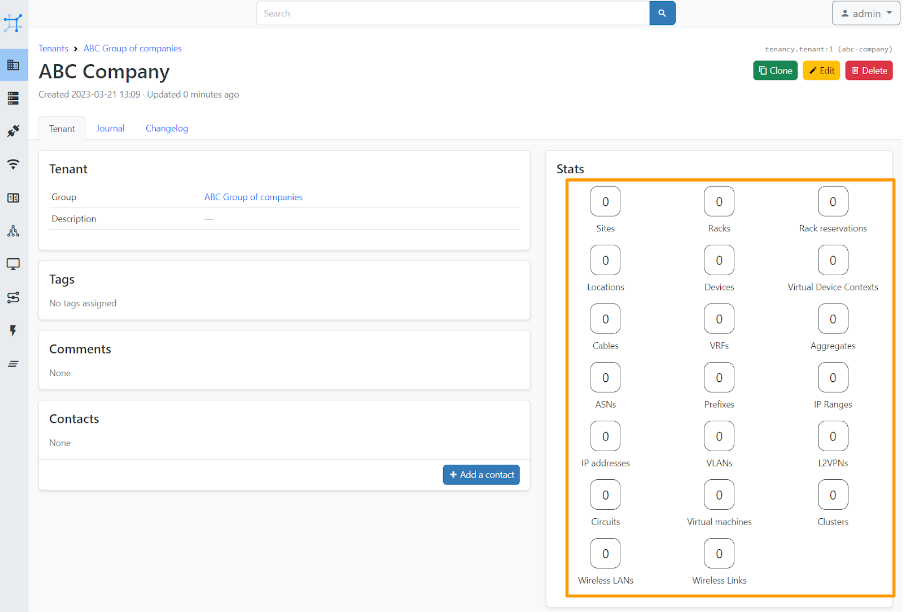
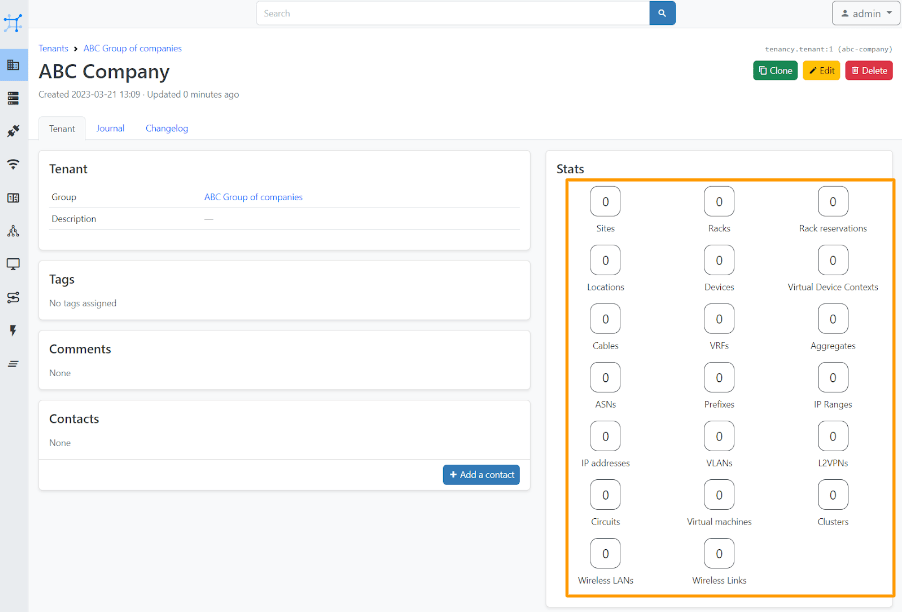
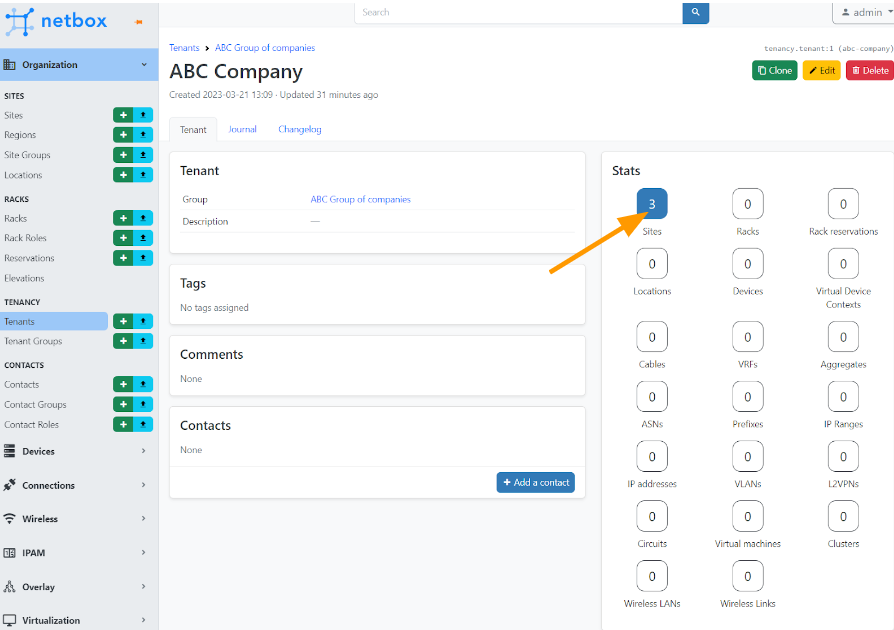
You will now see a dashboard of ABC company with all its information, such as sites, Racks, Prefixes and so on.
Since we just started it is all empty, and as in when we add the items to netbox, you will see the stats get incremented.
3. Add site Group
The site group categorization can be based on their respective functions, which can vary depending on the industry.
For instance, in a manufacturing company, there may be various sites with distinct functions, such as Operations, Manufacturing, Factories, and more. As every industry has its own unique requirements, the grouping of sites can be customised accordingly.
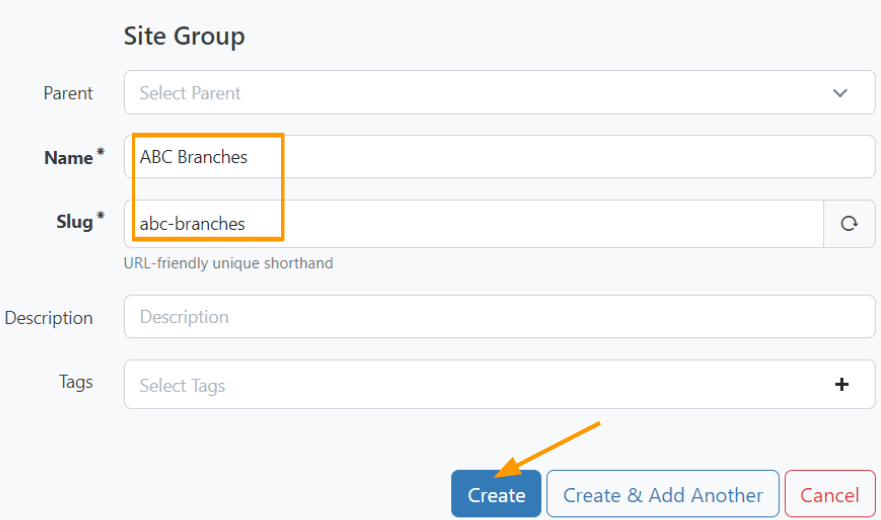
The same way you added tenant group, lets also add site group.
Under Organisation, click on Site Groups -> Add.
You can Give a user-friendly name such as ABC branches or sites as shown below and click on create.

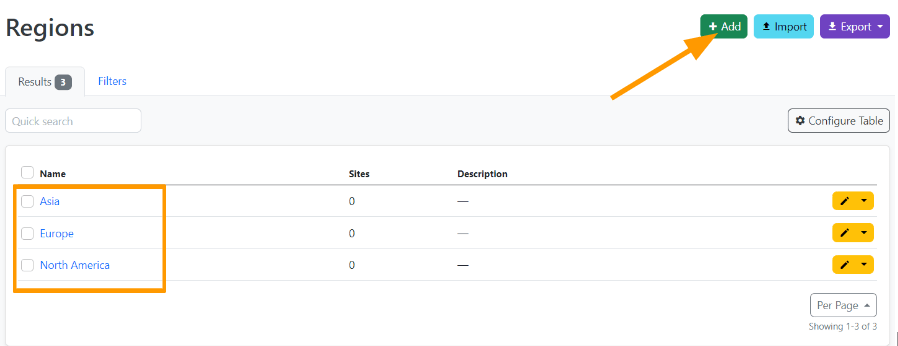
4. Add the regions.
Regions can be useful for organising sites by geographic location, making it easier to quickly filter and search for sites based on region. It may seem like a small thing, but when you’re managing multiple sites across the globe, every little bit helps.
As we looked at the diagrams above there are three locations, one is in california, another is in London and in bangalore.
So you can add the regions in netbox as a country, or continents. depending on your geographical network spread.
I am going to choose continents here.
Click on Add under Organization-> Regions-> Add.
And I added the regions as Asia, Europe, North America.

5. Add Sites.
Let’s now add some sites to the mix. By this point, you may be starting to see how everything fits together, and adding sites with all the above information, it will make a lot of sense.
Under Organisation-> Sites-> Add.
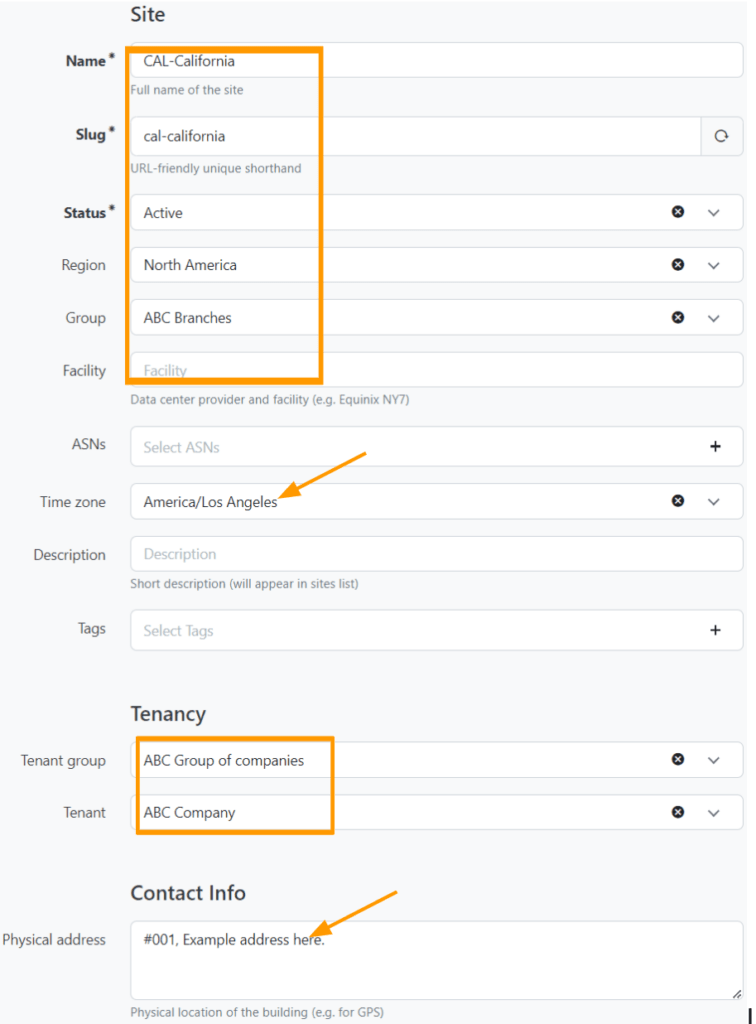
Name: CAL-California
Enter the name with site code, or maybe just name alone.
Status: When the site is in production you can select active, else choose the appropriate option from the drop down.
Region: North America.
Group: Choose the site group we created earlier.
Facility: Headquarters, or enter the name of the facility.
TimeZone: choose the timezone of the site.
Under Tenancy.
Choose the tenant and tenant group
Contact Info:
Within this section, you have the option to add both the physical address of the location and the shipping address. This can come in handy when working with vendors or needing to ship something out, as you can easily retrieve the address from here.

Latitude and Longitude.
This field can be captured from google map.
Goto the desired location in google maps, and right click and get the information.
The first value is Latitued and the second is the longitude.
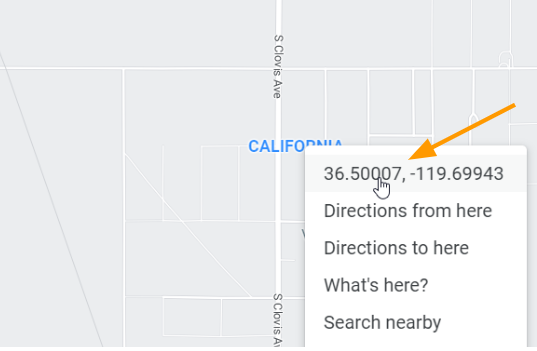
Ensure to add only the nine characters from the map as shown below.


And click on Create.
You can now see site has been added and by adding the longitude and latitude information to netbox, you can even click on ‘Map it’ to get the driving directions.
Currently related objects are empty and as in when you add items you will see it is getting updated.


Like we added the California site, you may add other sites as well.
As you can see, I have added all remaining sites now.

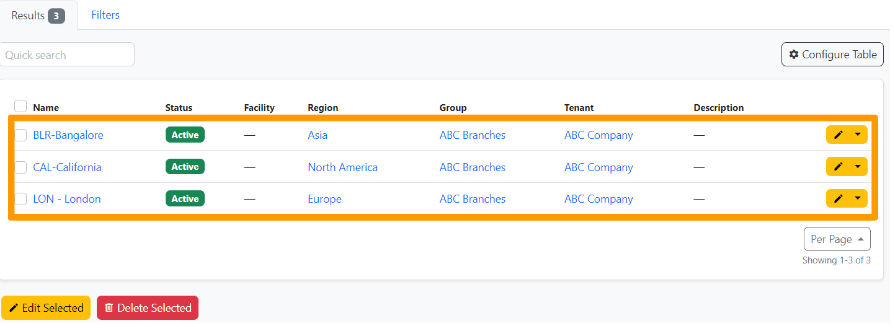
And if you now go back to the tenant that we created a while back, it has now populated with three sites, and you click on it to get back to the sites. Pretty cool

In summary, this is how you can add sites in NetBox. However, it’s worth noting that there isn’t necessarily a single “right” or “standard” method for doing so. The way you input data into NetBox will depend on the specific needs and nuances of your network.
That being said, this is a great starting point. If you find that you need to make modifications, feel free to do so. Once all of your information is in one place, that becomes your source of truth. This can be incredibly helpful when embarking on a network automation journey.