There are many ways you could configure a DNS server. If you are a network engineer and wanted to build a private DNS server for a small office, you can prefer to configure a router as a DNS server than configuring a Linux or a Windows machine for the same purpose, right?
In this lab, we are going to configure the Cisco routers as a DNS server. This DNS configuration would also be useful when you wanted to run some lab or small office that requires DNS configuration.
Objective.
The lab that I am configuring is as below, if you wanted to follow along, then you can spin up this lab under GNS3 or EVE-NG. May be you have topology that not necessarily like this, that way you can just focus the DNS server configuration.
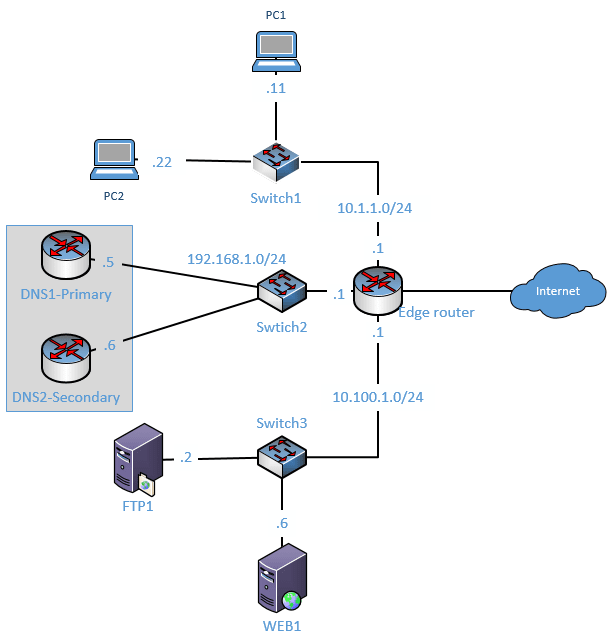
After you configured the DNS server on the router we would check the connectivity to internal hosts using the local DNS host A record and similarly we will also check the public DNS access, those public DNS request again will forward to the public DNS servers from our internal router DNS.
In the lab I have configured the below.
- Configured the IP address on each end host also the gateways.
- Make sure all the devices are connected, and it’s able to ping to each other.
As you can see from the DNS server, I can reach all the IP’s in the network, which is good.
DNS1#ping 10.1.1.11
 Type escape sequence to abort.
 Sending 5, 100-byte ICMP Echos to 10.1.1.11, timeout is 2 seconds:
 .!!!!
 Success rate is 80 percent (4/5), round-trip min/avg/max = 32/47/56 ms
 DNS1#ping 10.1.1.22
 Type escape sequence to abort.
 Sending 5, 100-byte ICMP Echos to 10.1.1.22, timeout is 2 seconds:
 .!!!!
 Success rate is 80 percent (4/5), round-trip min/avg/max = 36/54/68 ms
 DNS1#ping 10.100.1.6
 Type escape sequence to abort.
 Sending 5, 100-byte ICMP Echos to 10.100.1.6, timeout is 2 seconds:
 .!!!!
 Success rate is 80 percent (4/5), round-trip min/avg/max = 32/46/52 ms
 DNS1#ping 10.100.1.2
 Type escape sequence to abort.
 Sending 5, 100-byte ICMP Echos to 10.100.1.2, timeout is 2 seconds:
 .!!!!
 Success rate is 80 percent (4/5), round-trip min/avg/max = 44/49/52 ms
 DNS1#ping 192.168.1.6
 Type escape sequence to abort.
 Sending 5, 100-byte ICMP Echos to 192.168.1.6, timeout is 2 seconds:
 .!!!!
 Success rate is 80 percent (4/5), round-trip min/avg/max = 40/49/52 ms
 DNS1#
Everything looks great, and our network is up and running with full reachability. Let’s go ahead and configure the DNS on the cisco routers now.
How to setup DNS on Router?
- Enable DNS Service on the Router.
- Enable DNS lookup on the Router.
- Specify the domain name.
- Configure the Internal host A record.
- Configure the External DNS Servers.
- Configure the Name server.
- The final configuration from the DNS servers.
- Point the hosts to the DNS servers.
- Router DNS verification.
- How to flush DNS cache on router?
1. Enable DNS Service on the Router.
To enable DNS service on the router you can type the command ip dns server on the configuration terminal.
DNS1#conf t
DNS1(config)#ip dns server
2. Enable DNS lookup on the Router.
When you try to ping www.google.com by default you will not get any response.

For the domain resolution to work on the cisco router you need to enable domain lookup.
DNS1#conf t
Enter configuration commands, one per line.  End with CNTL/Z.
DNS1(config)#ip domain-lookup
DNS1(config)#exit
DNS1#
3. Specify the domain name.
You may have a domain name in your mind, you will have to specify the domain name here. Since this is my local DNS server, I would just choose my domain as getlabsdone.local
To mention the domain name, you have to type the command ip domain name getlabsdone.local
DNS1(config)#ip domain name getlabsdone.local
4. Configure the Internal host A record.
We are now going to configure the internal host A record in our DNS server. To configure the host A record you can use the command IP host in the configuration terminal, I have created a host A record as below, for now, I am adding only six records. If you have to configure more records you can add them down below using the IP host command.
For the below six records, the router will be the authoritative DNS server.
ip host dns1.getlabsdone.local 192.168.1.5
ip host dns2.getlabsdone.local 192.168.1.6
ip host web1.getlabsdone.local 10.100.1.2
ip host ftp1.getlabsdone.local 10.100.1.6
ip host pc1.getlabsdone.local  10.1.1.11
ip host pc2.getlabsdone.local  10.1.1.22
5. Configure the External DNS Servers.
We are going to use the Cisco router as the internal DNS servers for the internal network and we also configured the internal host A record just so the internal users can query and get the response.
What if any of your internal users wanted to go to the internet?
By default our DNS servers will not have an entry for the external host records, hence we need to configure our internal DNS servers to talk to the external DNS servers that way any external DNS queries will be relayed to the external DNS server.
For example, if when one user tries to query www.google.com and since it is an external DNS entry, our DNS router will forward the request out to external DNS servers that we have configured. And next time when the users try to query external entries, it will not forward the request rather the internal DNS server will respond from its cache. We will further see this in action in the router DNS verification in step 8.
To configure the external DNS servers on our internal cisco router, you can enter the command below. And I am using the external servers 8.8.8.8 and 4.2.2.2.
ip name-server 8.8.8.8 4.2.2.26. Configure the Name server.
Mention the NS record known as name server record as primary and secondary.
DNS1
ip dns primary getlabsdone.local soa dns1.getlabsdone.local mailbox.getlabsdone.localDNS2
ip dns primary getlabsdone.local soa dns2.getlabsdone.local mailbox.getlabsdone.local7. The final configuration from the DNS servers.
DNS1
ip dns server
ip domain-lookup
ip domain name getlabsdone.local
ip name-server 8.8.8.8 4.2.2.2
ip dns primary getlabsdone.local soa dns1.getlabsdone.local mailbox.getlabsdone.local
ip host getlabsdone.local ns dns1.getlabsdone.local
ip host getlabsdone.local ns dns2.getlabsdone.local
ip host dns1.getlabsdone.local  192.168.1.5
ip host dns2.getlabsdone.local  192.168.1.6
ip host web1.getlabsdone.local  10.100.1.2
ip host ftp1.getlabsdone.local  10.100.1.6
ip host pc1.getlabsdone.local   10.1.1.11
ip host pc2.getlabsdone.local   10.1.1.22
DNS2
ip dns server
ip domain-lookup
ip domain name getlabsdone.local
ip name-server 8.8.8.8 4.2.2.2
ip dns primary getlabsdone.local soa dns2.getlabsdone.local mailbox.getlabsdone.local
ip host getlabsdone.local ns dns2.getlabsdone.local
ip host getlabsdone.local ns dns1.getlabsdone.local
ip host dns1.getlabsdone.local 192.168.1.5
ip host dns2.getlabsdone.local 192.168.1.6
ip host web1.getlabsdone.local 10.100.1.2
ip host ftp1.getlabsdone.local 10.100.1.6
ip host pc1.getlabsdone.local  10.1.1.11
ip host pc2.getlabsdone.local  10.1.1.22
8. Point the hosts to the DNS servers.
You now have configured the DNS servers successfully, now you will have to point all the host machines on your internal network to talk to the primary and the secondary DNS servers also enable host lookup. Enter the below commands on all the end hosts.
Normally in the production network, you would configure the DNS servers automatically using DHCP. I have also covered, how you can setup a cisco router as the DHCP server here. As I have built this network for lab purposes I need to point the DNS servers manually.
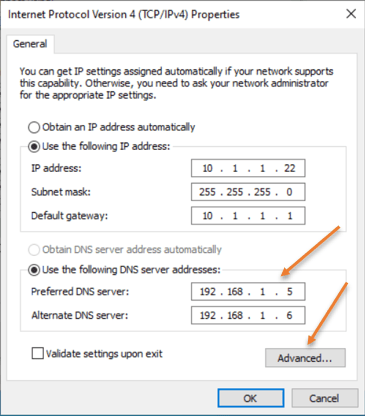
First let me configure the PC2 dns server, I am using windows 10 client as pc2.
- Click on the Start menu and type ncpa.cpl and hit enter. Alternatively, you can click start>Run>Type CMD>and type ncpa.cpl and hit enter.
- Right-click on the ethernet adapter and click on Properties.
- Choose internet protocol version 4 (TCP/IPv4) and click on properties.
- Along with the IP addresses, you can configure the primary and secondary IP addresses and click on Advanced.
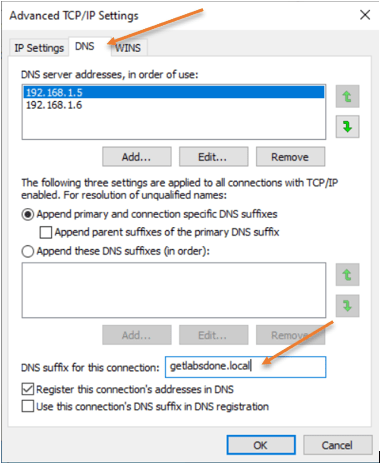
- Click on DNS tab, and in DNS suffix for this connection, type the domain name of our internal server. In my scenario it is getlabsdone.local and click on Ok.
- If you wanted to point the other cisco routers to talk to the DNS servers, you can enter the command below.
ip name-server 192.168.1.5 192.168.1.6
ip domain-lookup
ip domain name getlabsdone.local
9. Router DNS verification
How do we test the DNS configuration ?
Before we continue with the test, let me go ahead and shut down the interface on the DNS server2, that way only DNS1 will respond to DNS queries. DO NOT DO THIS IN PRODUCTION AS YOUR DNS ROUTER WILL ALSO BE CARRYING OTHER TRAFFICS SINCE THIS IS A LAB IT SHOULD BE FINE.
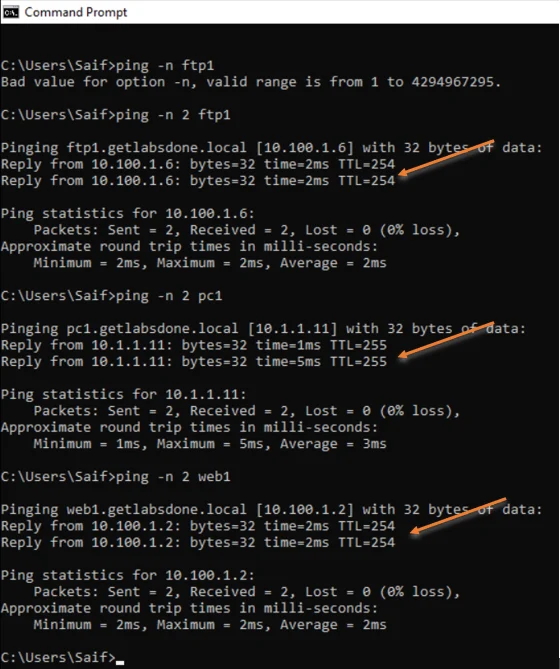
You can test the DNS configuration by pinging the hostname from the end-user machine or using nslookup.
So lets go to our windows hosts which is PC2, and try to ping our internal hosts.
As you can see, we are able to ping the internal hosts.
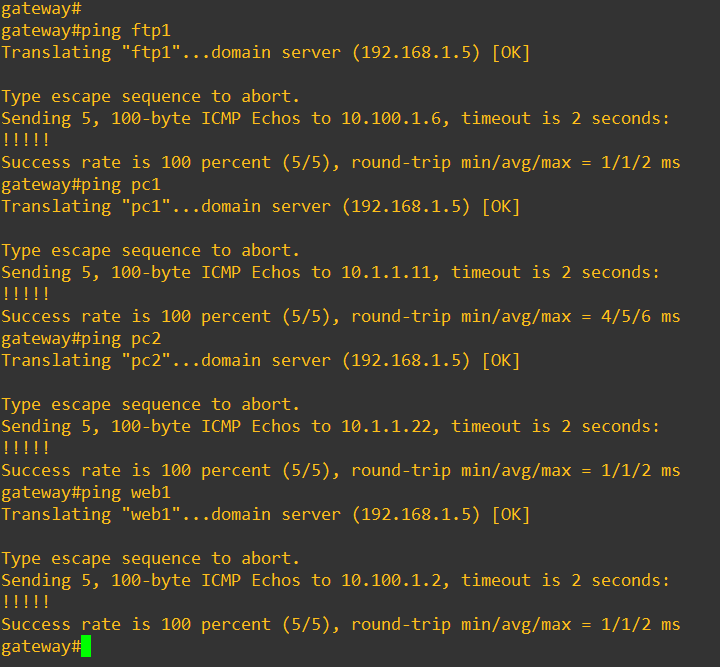
How about from our gateway router?
I have already pointed my router to talk to the DNS servers in step7, let me try to ping the internal hosts.
As you can see below, I am able to ping the internal hosts from the routers as well.
How about public DNS queries?
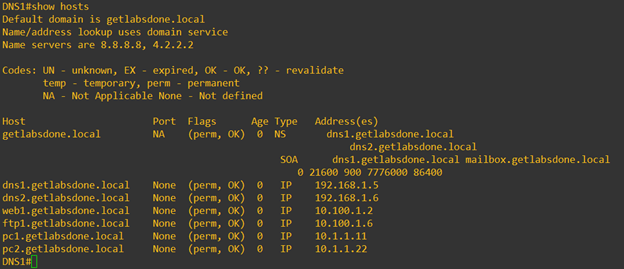
Before we start pinging the external DNS entries let’s take a look at our host entries by typing the command show hosts. We only can see, the internal host records and its flag shows as permanent.
Now, lets go ahead and ping some of the external DNS names.
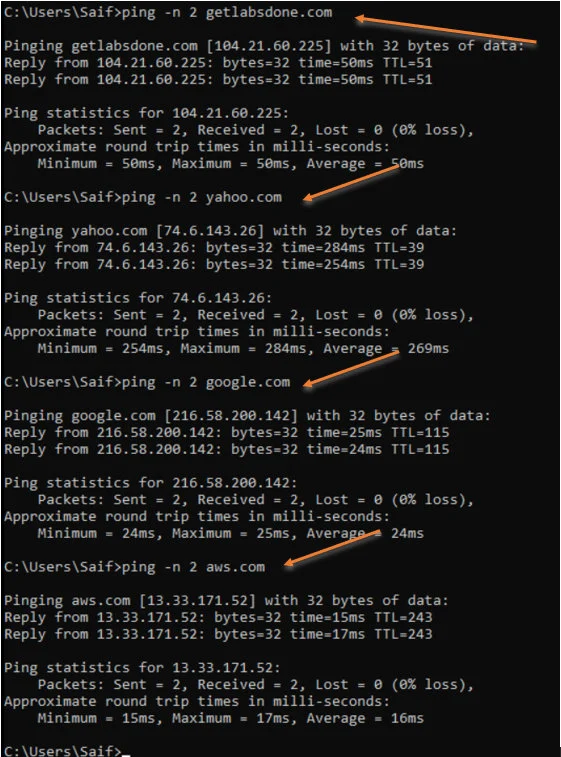
Alright, we got the response to the DNS queries for the external DNS names, so how do we check who provided the DNS resolution for the internal users?
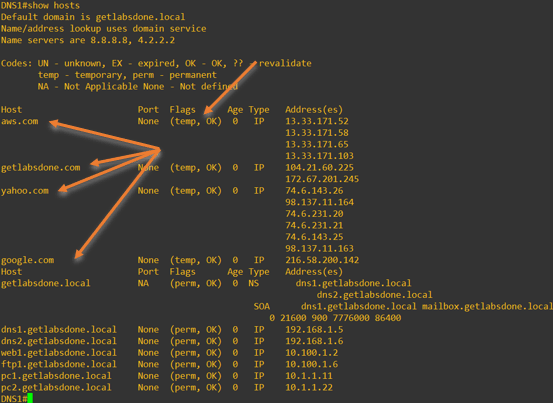
To see that you can go back to the DNS server on our router, and type the command that we ran previously, show hosts.
This time instead of just showing our own local DNS hosts records you can also see the external DNS entries.
If you look into the flags for the external entries you can see that it is temporary, which means that external entries are cached.
10. How to flush DNS cache on router?
Using the show hosts command we could see the DNS cached on our router, and how long this DNS cache will be stored on the router is based on the TTL that is set on the external DNS servers. I have again taken a look at the DNS cache on my router and this time the entries for Yahoo is present. other entries are removed automatically.
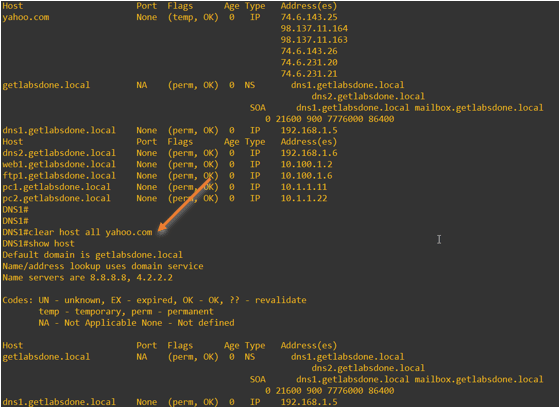
Before you clear DNS cache on the Cisco router, type show hosts to see the DNS records. As you can see we have only one record for yahoo.com.

Clear Specific DNS cache on router.
Since it is a lab I have only single DNS cache that is left, however in production you will have plenty of DNS entries. So to flush the specific DNS entries, in our case yahoo.com. You can type the command clear host all yahoo.com
I have cleared them on my DNS server, and I no longer have the entries for yahoo.com.
Clear the entire DNS cache on a cisco router.
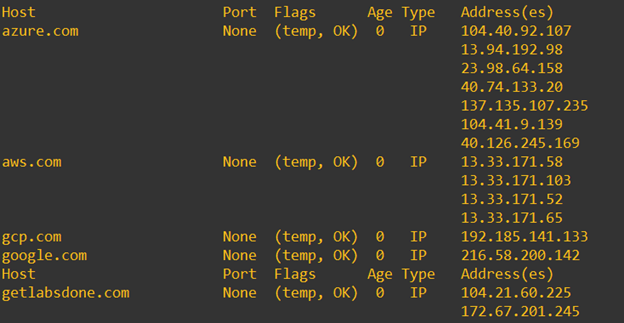
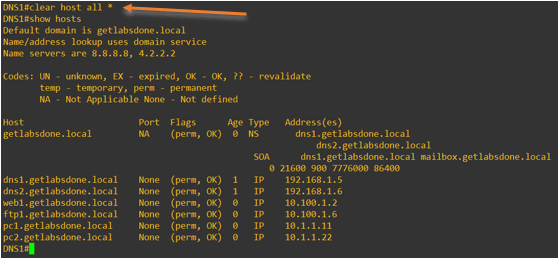
You may already have a DNS cache on your DNS server, if not you can start pinging as many external websites you can and use the below single command to flush the entire DNS cache.clear host all *
As you can see below I have some DNS cache on my DNS router.
After clear the entries you no longer have the records.
Why am I not able to see the DNS cache after clearing the cache on my router?
Just like the DNS cache on the DNS server, your end-user machine also has DNS cache enabled. So after you cleared the DNS cache on your router and when you try to ping the same IP from your windows 10 host for example, you may not see the cache on the DNS router. That is because the windows host has cached the DNS request hence it doesn’t have to send the query to the DNS server.
- To see the DNS cache on the windows host you can type the command ipconfig /dnsdisplay
- To clear the DNS cache on windows 10.
- Open CMD with Admin rights and type the command ipconfig /flushdns.
You can now go ahead and enable the interface on the DNS2 router interface so that you will have primary and secondary servers.
Conclusion.
Configuring the DNS service on a Cisco router is an easy way of enabling the DNS. However, the main functionality of a router is to route the traffic, and using a router as DNS is not the recommended method. This method would work fine for a lab, POC networks, and small networks. In a big network environment, it is recommended to use dedicated DNS servers for DNS functionality.